First example
Overview
Teaching: 15 min
Exercises: 5 minQuestions
How to run analyses on REANA cloud?
What are the basic REANA command-line client usage scenarios?
How to monitor my analysis using REANA web interface?
Objectives
Get hands-on experience with REANA command-line client
Overview
In this lesson we shall run our first simple REANA example. We shall see:
- structure of the example analysis and associated
reana.yamlfile - how to install the REANA command-line client
- how to connect REANA client to remote REANA cluster
- how to run analysis on remote REANA cluster
Checklist
Have you installed
reana-clientand/or have you logged into LXPLUS as described in Setup?
First REANA example
We shall get acquainted with REANA by means of running a sample analysis example:
Let’s start by cloning it:
git clone https://github.com/reanahub/reana-demo-root6-roofit
cd reana-demo-root6-roofit
What does the example do? The example emulates a typical particle physics analysis where the signal and background data is processed and fitted against a model. The example uses the RooFit package of the ROOT framework.
Four questions:
- Where is your input data? There is no input data. We shall simulate them.
- Where is your analysis code? Two files:
gendata.Cmacro generates signal and background data;fitdata.Cmacro makes a fit for the signal and the background data. - Which computing environment do you use? ROOT 6.18.04 with RooFit.
- What are the computational steps to achieve the results? Simple sequential steps: first run gendata, then run fitdata.
Workflow definition:
           START
            |
            |
            V
+-------------------------+
| (1) generate data       |
|                         |
|    $ root gendata.C ... |
+-------------------------+
            |
            | data.root
            V
+-------------------------+
| (2) fit data            |
|                         |
|    $ root fitdata.C ... |
+-------------------------+
            |
            | plot.png
            V
           STOP
The four questions expressed in reana.yaml fully define our analysis:
inputs:
  files:
    - code/gendata.C
    - code/fitdata.C
  parameters:
    events: 20000
    data: results/data.root
    plot: results/plot.png
workflow:
  type: serial
  specification:
    steps:
      - name: gendata
        environment: 'docker.io/reanahub/reana-env-root6:6.18.04'
        commands:
        - mkdir -p results && root -b -q 'code/gendata.C(${events},"${data}")'
      - name: fitdata
        environment: 'docker.io/reanahub/reana-env-root6:6.18.04'
        commands:
        - root -b -q 'code/fitdata.C("${data}","${plot}")'
outputs:
  files:
    - results/plot.png
Note the basic structure of reana.yaml answering the Four Questions. (Where is input data? Where
is analysis code? What compute environment to use? What are the computational steps to arrive at
results?)
Exercise
Familiarise yourself with the RooFit demo example by studying the README file and looking at the
gendata.Candfitdata.Csource code.
Solution
firefox https://github.com/reanahub/reana-demo-root6-roofit
First steps with the REANA command-line client
First we need to make sure we can use REANA command-line client. See the setup instructions if you haven’t already installed it.
The client will offer several commands which we shall go through in this tutorial:
reana-client --help
Usage: reana-client [OPTIONS] COMMAND [ARGS]...

  REANA client for interacting with REANA server.

Options:
  -l, --loglevel [DEBUG|INFO|WARNING]
                                  Sets log level
  --help                          Show this message and exit.

Quota commands:
  quota-show  Show user quota.

Configuration commands:
  info     List cluster general information.
  ping     Check connection to REANA server.
  version  Show version.

Workflow management commands:
  create  Create a new workflow.
  delete  Delete a workflow.
  diff    Show diff between two workflows.
  list    List all workflows and sessions.

Workflow execution commands:
  logs      Get workflow logs.
  restart   Restart previously run workflow.
  run       Shortcut to create, upload, start a new workflow.
  start     Start previously created workflow.
  status    Get status of a workflow.
  stop      Stop a running workflow.
  validate  Validate workflow specification file.

Workspace interactive commands:
  close  Close an interactive session.
  open   Open an interactive session inside the workspace.

Workspace file management commands:
  download  Download workspace files.
  du        Get workspace disk usage.
  ls        List workspace files.
  mv        Move files within workspace.
  prune     Prune workspace files.
  rm        Delete files from workspace.
  upload    Upload files and directories to workspace.

Workspace file retention commands:
  retention-rules-list  List the retention rules for a workflow.

Secret management commands:
  secrets-add     Add secrets from literal string or from file.
  secrets-delete  Delete user secrets by name.
  secrets-list    List user secrets.
You can use --help option to learn more about any command, for example validate:
reana-client validate --help
Usage: reana-client validate [OPTIONS]

  Validate workflow specification file.

  The ``validate`` command allows to check syntax and validate the reana.yaml
  workflow specification file.

  Examples:

       $ reana-client validate -f reana.yaml

Options:
  -f, --file PATH          REANA specification file describing the workflow to
                           execute. [default=reana.yaml]
  --environments           If set, check all runtime environments specified in
                           REANA specification file. [default=False]
  --pull                   If set, try to pull remote environment image from
                           registry to perform validation locally. Requires
                           ``--environments`` flag. [default=False]
  --server-capabilities    If set, check the server capabilities such as
                           workspace validation. [default=False]
  -t, --access-token TEXT  Access token of the current user.
  --help                   Show this message and exit.
Exercise
Validate our
reana.yamlfile to discover any errors. Usevalidatecommand to do so.
Solution
reana-client validate==> Verifying REANA specification file... reana.yaml -> SUCCESS: Valid REANA specification file. ==> Verifying REANA specification parameters... -> SUCCESS: REANA specification parameters appear valid. ==> Verifying workflow parameters and commands... -> SUCCESS: Workflow parameters and commands appear valid. ==> Verifying dangerous workflow operations... -> SUCCESS: Workflow operations appear valid.
Connect REANA client to remote REANA cluster
The REANA client will interact with a remote REANA cluster. It knows to which REANA cluster it connects by means of the following environment variable:
export REANA_SERVER_URL=https://reana.cern.ch
In order to authenticate to REANA, you need to generate a token.
Exercise: Obtain a token.
In order to obtain your token, please go to https://reana.cern.ch and ask for it.
In your terminal, paste the line with your new access token as seen below.
export REANA_ACCESS_TOKEN=xxxxxx
It may be a good idea to create a reana-setup-environment.sh file to store these two export
commands. That way you all you need to do to setup your environment is source
reana-setup-environment.sh. An alternative to this is opening up your .bashrc file and pasting
the above two export commands there.
The REANA client connection to remote REANA cluster can be verified via ping command:
reana-client ping
REANA server: https://reana.cern.ch
REANA server version: 0.9.1
REANA client version: 0.9.1
Authenticated as: John Doe <john.doe@example.org>
Status: Connected
Run example on REANA cluster
Now that we have defined and validated our reana.yaml, and connected to the REANA production
cluster, we can run the example easily via:
reana-client run -w roofit
==> Creating a workflow...
==> Verifying REANA specification file... reana.yaml
  -> SUCCESS: Valid REANA specification file.
==> Verifying REANA specification parameters...
  -> SUCCESS: REANA specification parameters appear valid.
==> Verifying workflow parameters and commands...
  -> SUCCESS: Workflow parameters and commands appear valid.
==> Verifying dangerous workflow operations...
  -> SUCCESS: Workflow operations appear valid.
==> Verifying compute backends in REANA specification file...
-> SUCCESS: Workflow compute backends appear to be valid.
roofit.1
==> SUCCESS: File /reana.yaml was successfully uploaded.
==> Uploading files...
==> Detected .gitignore file. Some files might get ignored.
==> SUCCESS: File /code/gendata.C was successfully uploaded.
==> SUCCESS: File /code/fitdata.C was successfully uploaded.
==> Starting workflow...
==> SUCCESS: roofit.1 is pending
Here, we use run command that will create a new workflow named roofit, upload its inputs as
specified in the workflow specification and finally start the workflow.
While the workflow is running, we can enquire about its status:
reana-client status -w roofit
NAME     RUN_NUMBER   CREATED               STARTED               STATUS    PROGRESS
roofit   1            2020-02-17T16:01:45   2020-02-17T16:01:48   running   1/2
After a minute or so, the workflow should finish:
reana-client status -w roofit
NAME     RUN_NUMBER   CREATED               STARTED               ENDED                 STATUS     PROGRESS
roofit   1            2020-02-17T16:01:45   2020-02-17T16:01:48   2020-02-17T16:02:44   finished   2/2
We can list the output files in the remote workspace:
reana-client ls -w roofit
NAME                SIZE     LAST-MODIFIED
reana.yaml          687      2020-02-17T16:01:46
code/gendata.C      1937     2020-02-17T16:01:46
code/fitdata.C      1648     2020-02-17T16:01:47
results/plot.png    15450    2020-02-17T16:02:44
results/data.root   154457   2020-02-17T16:02:17
We can also inspect the logs:
reana-client logs -w roofit | less
# (Hit q to quit 'less')
==> Workflow engine logs
2020-02-17 16:02:10,859 | root | MainThread | INFO | Publishing step:0, cmd: mkdir -p results && root -b -q 'code/gendata.C(20000,"results/data.root")', total steps 2 to MQ
2020-02-17 16:02:23,002 | root | MainThread | INFO | Publishing step:1, cmd: root -b -q 'code/fitdata.C("results/data.root","results/plot.png")', total steps 2 to MQ
2020-02-17 16:02:50,093 | root | MainThread | INFO | Workflow 424bc949-b809-4782-ba96-bc8cfa3e1a89 finished. Files available at /var/reana/users/b57e902f-fd11-4681-8a94-4318ae05d2ca/workflows/424bc949-b809-4782-ba96-bc8cfa3e1a89.

==> Job logs
==> Step: gendata
==> Workflow ID: 424bc949-b809-4782-ba96-bc8cfa3e1a89
==> Compute backend: Kubernetes
==> Job ID: 53c97429-25e9-4b74-94f7-c665d93fdbc2
==> Docker image: reanahub/reana-env-root6:6.18.04
==> Command: mkdir -p results && root -b -q 'code/gendata.C(20000,"results/data.root")'
==> Status: finished
==> Logs:
...
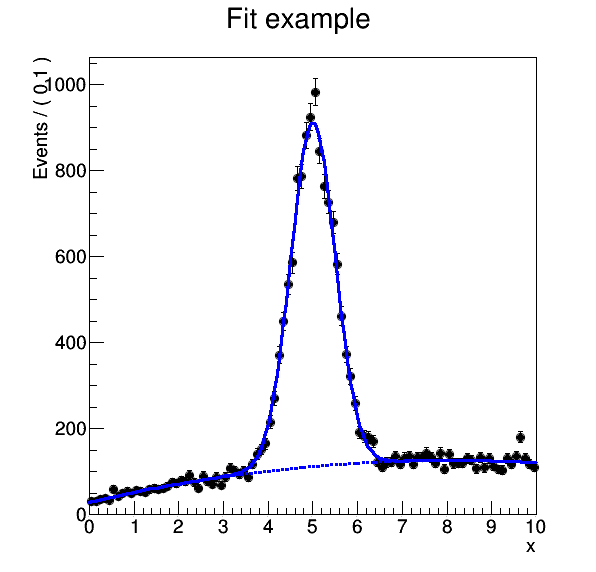
We can download the resulting plot:
reana-client download results/plot.png -w roofit
==> SUCCESS: File results/plot.png downloaded to reana-demo-root6-roofit.
And display it:
firefox results/plot.png
Exercise
Run the example workflow on REANA cluster. Practice
status,ls,logs,downloadcommands. For example, can you get the logs of the gendata step only?
Solution
reana-client logs -w roofit --filter step=gendata
Key Points
Use
reana-clientrich command-line client to run containerised workflows from your laptop on remote compute cloudsBefore running analysis remotely, check locally its correctness via
validatecommandAs always, when it doubt, use the
--helpcommand-line argument