Introduction
Overview
Teaching: 5 min
Exercises: 0 minQuestions
What is continuous integration / continuous deployment?
Objectives
Understand why CI/CD is important.
Learn what is possible with CI/CD.
Find resources to explore in more depth.
What is CI/CD?
Continuous Integration (CI), and Continuous Deployment (CD) are two related concepts in the field of DevOps, a sub-domain of software engineering.
- CI
- Continuously integrates source code changes into your repository while testing to ensure the changes do not "break" anything.
- CD
- Continuously deploys a service based on your code.
A common example of a CI/CD workflow or pipeline in a repository would be one which—after each push of a set of commits—tests the codebase (via CI) and deploys documentation (via CD) on a website.
CI/CD workflows can be configured to run after a push, after a merge-request, or on a schedule. The broader puprose of CI/CD is to automate anything repetitive that doesn’t need to be done manually, and can be thought of a labour-based manifestation of the DRY (don’t repeat yourself) principle in programming.
Catch and Release
This is just like a fishing practice for
conservationpreservation!
Breaking Changes
What does it even mean to “break” something? The idea of “breaking” something is pretty contextual. If you’re working on C++ code, then you probably want to make sure things compile and run without segfaulting at the bare minimum. If it’s Python code, maybe you have some tests with pytest that you want to make sure pass (“exit successfully”). Or if you’re working on a paper draft, you might check for grammar, misspellings, and that the document compiles from LaTeX. Whatever the use-case is, integration is about catching breaking changes.
Don’t know
pytest?To learn more about
pytestvisit its documentation or follow this training module.
Deployment
Similarly, “deployment” can mean a lot of things. Perhaps you have a Curriculum Vitae (CV) that is automatically built from LaTeX and uploaded to your website. Another case is to release Docker images of your framework that others depend on. Maybe it’s just uploading documentation. Or to even upload a new tag of your Python package on pypi. Whatever the use-case is, deployment is about releasing changes.
Workflow Automation
CI/CD is the first step to automating your entire workflow. Imagine everything you do in order to run an analysis, or make some changes. Can you make a computer do it automatically? If so, do it! The less human work you do, the less risk of making human mistakes.
Anything you can do, a computer can do better
Any command you run on your computer can be equivalently run in a CI job.
Don’t just limit yourself to thinking of CI/CD as primarily for testing changes, but as one part of automating an entire development cycle. You can trigger notifications to your cellphone, fetch/download new data, execute cron jobs, and so much more. However, for this lesson, we’ll focus primarily on setting up CI/CD with tests for existing code.
CI/CD Solutions
Now, obviously, we’re not going to make our own fully-fledged CI/CD solution. Plenty exist in the wild today, and below are just a popular few:
For this lesson, we’ll only focus on GitLab’s solution. However, be aware that all the concepts you’ll be taught today: including pipelines, stages, jobs, artifacts; all exist in other solutions by similar/different names. For example, GitLab supports two features known as caching and artifacts; but Travis doesn’t quite implement the same thing for caching and has no native support for artifacts. Therefore, while we don’t discourage you from trying out other solutions, there’s no “one size fits all” when designing your own CI/CD workflow.
Parallel lesson on GitHub CI/CD
We also have a training on GitHub actions, the CI/CD system of GitHub
Key Points
CI/CD is crucial for any reproducibility and testing.
Take advantage of automation to reduce your workload.
Exit Codes
Overview
Teaching: 10 min
Exercises: 10 minQuestions
What is an exit code?
Objectives
Understand exit codes.
Learn how to print exit codes.
Learn how to set exit codes in a script.
Learn how to ignore exit codes.
Create a script that terminates in success/error.
As we enter the first episode of the Continuous Integration / Continuous Deployment (CI/CD) session, we learn how to exit.
Exit codes communicate the outcome of a script with (in this case) the CI/CD pipeline. We generally want a CI/CD pipeline to fail if one of its components fails. For example, you would not usually want to run CD to deploy a custom Docker image if the CI tests fail for the code in that image.
Start by Exiting
How does a general task know whether or not a script finished correctly or not? You could parse (grep) the output:
ls nonexistent-file
ls: cannot access 'nonexistent-file': No such file or directory
But every command outputs something differently. Instead, scripts also have an (invisible) exit code:
ls nonexistent-file
echo $?
ls: cannot access 'nonexistent-file': No such file or directory
2
The exit code is 2 indicating failure. What about on success? The exit code is 0 like so:
echo
echo $?
0
But this works for any command you run on the command line! For example, if I mistyped git status:
git stauts
echo $?
git: 'stauts' is not a git command. See 'git --help'.

The most similar command is
  status
1
and there, the exit code is non-zero – a failure.
Exit Code is not a Boolean
You’ve probably trained your intuition to think of
0as false. However, exit code of0means there was no error. If you feel queasy about remembering this, imagine that the question asked is “Was there an error in executing the command?”0means “no” and non-zero (1,2, …) means “yes”.
Try out some other commands on your system, and see what things look like.
Some exit codes are recommended to have special meanings by convention, although there is nothing stopping someone from overriding them in their script.
Printing Exit Codes
As you’ve seen above, the exit code from the last executed command is stored in the $? environment variable. Accessing from a shell is easy echo $?. What about from Python? There are many different ways depending on which library you use. Using similar examples above, we can use the (note: deprecated) os.system call:
Snake Charming
To enter the Python interpreter, simply type
pythonin your command line.Once inside the Python interpreter, simply type
exit()then press enter, to exit.
>>> import os,subprocess
>>> ret = os.system('ls')
>>> os.WEXITSTATUS(ret)
0
>>> ret = os.system('ls nonexistent-file')
>>> os.WEXITSTATUS(ret)
1
One will note that this returned a different exit code than from the command line (indicating there’s some internal implementation in Python). All you need to be concerned with is that the exit code was non-zero (there was an error).
Setting Exit Codes
So now that we can get those exit codes, how can we set them? Let’s explore this in shell and in python.
Shell
Create a file called bash_exit.sh with the following content:
#!/usr/bin/env bash

if [ $1 == "hello" ]
then
  exit 0
else
  exit 59
fi
and then make it executable chmod +x bash_exit.sh. Now, try running it with ./bash_exit.sh hello and ./bash_exit.sh goodbye and see what those exit codes are.
Python
Create a file called python_exit.py with the following content:
#!/usr/bin/env python

import sys
if sys.argv[1] == "hello":
  sys.exit(0)
else:
  sys.exit(59)
and then make it executable chmod +x python_exit.py. Now, try running it with ./python_exit.py hello and ./python_exit.py goodbye and see what those exit codes are. Déjà vu?
Ignoring Exit Codes
To finish up this section, one thing you’ll notice sometimes (in ATLAS or CMS) is that a script you run doesn’t seem to respect exit codes. A notable example in ATLAS is the use of setupATLAS which returns non-zero exit status codes even though it runs successfully! This can be very annoying when you start development with the assumption that exit status codes are meaningful (such as with CI). In these cases, you’ll need to ignore the exit code. An easy way to do this is to execute a second command that always gives exit 0 if the first command doesn’t, like so:
false || echo "ignore failure"
echo $?
ignore failure
0
where false is just a simple command that always returns a non-zero exit code.
The command_1 || command_2 OR-operator means to execute command_2 only if command_1 has failed (non-zero exit code).
Similarly, the command_1 && command_2 AND-operator means to execute command_2 only if command_1 has succeeded.
These are both examples of short-ciruited boolean expressions. Short-circuited expressions return the result of the boolean expression as soon as the minimal information necessary for the result is computed: the operands are executed from left to right, and the right operand only evaluates if the left operand doesn’t determine the answer.
Try this out using one of the scripts you made in the previous session:
./python_exit.py goodbye || echo ignore
What does that give you?
It’s possible to ignore an exit code quietly by running command_1 || true, where true always returns an exit code of 0.
Overriding Exit Codes
It’s not really recommended to ‘hack’ the exit codes like this, but this example is provided so that you are aware of how to do it if you ever run into this situation. Assume that scripts respect exit codes, until you run into one that does not.
Key Points
Exit codes are used to identify if a command or script executed with errors or not.
Not everyone respects exit codes.
Understanding Yet Another Markup Language
Overview
Teaching: 5 min
Exercises: 0 minQuestions
What is YAML?
Objectives
Learn about YAML.
YAML
YAML (Yet Another Markup Language or sometimes popularly referred to as YAML Ain’t Markup Language (a recursive acronym)) is a human-readable data-serialization language. It is commonly used for configuration files and in applications where data is being stored or transmitted. CI systems’ modus operandi typically rely on YAML for configuration. We’ll cover, briefly, some of the native types involved and what the structure looks like.
Tabs or Spaces?
We strongly suggest you use spaces for a YAML document. Indentation is done with one or more spaces, however two spaces is the unofficial standard commonly used.
Scalars
number-value: 42
floating-point-value: 3.141592
boolean-value: true # on, yes -- also work
# strings can be both 'single-quoted` and "double-quoted"
string-value: 'Bonjour'
python-version: "3.10"
unquoted-string: Hello World
hexadecimal: 0x12d4
scientific: 12.3015e+05
infinity: .inf
not-a-number: .NAN
null: ~
another-null: null
key with spaces: value
datetime: 2001-12-15T02:59:43.1Z
datetime_with_spaces: 2001-12-14 21:59:43.10 -5
date: 2002-12-14
Give your colons some breathing room
Notice that in the above list, all colons have a space afterwards,
:. This is important for YAML parsing and is a common mistake.
YAML and trailing floating point zeroes
YAML truncates trailing zeroes from a floating point number, which means that
python-version: 3.10will automatically be converted topython-version: 3.1(notice3.1instead of3.10). The conversion will lead to unexpected failures as your CI will be running on a version not specified by you. This behavior resulted in several failed jobs after the release of Python 3.10 on CI services. The conversion (and the build failure) can be avoided by converting the floating point numbers to strings -python-version: "3.10".
Lists and Dictionaries
jedis:
  - Yoda
  - Qui-Gon Jinn
  - Obi-Wan Kenobi
  - Luke Skywalker

jedi:
  name: Obi-Wan Kenobi
  home-planet: Stewjon
  species: human
  master: Qui-Gon Jinn
  height: 1.82m
List/Dictionary syntax
Just like scalars, list and dictionaries require a space at the
-,:. Notice that there is indentation below the name of the list or the dictionary.Finally, all elements have to be at the same indentation level for the entire list or dictionary.
Inline-Syntax
Since YAML is a superset of JSON, you can also write JSON-style maps and sequences.
episodes: [1, 2, 3, 4, 5, 6, 7]
best-jedi: {name: Obi-Wan, side: light}
Multiline Strings
In YAML, there are two different ways to handle multiline strings. This is useful, for example, when you have a long code block that you want to format in a pretty way, but don’t want to impact the functionality of the underlying CI script. In these cases, multiline strings can help. For an interactive demonstration, you can visit https://yaml-multiline.info/.
Put simply, you have two operators you can use to determine whether to keep newlines (|, exactly how you wrote it) or to remove newlines (>, fold them in). Similarly, you can also choose whether you want a single newline at the end of the multiline string, multiple newlines at the end (+), or no newlines at the end (-). The below is a summary of some variations:
folded_no_ending_newline:
  script:
    - >-
      echo "foo" &&
      echo "bar" &&
      echo "baz"


    - echo "do something else"

unfolded_ending_single_newline:
  script:
    - |
      echo "foo" && \
      echo "bar" && \
      echo "baz"


    - echo "do something else"
Nested
requests:
  # first item of `requests` list is just a string
  - http://example.com/

  # second item of `requests` list is a dictionary
  - url: http://example.com/
    method: GET
Comments
Comments begin with a pound sign (#) and continue for the rest of the line:
# This is a full line comment
foo: bar # this is a comment, too
Anchors
YAML also has a handy feature called ‘anchors’, which lets you easily duplicate content across your document. Anchors look like references
&in C/C++ and named anchors can be dereferenced using*.anchored_content: &anchor_name This string will appear as the value of two keys. other_anchor: *anchor_name base: &base name: Everyone has same name foo: &foo <<: *base age: 10 bar: &bar <<: *base age: 20The
<<allows you to merge the items in a dereferenced anchor. Bothbarandfoowill have anamekey.
Key Points
YAML is a plain-text format, similar to JSON, useful for configuration.
YAML is a superset of JSON, so it contains additional features like comments and anchors, while still supporting JSON.
YAML and CI
Overview
Teaching: 5 min
Exercises: 0 minQuestions
What is the GitLab CI specification?
Objectives
Learn where to find more details about everything for the GitLab CI.
Understand the structure of the GitLab CI YAML file.
GitLab CI YAML
The GitLab CI configurations are specified using a YAML file called .gitlab-ci.yml. Here is an example:
stages:
  - build

job_1:
  stage: build
  script:
    - echo "This is the first step of my first job"
This is a minimal example used to introduce the basic structure of a GitLab CI/CD pipeline. The provided YAML configuration sets up a single-stage pipeline with one job named job_1. Let’s break down the key components:
-
The
stagessection defines the different stages in the pipeline. In this example, there is a single stage namedbuild. -
The
job_1section specifies a job within thebuildstage. Thescriptsection contains the commands to be executed as part of the job. In this case, the job simply prints the message “This is the first step of my first job.”
This YAML configuration represents a basic GitLab CI/CD pipeline with one stage (build) and one job (job_1). The job executes a simple script that echoes a message to the console. In more complex scenarios, jobs can include various tasks such as building, testing, and deploying code. Understanding this foundational structure is essential for creating more advanced and customized CI/CD pipelines in GitLab.
scriptcommandsSometimes,
scriptcommands will need to be wrapped in single or double quotes. For example, commands that contain a colon (:) need to be wrapped in quotes so that the YAML parser knows to interpret the whole thing as a string rather than a “key: value” pair. Be careful when using special characters::,{,},[,],,,&,*,#,?,|,-,<,>,=,!,%,@,\`.
Overall Structure
Every single parameter we consider for all configurations are keys under jobs. The YAML is structured using job names. For example, we can define three jobs that run in parallel (more on parallel/serial later) with different sets of parameters.
job1:
  param1: null
  param2: null

job2:
  param1: null
  param3: null

job3:
  param2: null
  param4: null
  param5: null
Parallel or Serial Execution?
Note that by default, all jobs you define run in parallel. If you want them to run in serial, or a mix of parallel and serial, or as a directed acyclic graph, we’ll cover this in a later section.
What can you not use as job names? There are a few reserved keywords (because these are used as global parameters for configuration, in addition to being job-specific parameters):
defaultimageservicesstagestypesbefore_scriptafter_scriptvariablescache
Global parameters mean that you can set parameters at the top-level of the YAML file. What does that actually mean? Here’s another example:
stages: [build, test, deploy]

<workflow_name>:
  stage: build
  script:
    - echo "This is the script for the workflow."

job_1:
  stage: test
  script:
    - echo "Commands for the first job - Step 1"
    - echo "Commands for the first job - Step 2"

job_2:
  stage: test
  script:
    - echo "Commands for the second job - Step 1"
    - echo "Commands for the second job - Step 2"
Stages???
Ok, ok, yes, there are also stages. You can think of it like putting on a show. A pipeline is composed of stages. Stages are composed of jobs. All jobs in a stage perform at the same time, run in parallel. You can only perform on one stage at a time, like in broadway. We’ll cover stages and serial/parallel execution in a later lesson when we add more complexity to our CI/CD.
Additionally, note that all jobs are defined with a default (unnamed) stage unless explicitly specified. Therefore, all jobs you define will run in parallel by default. When you care about execution order (such as building before you test), then we need to consider multiple stages and job dependencies.
Job Parameters
What are some of the parameters that can be used in a job? Rather than copy/pasting from the documentation, we’ll go to the Configuration parameters section in the GitLab docs. The most important parameter, and the only one needed to define a job, is script
job one:
  script: make

job two:
  script:
    - python test.py
    - coverage
Understanding the Reference
One will notice that the reference uses colons like
:job:image:nameto refer to parameter names. This is represented in yaml like:job: image: name: rikorose/gcc-cmake:gcc-6where the colon refers to a child key.
Documentation
The reference guide for all GitLab CI/CD pipeline configurations is found at https://docs.gitlab.com/ee/ci/yaml/. This contains all the different parameters you can assign to a job.
Key Points
You should bookmark the GitLab reference on CI/CD. You’ll visit that page often.
A job is defined by a name and a script, at minimum.
Other than job names, reserved keywords are the top-level parameters defined in a YAML file.
Coffee break!
Overview
Teaching: 0 min
Exercises: 15 minQuestions
Get up, stretch out, take a short break.
Objectives
Refresh your mind.
Key Points
You’ll be back.
They’re the jedi of the sea.
Hello CI World
Overview
Teaching: 5 min
Exercises: 10 minQuestions
How do I run a simple GitLab CI job?
Objectives
Add CI/CD to your project.
Adding CI/CD to a project
The first thing we’ll do is create a .gitlab-ci.yml file in the project.
cd virtual-pipelines-eventselection/
echo "hello world" >> .gitlab-ci.yml
git checkout -b feature/add-ci
git add .gitlab-ci.yml
git commit -m "my first ci/cd"
git push -u origin feature/add-ci
Feature Branches
Since we’re adding a new feature (CI/CD) to our project, we’ll work in a feature branch. This is just a human-friendly named branch to indicate that it’s adding a new feature.
Now, if you navigate to the GitLab webpage for that project and branch, you’ll notice a shiny new button

which will link to the newly added .gitlab-ci.yml. But wait a minute, there’s also a big red x on the page too!

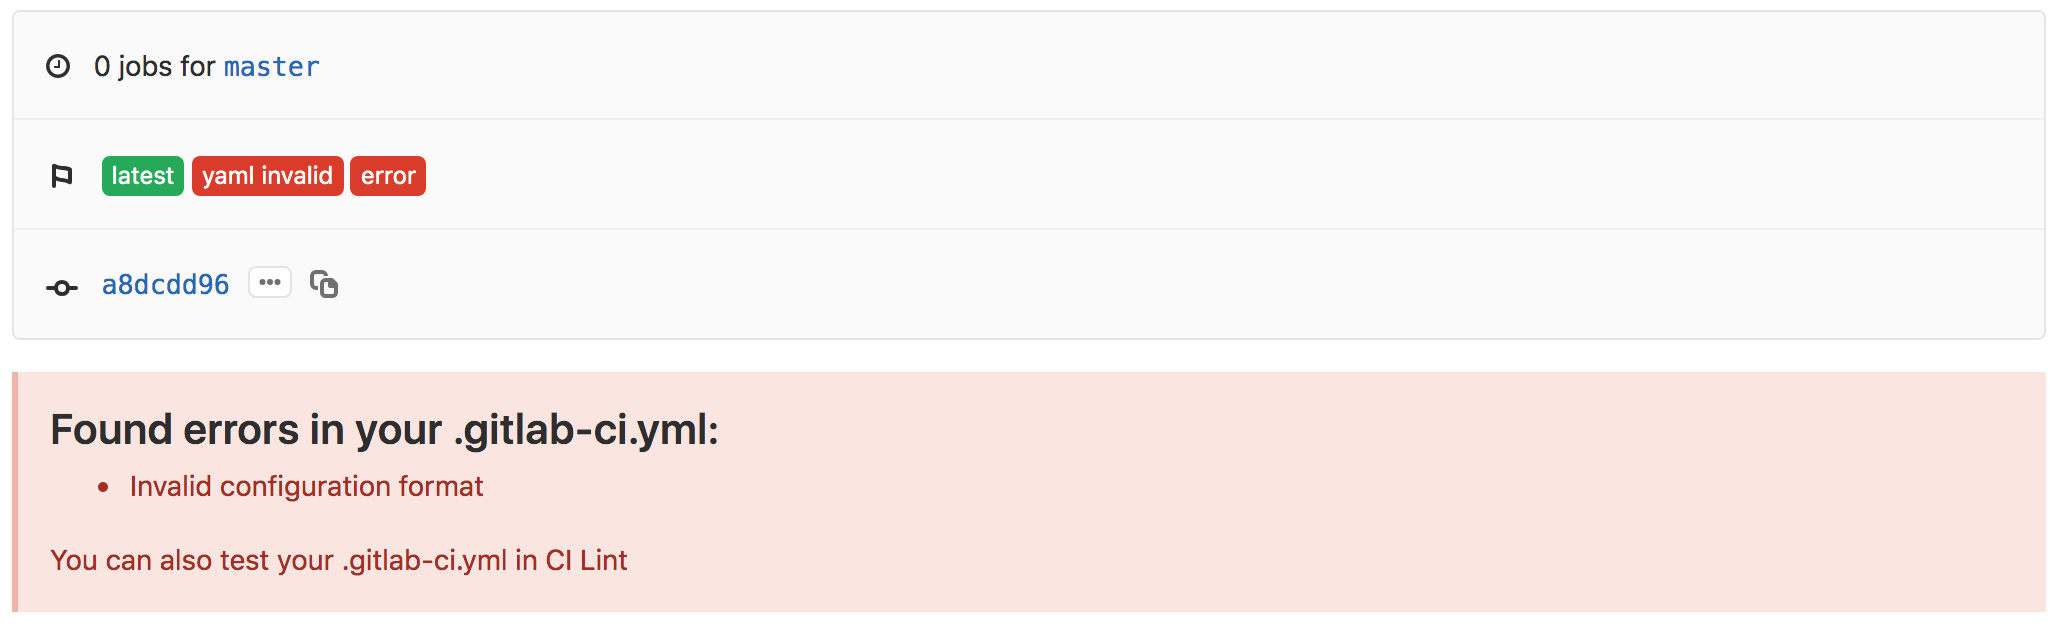
What happened??? Let’s find out. Click on the red x which takes us to the pipelines page for the commit. On this page, we can see that this failed because the YAML was invalid…
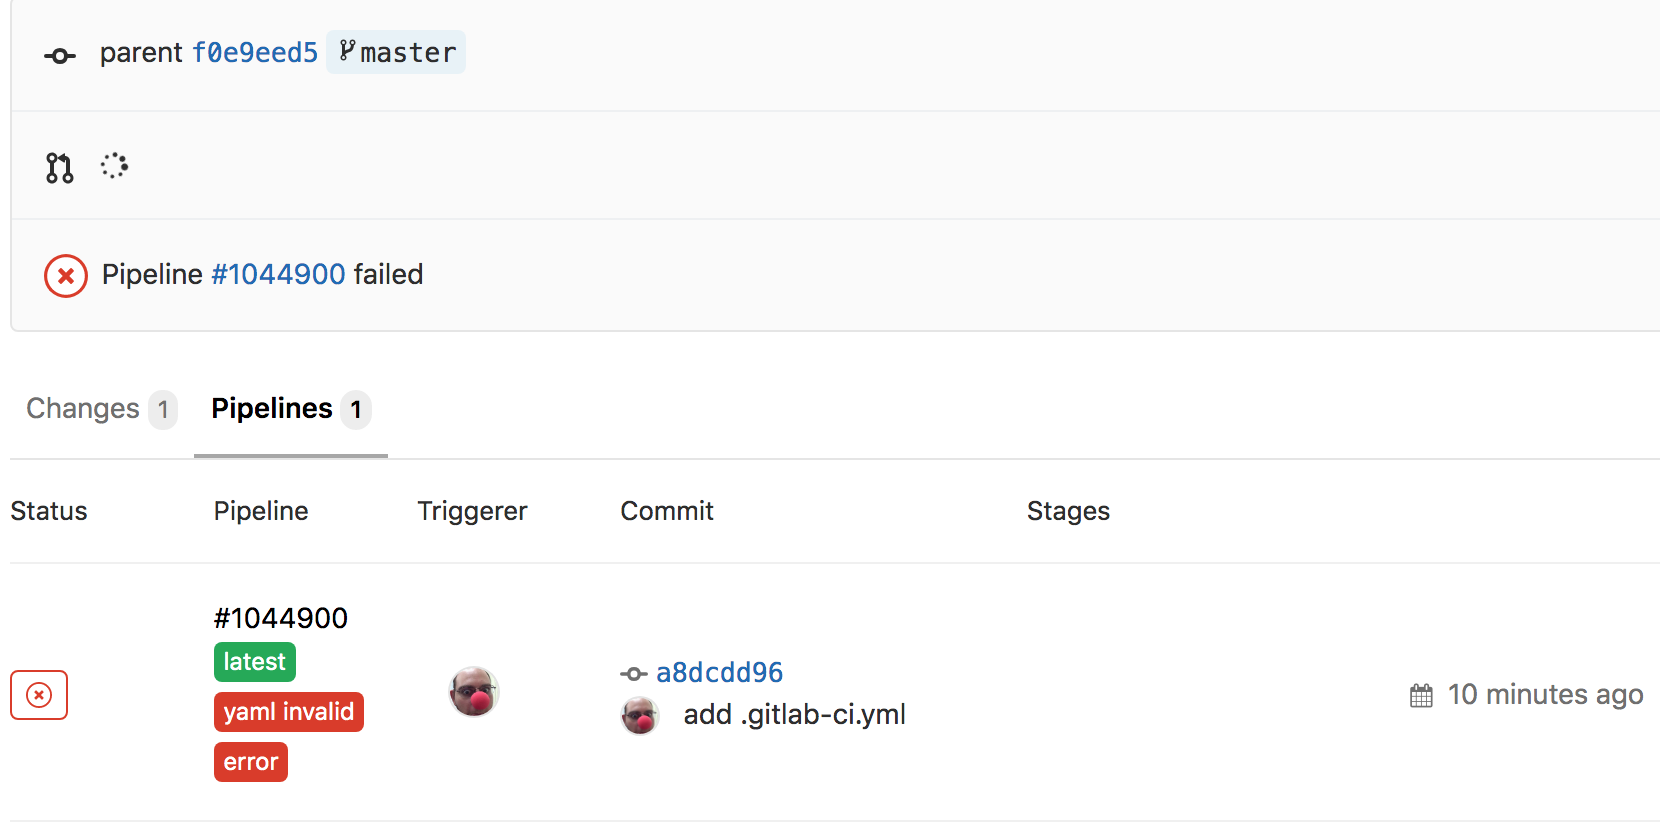
We should fix this. If you click through again on the red x on the left for the pipeline there, you can get to the detailed page for the given pipeline to find out more information
Validating CI/CD YAML Configuration
Every single project you make on GitLab comes with a linter for the YAML you write. This linter can be found at
<project-url>/-/ci/lint. For example, if I have a project at https://gitlab.cern.ch/gfidalgo/ci-testing, then the linter is at https://gitlab.cern.ch/gfidalgo/ci-testing/-/ci/lint.This can also be found by going to
CI/CD -> PipelinesorCI/CD -> Jobspage and clicking theCI Lintbutton at the top right.
But what’s a linter?
From wikipedia:
lint, or a linter, is a tool that analyzes source code to flag programming errors, bugs, stylistic errors, and suspicious constructs. The term originates from a Unix utility that examined C language source code.
Lastly, we’ll open up a merge request for this branch, since we plan to merge this back into master when we’re happy with the first iteration of the CI/CD.
Work In Progress?
If you expect to be working on a branch for a bit of time while you have a merge request open, it’s good etiquette to mark it as a Work-In-Progress (WIP).

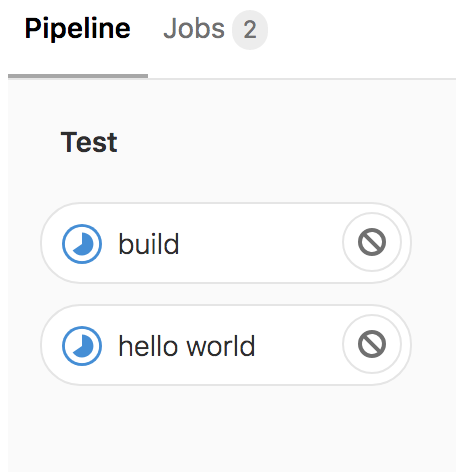
Hello World
Fixing the YAML
Now, our YAML is currently invalid, but this makes sense because we didn’t actually define any script to run. Let’s go ahead and update our first job that simply echoes “Hello World”.
hello world:
  script: echo "Hello World"
Before we commit it, since we’re still new to CI/CD, let’s copy/paste it into the CI linter and make sure it lints correctly.
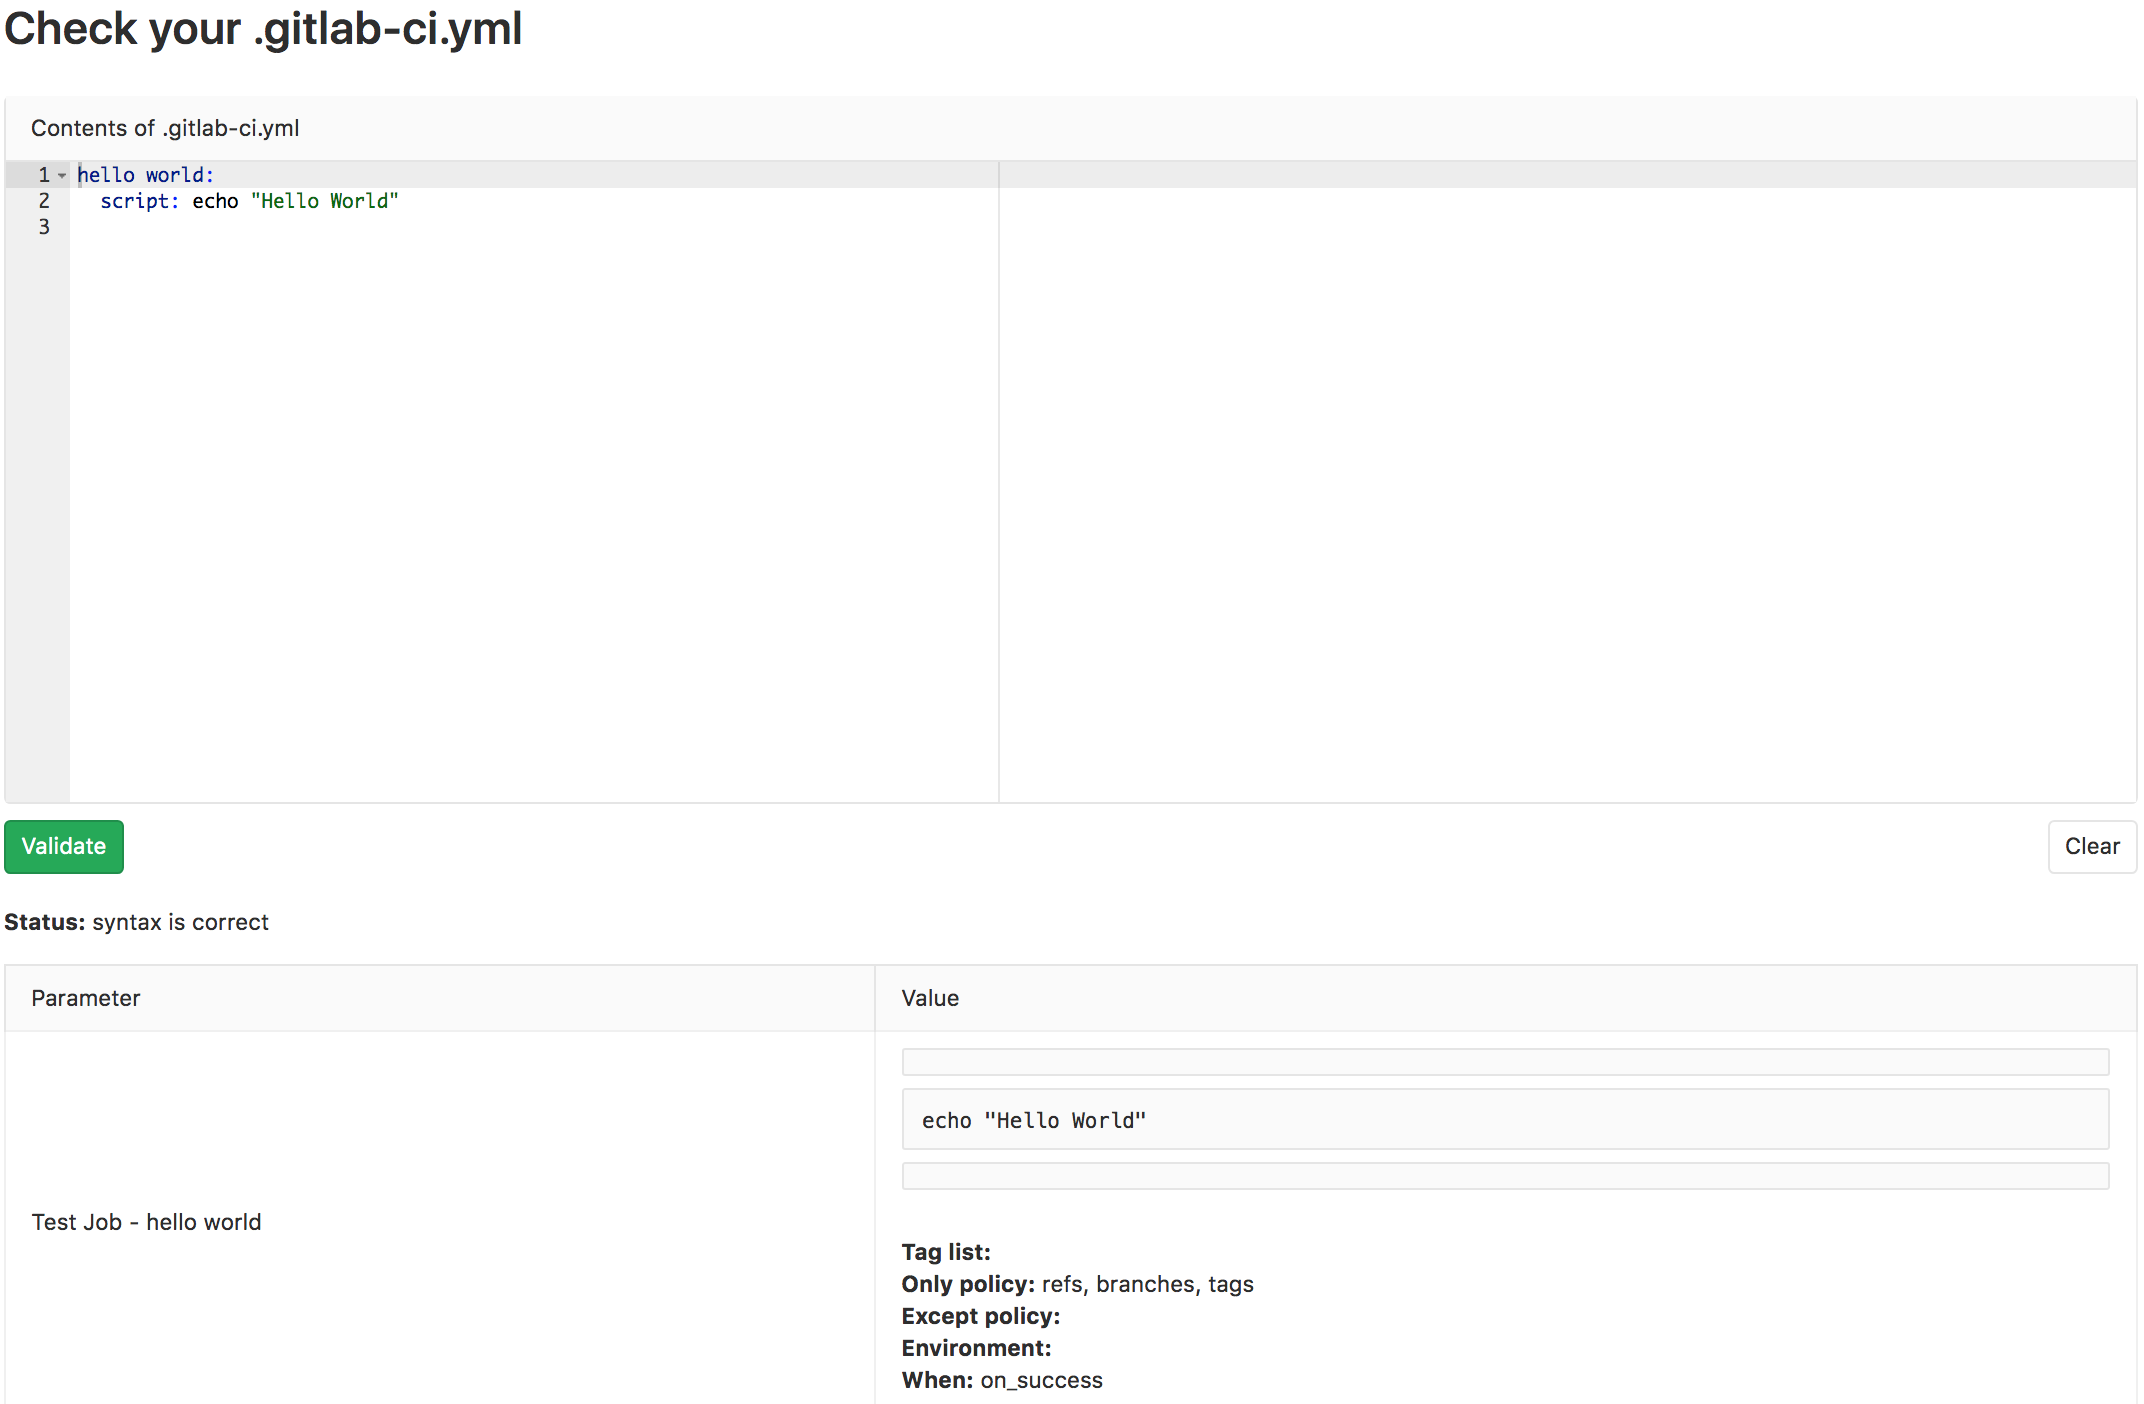
Looks good! Let’s stage the changes with git add .gitlab-ci.yml, commit it with an appropriate commit message, and push!
Checking Pipeline Status
Now we want to make sure that this worked. How can we check the status of commits or pipelines? The GitLab UI has a couple of ways:
- go to the
commitspage of your project and see the pipeline’s status for that commit
- go to
CI/CD -> Pipelinesof your project, see all pipelines, and find the right one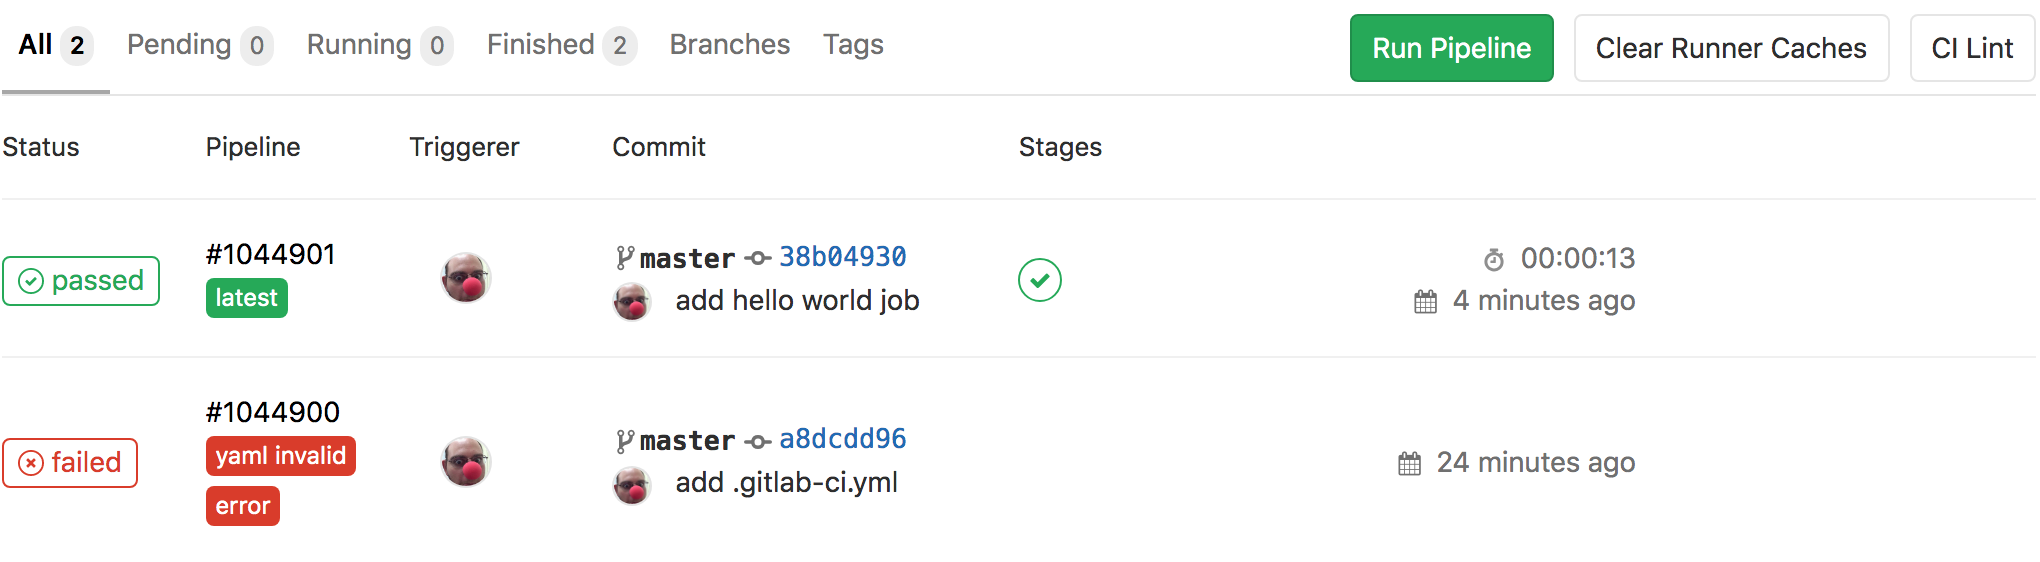
- go to
CI/CD -> Jobsof your project, see all jobs, and find the right one
Checking Job’s Output
From any of these pages, click through until you can find the output for the successful job run, which should look like the following:

And that’s it! You’ve successfully run your CI/CD job and you can view the output.
Pipelines and Jobs?
You might have noticed that there are both pipelines and jobs. What’s the difference? Pipelines are the top-level component of continuous integration, delivery, and deployment.
Pipelines comprise:
- Jobs that define what to run. For example, code compilation or test runs.
- Stages that define when and how to run. For example, that tests run only after code compilation.
Multiple jobs in the same stage are executed by Runners in parallel, if there are enough concurrent Runners.
If all the jobs in a stage:
- Succeed, the pipeline moves on to the next stage.
- Fail, the next stage is not (usually) executed and the pipeline ends early.
Key Points
Adding a
.gitlab-ci.ymlis the first step to salvation.Pipelines are made of stages, stages are made of jobs.
CI Linters are especially useful to check syntax before pushing changes.
Adding CI to Your Existing Code
Overview
Teaching: 5 min
Exercises: 10 minQuestions
I have code already in GitLab, how can I add CI to it?
Objectives
Learn how to get your CI/CD Runners to build your code.
Try and see if the CI/CD can catch problems with our code.
Time To Skim
The Naive Attempt
As of right now, your .gitlab-ci.yml should look like
hello world:
  script:
   - echo "Hello World"
Let’s go ahead and teach our CI to build our code. Let’s add another job (named build_skim) that runs in parallel for right now, and runs the compiler ROOT uses. This worked for me on my computer, so we should try it:
COMPILER=$(root-config --cxx)
$COMPILER -g -O3 -Wall -Wextra -Wpedantic -o skim skim.cxx
which will produce an output binary called skim.
Adding a new job
How do we change the CI in order to add a new parallel job that compiles our code?
Solution
hello world:
  script:
   - echo "Hello World"

build_skim:
  script:
   - COMPILER=$(root-config --cxx)
   - $COMPILER -g -O3 -Wall -Wextra -Wpedantic -o skim skim.cxx
No root-config?
Ok, so maybe we were a little naive here. Let’s start debugging. You got this error when you tried to build
Broken Build
Initialized empty Git repository in /builds/sharmari/virtual-pipelines-eventselection/.git/

Created fresh repository.

Checking out a38a66ae as detached HEAD (ref is master)...

Skipping Git submodules setup

Executing "step_script" stage of the job script 00:00

$ # INFO: Lowering limit of file descriptors for backwards compatibility. ffi: https://cern.ch/gitlab-runners-limit-file-descriptors # collapsed multi-line command

$ COMPILER=$(root-config --cxx)

/scripts-178677-36000934/step_script: line 152: root-config: command not found

Cleaning up project directory and file based variables 00:01

ERROR: Job failed: command terminated with exit code 1
We have a broken build. What happened?
Answer
It turns out we didn’t have ROOT installed. How do we fix it? We need to download and install the miniforge installer. The
-b -poptions specify a batch mode installation without user interaction, and the installation path is set to$HOME/miniconda. Set up the conda environment and initialize conda. Then install ROOT with conda and verify the installation with a Python script.hello_world: script: - echo "Hello World" build_skim: script: - wget https://github.com/conda-forge/miniforge/releases/latest/download/Miniforge3-Linux-x86_64.sh -O ~/miniconda.sh - bash ~/miniconda.sh -b -p $HOME/miniconda - eval "$(~/miniconda/bin/conda shell.bash hook)" - conda init - conda install root --yes - COMPILER=$(root-config --cxx) - $COMPILER -g -O3 -Wall -Wextra -Wpedantic -o skim skim.cxx
Still failed??? What the hell.
What happened?
Answer
It turns out we just forgot the include flags needed for compilation. If you look at the log, you’ll see
 $ COMPILER=$(root-config --cxx)
 $ $COMPILER -g -O3 -Wall -Wextra -Wpedantic -o skim skim.cxx
 skim.cxx:11:10: fatal error: ROOT/RDataFrame.hxx: No such file or directory
  #include "ROOT/RDataFrame.hxx"
           ^~~~~~~~~~~~~~~~~~~~~
 compilation terminated.
 ERROR: Job failed: exit code 1
How do we fix it? We just need to add another variable to add the flags at the end via
$FLAGSdefined asFLAGS=$(root-config --cflags --libs).
Ok, let’s go ahead and update our .gitlab-ci.yml again. It works!
Building multiple versions
Great, so we finally got it working… CI/CD isn’t obviously powerful when you’re only building one thing. Let’s build the code both with the latest ROOT image and also with a specific ROOT version. Let’s name the two jobs build_skim and build_skim_latest.
Adding the
build_skim_latestjobWhat does the
.gitlab-ci.ymllook like now?Solution
hello world:
  script:
   - echo "Hello World"

build_skim:
 script:
   - wget https://github.com/conda-forge/miniforge/releases/latest/download/Miniforge3-Linux-x86_64.sh -O ~/miniconda.sh
   - bash ~/miniconda.sh -b -p $HOME/miniconda
   - eval "$(~/miniconda/bin/conda shell.bash hook)"
   - conda init
   - conda install root=6.28 --yes
   - COMPILER=$(root-config --cxx)
   - FLAGS=$(root-config --cflags --libs)
   - $COMPILER -g -O3 -Wall -Wextra -Wpedantic -o skim skim.cxx $FLAGS

build_skim_latest:
 script:
   - wget https://github.com/conda-forge/miniforge/releases/latest/download/Miniforge3-Linux-x86_64.sh -O ~/miniconda.sh
   - bash ~/miniconda.sh -b -p $HOME/miniconda
   - eval "$(~/miniconda/bin/conda shell.bash hook)"
   - conda init
   - conda install root --yes
   - COMPILER=$(root-config --cxx)
   - FLAGS=$(root-config --cflags --libs)
   - $COMPILER -g -O3 -Wall -Wextra -Wpedantic -o skim skim.cxx $FLAGS
However, we probably don’t want our CI/CD to crash if one of the jobs fails. So let’s also add :build_skim_latest:allow_failure = true to our job as well. This allows the job to fail without crashing the CI/CD – that is, it’s an acceptable failure. This indicates to us when we do something in the code that might potentially break the latest release, or indicate when our code will not build in a new release.
build_skim_latest:

  script: [....]
  allow_failure: true
Finally, we want to clean up the two jobs a little by separating out the miniconda download into a before_script and initialization, since this is actually preparation for setting up our environment – rather than part of the script we want to test! For example,
build_skim_latest:
  before_script:
   - wget https://github.com/conda-forge/miniforge/releases/latest/download/Miniforge3-Linux-x86_64.sh -O ~/miniconda.sh
   - bash ~/miniconda.sh -b -p $HOME/miniconda
   - eval "$(~/miniconda/bin/conda shell.bash hook)"
   - conda init

  script:
   - conda install root --yes
   - COMPILER=$(root-config --cxx)
   - FLAGS=$(root-config --cflags --libs)
   - $COMPILER -g -O3 -Wall -Wextra -Wpedantic -o skim skim.cxx $FLAGS
  allow_failure: yes
Building only on changes?
Sometimes you might find that certain jobs don’t need to be run when unrelated files change. For example, in this example, our job depends only on
skim.cxx. While there is no nativeMakefile-like solution (with targets) for GitLab CI/CD (or CI/CD in general), you can emulate this with the:job:only:changesflag like sobuild_skim: before_script: - wget https://github.com/conda-forge/miniforge/releases/latest/download/Miniforge3-Linux-x86_64.sh -O ~/miniconda.sh - bash ~/miniconda.sh -b -p $HOME/miniconda - eval "$(~/miniconda/bin/conda shell.bash hook)" - conda init script: - conda install root=6.28 --yes - COMPILER=$(root-config --cxx) - FLAGS=$(root-config --cflags --libs) - $COMPILER -g -O3 -Wall -Wextra -Wpedantic -o skim skim.cxx $FLAGS only: changes: - skim.cxxand this will build a new version with
./skimonly if theskim.cxxfile changes. There’s plenty more one can do with this that doesn’t fit into this lesson, so feel free to try it out on your own time.
Key Points
Setting up CI/CD shouldn’t be mind-numbing.
All defined jobs run in parallel by default.
Jobs can be allowed to fail without breaking your CI/CD.
Eins Zwei DRY
Overview
Teaching: 5 min
Exercises: 10 minQuestions
How can we make job templates?
Objectives
Don’t Repeat Yourself (DRY).
Make reusable/flexible CI/CD jobs.
Hidden (keys) Jobs
A fun feature about GitLab’s CI YAML is the ability to disable entire jobs simply by prefixing the job name with a period (.). Naively, we could just comment it out.
#hidden job:
#  script:
#    - make
but it’s much easier to simply write
.hidden job:
  script:
    - make
Why is this fun? We should be able to combine it with some other nice features of GitLab’s CI YAML to build…
Job Templates
From the previous lesson, our .gitlab-ci.yml looks like
hello_world:
  script:
    - echo "Hello World"

build_skim:
  before_script:
    - wget https://github.com/conda-forge/miniforge/releases/latest/download/Miniforge3-Linux-x86_64.sh -O ~/miniconda.sh
    - bash ~/miniconda.sh -b -p $HOME/miniconda
    - eval "$(~/miniconda/bin/conda shell.bash hook)"
    - conda init
  script:
    - conda install root=6.28
    - COMPILER=$(root-config --cxx)
    - FLAGS=$(root-config --cflags --libs)
    - $COMPILER -g -O3 -Wall -Wextra -Wpedantic -o skim skim.cxx $FLAGS

build_skim_latest:
  before_script:
    - wget https://github.com/conda-forge/miniforge/releases/latest/download/Miniforge3-Linux-x86_64.sh -O ~/miniconda.sh
    - bash ~/miniconda.sh -b -p $HOME/miniconda
    - eval "$(~/miniconda/bin/conda shell.bash hook)"
    - conda init
  script:
    - conda install root
    - COMPILER=$(root-config --cxx)
    - FLAGS=$(root-config --cflags --libs)
    - $COMPILER -g -O3 -Wall -Wextra -Wpedantic -o skim skim.cxx $FLAGS
  allow_failure: true
We’ve already started to repeat ourselves. How can we combine the two into a single job template called .template_build? Let’s refactor things a little bit.
Refactoring the code
Can you refactor the above code by adding a hidden job (named
.template_build) containing parameters thatbuild_skimandbuild_skim_versionhave in common?Solution
hello_world:
  script:
    - echo "Hello World"

.template_build:
  before_script:
    - wget https://github.com/conda-forge/miniforge/releases/latest/download/Miniforge3-Linux-x86_64.sh -O ~/miniconda.sh
    - bash ~/miniconda.sh -b -p $HOME/miniconda
    - eval "$(~/miniconda/bin/conda shell.bash hook)"
    - conda init


build_skim:
  before_script:
    - wget https://github.com/conda-forge/miniforge/releases/latest/download/Miniforge3-Linux-x86_64.sh -O ~/miniconda.sh
    - bash ~/miniconda.sh -b -p $HOME/miniconda
    - eval "$(~/miniconda/bin/conda shell.bash hook)"
    - conda init
  script:
   - conda install root=6.28 --yes
   - COMPILER=$(root-config --cxx)
   - FLAGS=$(root-config --cflags --libs)
   - $COMPILER -g -O3 -Wall -Wextra -Wpedantic -o skim skim.cxx $FLAGS


build_skim_latest:
  before_script:
    - wget https://github.com/conda-forge/miniforge/releases/latest/download/Miniforge3-Linux-x86_64.sh -O ~/miniconda.sh
    - bash ~/miniconda.sh -b -p $HOME/miniconda
    - eval "$(~/miniconda/bin/conda shell.bash hook)"
    - conda init
  script:
   - conda install root --yes
   - COMPILER=$(root-config --cxx)
   - FLAGS=$(root-config --cflags --libs)
   - $COMPILER -g -O3 -Wall -Wextra -Wpedantic -o skim skim.cxx $FLAGS
  allow_failure: true
The idea behind not repeating yourself is to merge multiple (job) definitions together, usually a hidden job and a non-hidden job. This is done through a concept of inheritance. Interestingly enough, GitLab CI/CD also allows for :job:extends as an alternative to using YAML anchors. I tend to prefer this syntax as it appears to be “more readable and slightly more flexible” (according to GitLab - but I argue it’s simply just more readable and has identical functionality!!!).
.only-important:
  only:
    - master
    - stable
  tags:
    - production

.in-docker:
  tags:
    - docker
  image: alpine

rspec:
  extends:
    - .only-important
    - .in-docker
  script:
    - rake rspec
will become
rspec:
  only:
    - master
    - stable
  tags:
    - docker
  image: alpine
  script:
    - rake rspec
Note how .in-docker overrides :rspec:tags because it’s “closest in scope”.
Anchors Away?
If we use
extendsto remove duplicate code, what do we get?Solution
hello_world:
  script:
    - echo "Hello World"

.template_build:
  before_script:
    - wget https://github.com/conda-forge/miniforge/releases/latest/download/Miniforge3-Linux-x86_64.sh -O ~/miniconda.sh
    - bash ~/miniconda.sh -b -p $HOME/miniconda
    - eval "$(~/miniconda/bin/conda shell.bash hook)"
    - conda init


build_skim:
  extends: .template_build
  script:
   - conda install root=6.28 --yes
   - COMPILER=$(root-config --cxx)
   - FLAGS=$(root-config --cflags --libs)
   - $COMPILER -g -O3 -Wall -Wextra -Wpedantic -o skim skim.cxx $FLAGS


build_skim_latest:
  extends: .template_build
  script:
   - conda install root --yes
   - COMPILER=$(root-config --cxx)
   - FLAGS=$(root-config --cflags --libs)
   - $COMPILER -g -O3 -Wall -Wextra -Wpedantic -o skim skim.cxx $FLAGS
  allow_failure: yes
Look how much cleaner you’ve made the code. You should now see that it’s pretty easy to start adding more build jobs for other versions in a relatively clean way, as you’ve now abstracted the actual building from the definitions.
Key Points
Hidden jobs can be used as templates with the
extendsparameter.Using job templates allows you to stay DRY!
Even more builds
Overview
Teaching: 10 min
Exercises: 5 minQuestions
How can we make variations of our builds?
Objectives
Matrix workflows.
Make reusable/flexible CI/CD jobs.
Parallel and Matrix jobs
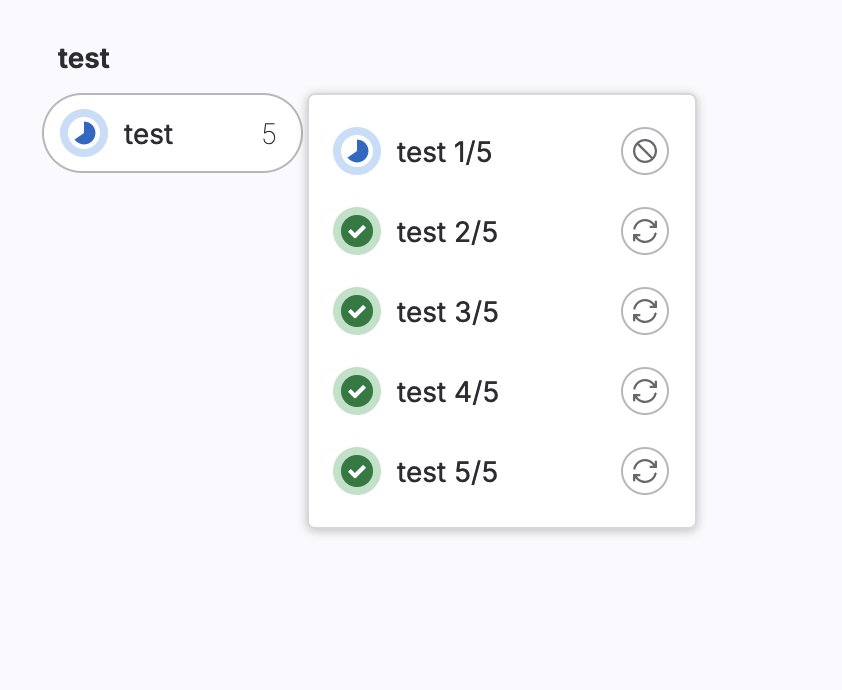
Matrices are one of the fundamental concepts of CIs. They allow for flexible workflows that involve building or running scripts with many variations in a few lines. In GitLab, we need to use the parallel keyword to run a job multiple times in parallel in a single pipeline.
This example creates 5 jobs that run in parallel, named test 1/5 to test 5/5.
test:
  script: echo "multiple jobs"
  parallel: 5
A pipeline with jobs that use parallel might:
- Create more jobs running in parallel than available runners. Excess jobs are queued and marked pending while waiting for an available runner.
- Create too many jobs, and the pipeline fails with a
job_activity_limit_exceedederror. The maximum number of jobs that can exist in active pipelines is limited at the GitLab-instance level.
Matrices
It’s not really useful to simply repeat the same exact job; it is far more useful if each job can be different.
Use parallel:matrix to run a job multiple times in parallel in a single pipeline, but with different variable values for each instance of the job. Some conditions on the possible inputs are:
- The variable names can use only numbers, letters, and underscores
_. - The values must be either a string or an array of strings.
- The number of permutations cannot exceed 200.
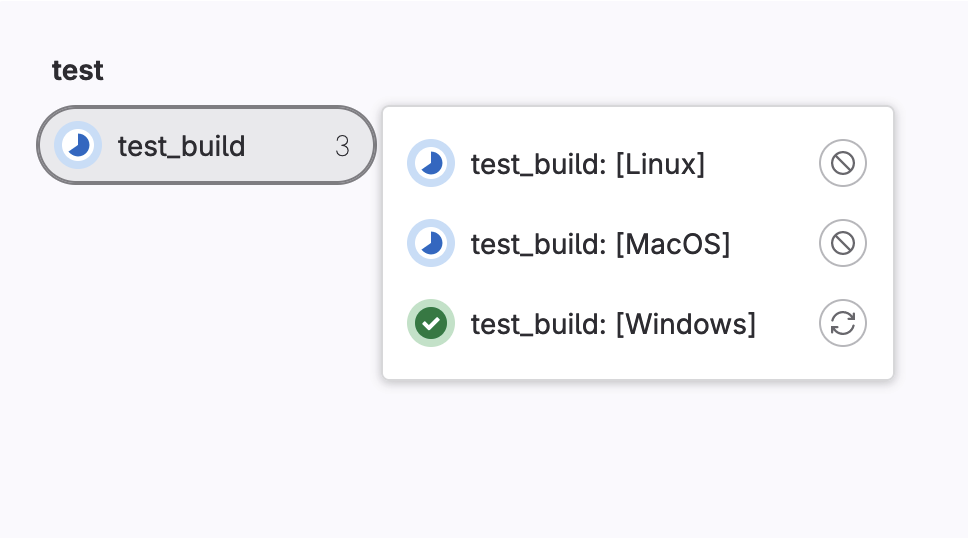
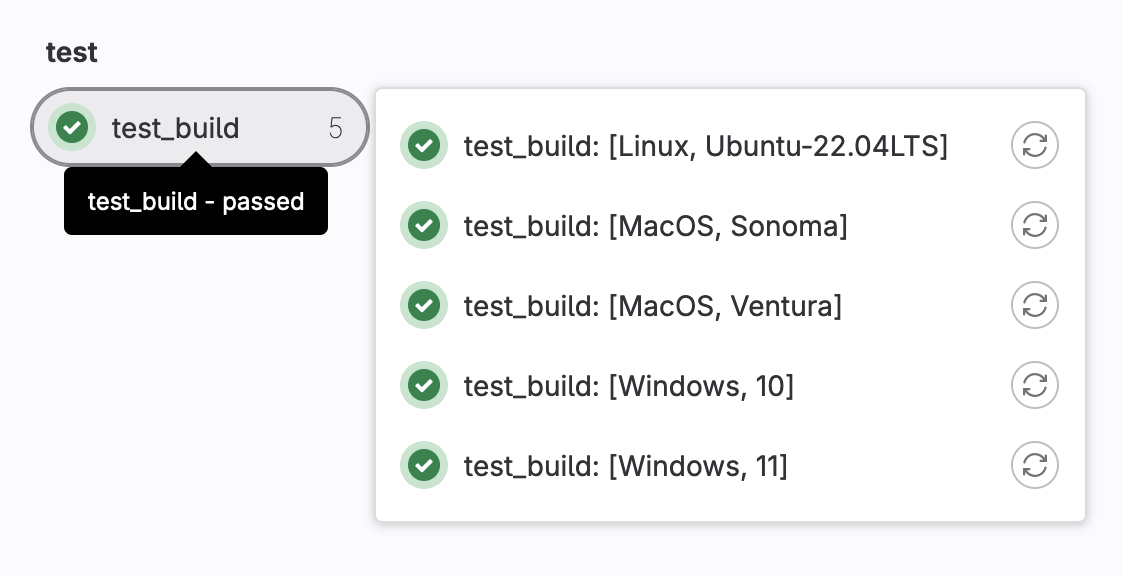
In order to make use of parallel:matrix let’s give a list of dictionaries that simulate a build running on Windows, Linux or MacOS.
test_build:

  script:
    - echo "My $my_os build"
  parallel:
    matrix:
      - my_os: [Windows, Linux, MacOS]
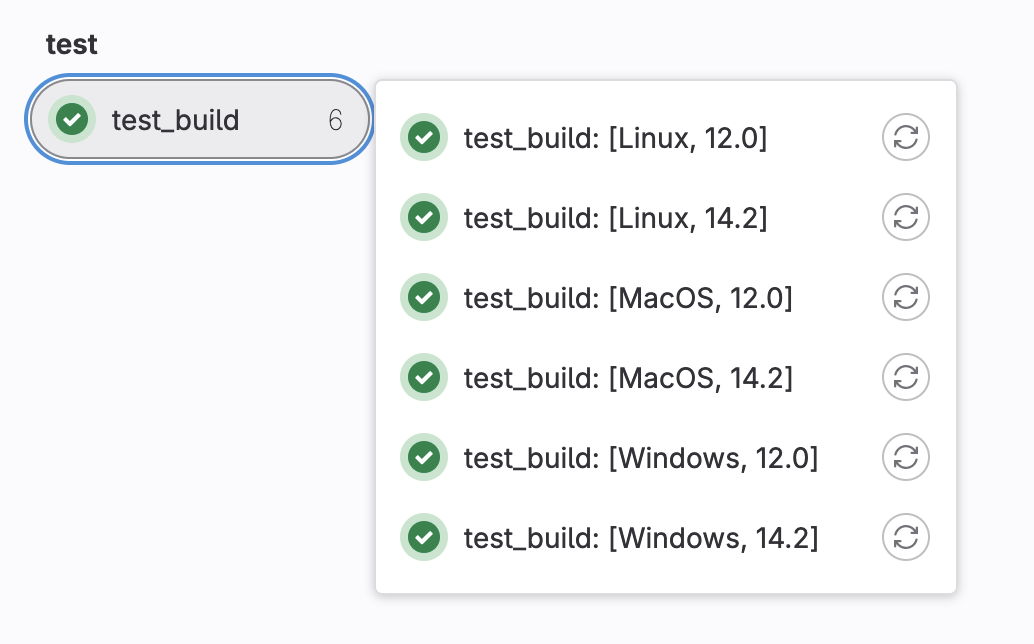
We can create multiple versions of the build by giving more options. Let’s add a version and give it a list of 2 numbers.
test_build:

  script:
    - echo "My $my_os build"
  parallel:
    matrix:
      - my_os: [Windows, Linux, MacOS]
        version: ["12.0", "14.2"]
If you want to specify different OS and version pairs, you can do that as well.
test_build:
  script:
    - echo "My $my_os build"
  parallel:
    matrix:
      - my_os: Windows
        version: ["10", "11"]
      - my_os: Linux
        version: "Ubuntu-22.04LTS"
      - my_os: MacOS
        version: ["Sonoma", "Ventura"]
Variables
You might have noticed that we use $my_os in the script above. If we take a look at one of the logs it shows that we have obtained the following output.
Executing "step_script" stage of the job script 00:00
$ # INFO: Lowering limit of file descriptors for backwards compatibility. ffi: https://cern.ch/gitlab-runners-limit-file-descriptors # collapsed multi-line command
$ echo "My $my_os build"
My MacOS build
Cleaning up project directory and file based variables 00:01
Job succeeded
What this means is that we can access the values from the variable my_os and do something with it! This is very handy, as you will see. Not only can we access values from the yml but we can create global variables that remain constant for the entire process.
Example
variables:
  global_var: "My global variable"

test_build:
  variables:
    my_local_var: "My local World"
  script:
    - echo "Hello $my_var"
    - echo "Hello $global_var"
    - echo "My $my_os build version $version"
  parallel:
    matrix:
      - my_os: Windows
        version: ["10", "11"]
      - my_os: Linux
        version: "Ubuntu-22.04LTS"
      - my_os: MacOS
        version: ["Sonoma", "Ventura"]
Mix it all up and write less code!
Let’s now mix the usage of parallel jobs and the fact that we can extract values from variables we defined. Let’s try implementing this with the config file we’ve been developing so far.
Remember what we have so far
hello_world:
  script:
    - echo "Hello World"

.template_build:
  before_script:
    - wget https://github.com/conda-forge/miniforge/releases/latest/download/Miniforge3-Linux-x86_64.sh -O ~/miniconda.sh
    - bash ~/miniconda.sh -b -p $HOME/miniconda
    - eval "$(~/miniconda/bin/conda shell.bash hook)"
    - conda init


build_skim:
  extends: .template_build
  script:
   - conda install root=6.28 --yes
   - COMPILER=$(root-config --cxx)
   - FLAGS=$(root-config --cflags --libs)
   - $COMPILER -g -O3 -Wall -Wextra -Wpedantic -o skim skim.cxx $FLAGS


build_skim_latest:
  extends: .template_build
  script:
   - conda install root --yes
   - COMPILER=$(root-config --cxx)
   - FLAGS=$(root-config --cflags --libs)
   - $COMPILER -g -O3 -Wall -Wextra -Wpedantic -o skim skim.cxx $FLAGS
  allow_failure: yes
Now let’s apply what we learned to refactor and reduce the code into a single job named multi_build.
hello_world:
  script:
    - echo "Hello World"

.template_build:
  before_script:
    - wget https://github.com/conda-forge/miniforge/releases/latest/download/Miniforge3-Linux-x86_64.sh -O ~/miniconda.sh
    - bash ~/miniconda.sh -b -p $HOME/miniconda
    - eval "$(~/miniconda/bin/conda shell.bash hook)"
    - conda init
    - conda install $ROOT_VERS --yes
    - COMPILER=$(root-config --cxx)
    - FLAGS=$(root-config --cflags --libs)
  script:
    - $COMPILER -g -O3 -Wall -Wextra -Wpedantic -o skim skim.cxx $FLAGS

multi_build:
  extends: .template_build
  parallel:
    matrix:
      - ROOT_VERS: ["root=6.28", "root"]
Note
- We have only defined a
ROOT_VERSlist, and we use this in thebefore_scriptsection to set up the installation of ROOT. After testing it we can see that this works and we’ve been able to reduce the amount of text a lot more.- We have dropped the
allow_failure: yesfor now because we’re feeling confident.- We have factored out the
before_scriptand thescriptinto our.build_template.
Key Points
Matrices can help make many builds with variations.
Use Variables whenever it’s convenient.
Building with Images
Overview
Teaching: 10 min
Exercises: 5 minQuestions
Can we use Docker images to ease our setup?
Objectives
Use Docker images.
Make reusable/flexible CI/CD jobs.
Say “Docker” 🐳
While we won’t be going into detail about containers (for that check our Docker lesson), we’ve been using them all this time with Gitlab. Gitlab runners are working within a barebones virtual environment that runs Linux, and is itself an image.
Naturally, we can leverage the fact that GitLab runners can run Docker to further simplify setting up the working environment. This is done using the image keyword. The input for image is the name of the image, including the registry path if needed, in one of these formats:
<image-name>(Same as using<image-name>with the latest tag)<image-name>:<tag><image-name>@<digest>
Here’s an example:
tests:
  image: $IMAGE
  script:
    - python3 --version
  parallel:
    matrix:
      - IMAGE: "python:3.7-buster"
      - IMAGE: "python:3.8-buster"
      - IMAGE: "python:3.9-buster"
      - IMAGE: "python:3.10-buster"
      - IMAGE: "python:3.11-buster"
#   You could also do
# - IMAGE: ["python:3.7-buster","python:3.8-buster","python:3.9-buster","python:3.10-buster","python:3.11-buster"]
Back to our CI file
Go to the ROOT Docker Hub page https://hub.docker.com/r/rootproject/root and choose a version any version you wish to try.
Let’s add image: $ROOT_IMAGE because we can still use parallel:matrix: to make various builds easily.
Since we’re going to use a docker image to have a working version of ROOT, we can omit the lines that install and set up conda and ROOT.
Again, taking the yml file we’ve been working on, we can further reduce the text using Docker images as follows.
hello_world:
  script:
    - echo "Hello World"

.template_build:
  before_script:
    - COMPILER=$(root-config --cxx)
    - FLAGS=$(root-config --cflags --libs)
  script:
    - $COMPILER -g -O3 -Wall -Wextra -Wpedantic -o skim skim.cxx $FLAGS

multi_build:
  extends: .template_build
  image: $ROOT_IMAGE
  parallel:
    matrix:
      - ROOT_IMAGE: ["rootproject/root:6.28.10-ubuntu22.04","rootproject/root:latest"]
Note
We used the
latestDocker image and anUbuntuimage in this particular example but the script remains the same regardless if you wish to use the conda build or an Ubuntu build of ROOT.Make sure your image works with the CI; not all images listed in the rootproject’s Docker Hub work 100% of the time.
Key Points
We can shorten a lot of the setup with Docker images.
Coffee break!
Overview
Teaching: 0 min
Exercises: 15 minQuestions
Get up, stretch out, take a short break.
Objectives
Refresh your mind.
Key Points
Stupid mistakes happen, but telling a computer to do what you mean versus what you say is hard.
All the World's a Stage
Overview
Teaching: 5 min
Exercises: 5 minQuestions
How do you make some jobs run after other jobs?
Objectives
Make multiple stages and run some jobs in serial.
Defining Stages
From the last session, we’re starting with
hello_world:
  script:
    - echo "Hello World"

.template_build:
  before_script:
    - COMPILER=$(root-config --cxx)
    - FLAGS=$(root-config --cflags --libs)
  script:
    - $COMPILER -g -O3 -Wall -Wextra -Wpedantic -o skim skim.cxx $FLAGS

multi_build:
  extends: .template_build
  image: $ROOT_IMAGE
  parallel:
    matrix:
      - ROOT_IMAGE: ["rootproject/root:6.28.10-ubuntu22.04", "rootproject/root:latest"]
We’re going to talk about another global parameter :stages (and the associated per-job parameter :job:stage. Stages allow us to group up parallel jobs, with each group running after the other in the order you define. What have our jobs looked like so far in the pipelines we’ve been running?
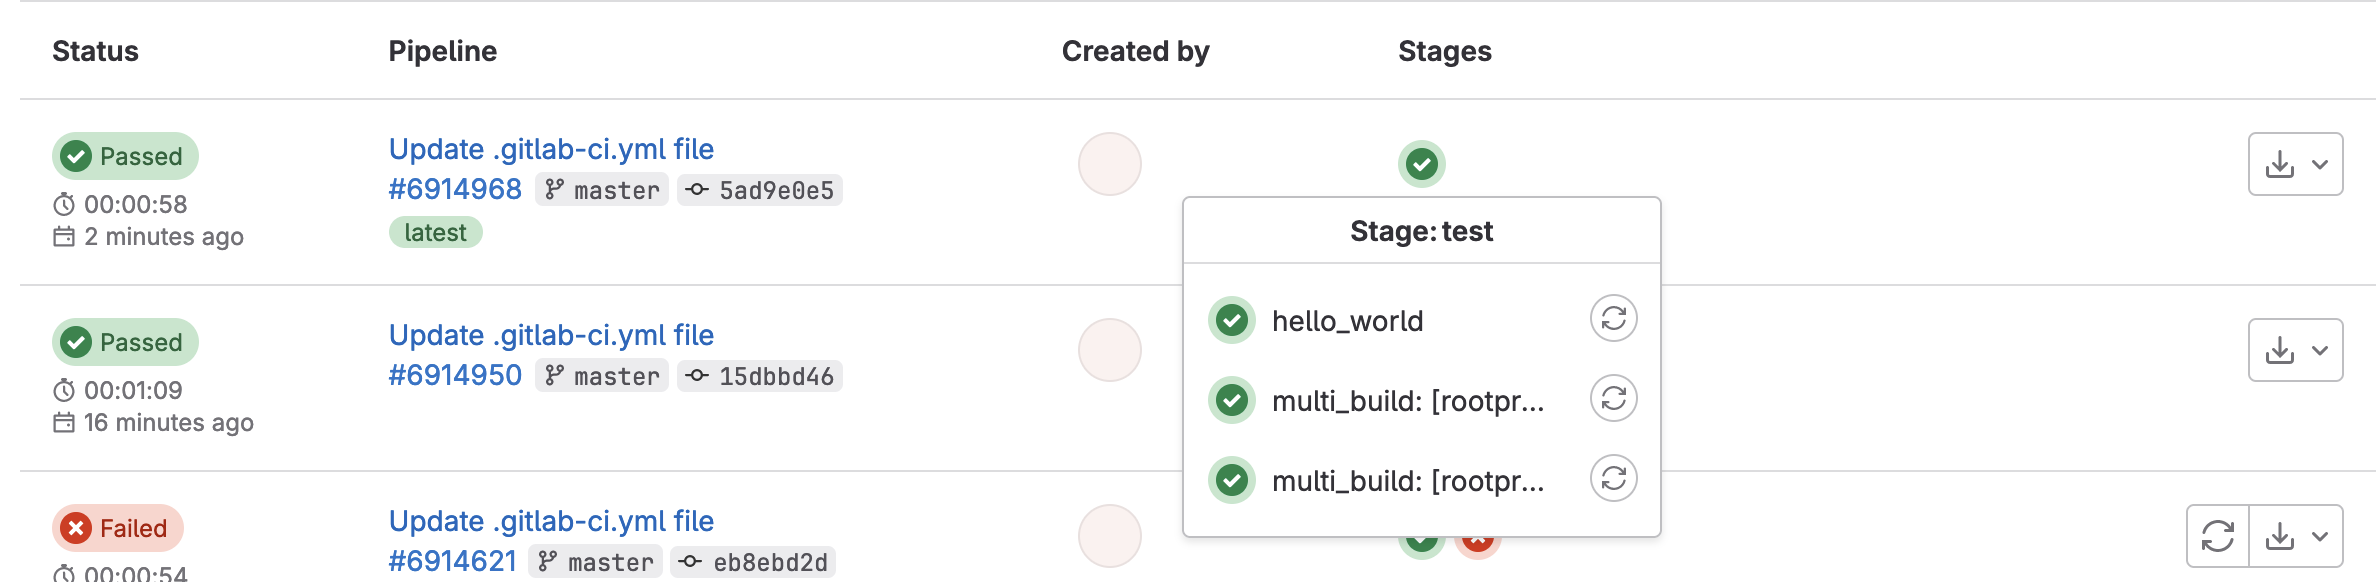
Default job stage
You’ll note that the default job stage is
test. Of course, for CI/CD, this is likely the most obvious choice.
Stages allow us to categorize jobs by functionality, such as build, test, or deploy – with job names being the next level of specification, such as test_cpp, build_current, build_latest, or deploy_pages. Remember that two jobs cannot have the same name (globally), no matter what stage they’re in. Like the other global parameter variables, we keep stages towards the top of our .gitlab-ci.yml file.
Adding Stages
Let’s add stages to your code. We will define two stages for now:
greetingandbuild. Don’t forget to assign those stages to the appropriate jobs.Solution
stages:
  - greeting
  - build

hello world:
  stage: greeting
  script:
   - echo "Hello World"

.template_build:
  stage: build
  before_script:
   - COMPILER=$(root-config --cxx)
   - FLAGS=$(root-config --cflags --libs)
  script:
   - $COMPILER -g -O3 -Wall -Wextra -Wpedantic -o skim skim.cxx $FLAGS

multi_build:
  extends: .template_build
  image: $ROOT_IMAGE
  parallel:
    matrix:
      - ROOT_IMAGE: ["rootproject/root:6.28.10-ubuntu22.04", "rootproject/root:latest"]
If you do it correctly, you should see a pipeline graph with two stages.
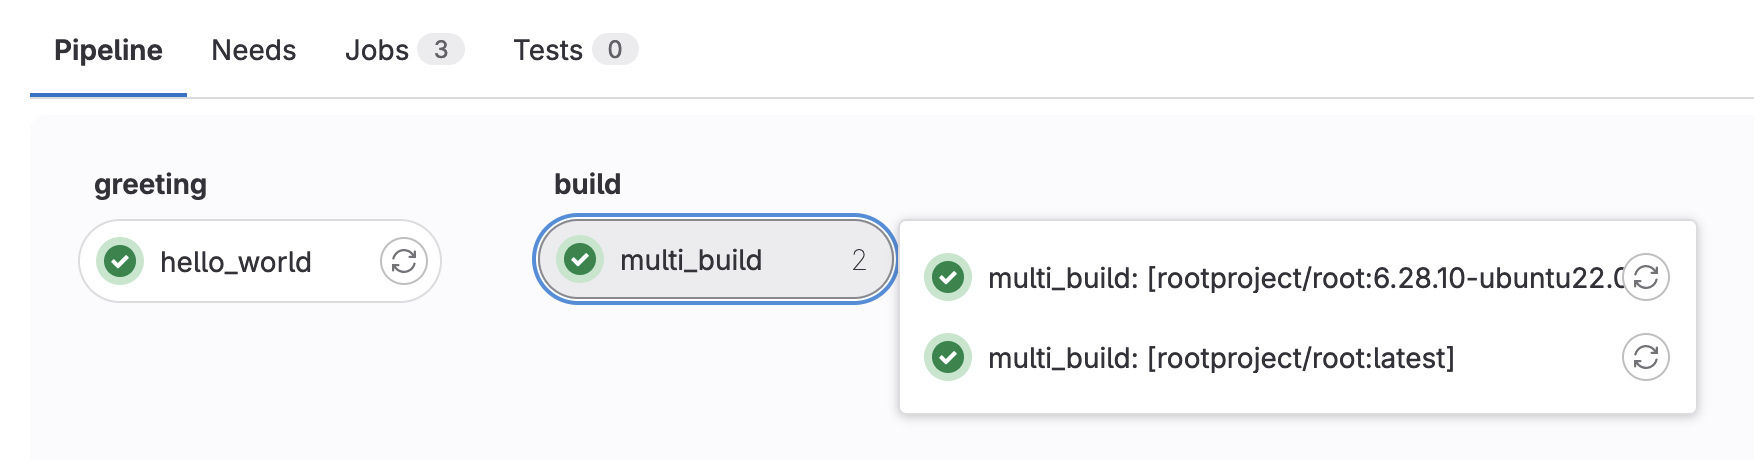
Now all jobs in greeting run first, before all jobs in build (as this is the order we’ve defined our stages). All jobs within a given stage run in parallel as well.
Default CI/CD stages
The default stages are
.prebuildtestdeploy.postWhen you define your own
stages, as we’ve done above by addinggreetingsandbuild, the.preand.poststages remain, while the others are overwritten. So, in our example above, the stages available are
.pregreetingsbuild.postBut, only the stages with jobs are used.
That’s it. There’s nothing more to stages apart from that! In fact, everything in terms of parallel/serial as well as job dependencies only make sense in the context of having multiple stages. In all the previous sessions, you’ve just been using the default test stage for all jobs; the jobs all ran in parallel.
Further Reading
Key Points
Stages allow for a mix of parallel/serial execution.
Stages help define job dependencies.
A Skimmer Higgs
Overview
Teaching: 5 min
Exercises: 10 minQuestions
How can I run my skimming code in the GitLab CI/CD?
Objectives
Learn how to skim code and set up artifacts.
The First Naive Attempt
Let’s just attempt to try and get the code working as it is. Since it worked for us already locally, surely the CI/CD must be able to run it??? As a reminder of what we ended with from the last session:
stages:
  - greeting
  - build

hello world:
  stage: greeting
  script:
   - echo "Hello World"

.template_build:
  stage: build
  before_script:
   - COMPILER=$(root-config --cxx)
   - FLAGS=$(root-config --cflags --libs)
  script:
   - $COMPILER -g -O3 -Wall -Wextra -Wpedantic -o skim skim.cxx $FLAGS

multi_build:
  extends: .template_build
  image: $ROOT_IMAGE
  parallel:
    matrix:
      - ROOT_IMAGE: ["rootproject/root:6.28.10-ubuntu22.04", "rootproject/root:latest"]
So we need to do two things:
- Add a
runstage - Add a
skim_ggHjob to this stage
Let’s go ahead and do that, so we now have three stages.
stages:
  - greeting
  - build
  - run
and we just need to figure out how to define a run job. Since the skim binary is built, just see if we can run skim. Seems too easy to be true?
skim_ggH:
  stage: run
  script:
    - ./skim
 $ ./skim
 /scripts-178677-36237303/step_script: line 154: ./skim: No such file or directory
We’re too naive
Ok, fine. That was way too easy. It seems we have a few issues to deal with.
- The code in the
multi_buildjobs (of thebuildstage) isn’t in theskim_ggHjob by default. We need to use GitLabartifactsto copy over this from one of the jobs (let’s choose as an example themulti_build: [rootproject/root:6.28.10-ubuntu22.04]job). - The data (ROOT file) isn’t available to the Runner yet.
Artifacts
artifacts is used to specify a list of files and directories that should be attached to the job when it succeeds, fails, or always. The artifacts will be sent to GitLab after the job finishes and will be available for download in the GitLab UI.
More Reading
Default Behavior
Artifacts from all previous stages are passed in by default.
Artifacts are the way to transfer files between jobs of different stages. In order to take advantage of this, one combines artifacts with dependencies.
Using Dependencies
To use this feature, define
dependenciesin the context of the job and pass a list of all previous jobs from which the artifacts should be downloaded. You can only define jobs from stages that are executed before the current one. An error will be shown if you define jobs from the current stage or the next ones. Defining an empty array will skip downloading any artifacts for that job. The status of the previous job is not considered when usingdependencies, so if it failed or is a manual job that was not run, no error occurs.
Don’t want to use dependencies?
Adding
dependencies: []will prevent downloading any artifacts into that job. Useful if you want to speed up jobs that don’t need the artifacts from previous stages!
Ok, so what can we define with artifacts?
artifacts:paths: wild-carding works (but not often suggested)artifacts:name: name of the archive when downloading from the UI (default:artifacts -> artifacts.zip)artifacts:untracked: boolean flag indicating whether to add all Git untracked files or notartifacts:when: when to upload artifacts;on_success(default),on_failure, oralwaysartifacts:expire_in: human-readable length of time (default:30 days) such as3 mins 14 secondsartifacts:reports(JUnit tests - expert-mode, will not cover)
Since the build artifacts don’t need to exist for more than a day, let’s add artifacts to our jobs in build that expire_in = 1 day.
Adding Artifacts
Let’s add
artifactsto our jobs to save theskimbinary. We’ll also make sure theskim_ggHjob has the rightdependenciesas well. In this case, the jobmulti_buildis actually running two parallel jobs: one for the ROOT version 6.28 and the other for the latest version of ROOT. So we have to make sure we specify the right dependency as"multi_build: [rootproject/root:6.28.10-ubuntu22.04]".Solution
...
...
.template_build:
  stage: build
  before_script:
   - COMPILER=$(root-config --cxx)
   - FLAGS=$(root-config --cflags --libs)
  script:
   - $COMPILER -g -O3 -Wall -Wextra -Wpedantic -o skim skim.cxx $FLAGS
  artifacts:
    paths:
      - skim
    expire_in: 1 day
...
...
skim_ggH:
  stage: run
  dependencies:
    - "multi_build: [rootproject/root:6.28.10-ubuntu22.04]"
  script:
    - ./skim
Ok, it looks like the CI failed because it couldn’t find the shared libraries. We should make sure we use the same image to build the skim as we use to run the skim.
Set The Right Image
Update the
skim_ggHjob to use the same image as themulti_buildjob.Solution
...
...
skim_ggH:
  stage: run
  dependencies:
    - "multi_build: [rootproject/root:6.28.10-ubuntu22.04]"
  image: rootproject/root:6.28.10-ubuntu22.04
  script:
    - ./skim
Getting Data
So now we’ve dealt with the first problem of getting the built code available to the skim_ggH job via artifacts and dependencies. Now we need to think about how to get the data in. We could:
wgetthe entire ROOT file every time.git committhe ROOT file into the repo.- ok, maybe not our repo, but another repo that you can add as a submodule so you don’t have to clone it every time.
- Fine, maybe we can make a smaller ROOT file.
- What? don’t we have time to cover that? ok, can we use
xrdcp? - Yes, I realize it’s a big ROOT file, but still…
Anyway, there are lots of options. For large (ROOT) files, it’s usually preferable to either.
- Stream the file event-by-event (or chunks of events at a time) and only process a small number of events.
- Download a small file that you process entirely.
The xrdcp option is going to be much easier to deal with in the long run, especially as the data file is on eos.
Updating the CI to point to the data file
Now, the data file we’re going to use via xrdcp is in a public eos space: /eos/root-eos/HiggsTauTauReduced/. Depending on which top-level eos space we’re located in, we have to use different xrootd servers to access files:
/eos/user -> eosuser.cern.ch/eos/atlas -> eosatlas.cern.ch/eos/group -> eosgroup.cern.ch/eos/root-eos -> eospublic.cern.ch
Note: the other eos spaces are NOT public
What files are in here?
By now, you should get the idea of how to explore eos spaces.
$ xrdfs eospublic.cern.ch ls /eos/root-eos/HiggsTauTauReduced/
/eos/root-eos/HiggsTauTauReduced/DYJetsToLL.root
/eos/root-eos/HiggsTauTauReduced/GluGluToHToTauTau.root
/eos/root-eos/HiggsTauTauReduced/Run2012B_TauPlusX.root
/eos/root-eos/HiggsTauTauReduced/Run2012C_TauPlusX.root
/eos/root-eos/HiggsTauTauReduced/TTbar.root
/eos/root-eos/HiggsTauTauReduced/VBF_HToTauTau.root
/eos/root-eos/HiggsTauTauReduced/W1JetsToLNu.root
/eos/root-eos/HiggsTauTauReduced/W2JetsToLNu.root
/eos/root-eos/HiggsTauTauReduced/W3JetsToLNu.root
- For those of you with CERN accounts, I’ve provided a file we should use in a CERN-restricted space here:
/eos/user/g/gstark/AwesomeWorkshopFeb2020/GluGluToHToTauTau.root. Therefore, the xrootd path we use isroot://eosuser.cern.ch//eos/user/g/gstark/AwesomeWorkshopFeb2020/GluGluToHToTauTau.root - For those of you without CERN accounts, we have provided a file we should use in a public space here:
/eos/root-eos/HiggsTauTauReduced/GluGluToHToTauTau.root. Therefore, the xrootd path we use isroot://eospublic.cern.ch//eos/root-eos/HiggsTauTauReduced/GluGluToHToTauTau.root.
Nicely enough, TFile::Open takes in, not only local paths (file://), but xrootd paths (root://) paths as well (also HTTP and others, but we won’t cover that). Since we’ve modified the code we can now pass in files:
script:
  - ./skim root://eosuser.cern.ch//eos/user/g/gstark/AwesomeWorkshopFeb2020/GluGluToHToTauTau.root skim_ggH.root 19.6 11467.0 0.1

# or (if you don't have CERN accounts)

script:
  - ./skim root://eospublic.cern.ch//eos/root-eos/HiggsTauTauReduced/GluGluToHToTauTau.root skim_ggH.root 19.6 11467.0 0.1
Get the output as an artifact
Finally, let’s retrieve the output as an artifact and have it expire in 1 week. (Remember that the output of this script is skim_ggH.root)
...
skim_ggH:
...
  script: [...]

  artifacts:
    paths:
      - skim_ggH.root
    expire_in: 1 week
How many events to run over?
For CI jobs, we want things to run fast and have a fast turnaround time. More especially since everyone at CERN shares a pool of runners for most CI jobs, so we should be courteous about the run time of our CI jobs. I generally suggest running over just enough events for you to be able to test what you want to test - whether cutflow or weights.
Let’s go ahead and commit those changes and see if the run job succeeded or not.
- If you use the file in a public space, your job will succeed.
- If you use the file in a CERN-restricted space, your job will fail with a similar error below:
$ ./skim root://eosuser.cern.ch//eos/user/g/gstark/AwesomeWorkshopFeb2020/GluGluToHToTauTau.root skim_ggH.root 19.6 11467.0 0.1
>>> Process input: root://eosuser.cern.ch//eos/user/g/gstark/AwesomeWorkshopFeb2020/GluGluToHToTauTau.root
Error in <TNetXNGFile::Open>: [ERROR] Server responded with an error: [3010] Unable to give access - user access restricted - unauthorized identity used ; Permission denied
Warning in <TTreeReader::SetEntryBase()>: There was an issue opening the last file associated to the TChain being processed.
Number of events: 0
Cross-section: 19.6
Integrated luminosity: 11467
Global scaling: 0.1
Error in <TNetXNGFile::Open>: [ERROR] Server responded with an error: [3010] Unable to give access - user access restricted - unauthorized identity used ; Permission denied
terminate called after throwing an instance of 'std::runtime_error'
  what():  GetBranchNames: error in opening the tree Events
/bin/bash: line 87:    13 Aborted                 (core dumped) ./skim root://eosuser.cern.ch//eos/user/g/gstark/AwesomeWorkshopFeb2020/GluGluToHToTauTau.root skim_ggH.root 19.6 11467.0 0.1
section_end:1581450227:build_script
ERROR: Job failed: exit code 1
Sigh. Another one. Ok, fine, you know what? Let’s just deal with this in the next session, ok?
Key Points
Making jobs aware of each other is pretty easy.
Artifacts are pretty neat.
We’re too naive.
Getting into the Spy Game (Optional)
Overview
Teaching: 5 min
Exercises: 10 minQuestions
How can I give my GitLab CI job private information?
Objectives
Add custom environment variables.
Learn how to give your CI/CD Runners access to private information.
Note that you need to follow the steps in this chapter only if you are trying to use the file in the CERN restricted space. If you used the file in a public space, you can skip to the next chapter.
So we’re nearly done with getting the merge request for the CI/CD up and running, but we need to deal with this error:
$ ./skim root://eosuser.cern.ch//eos/user/g/gstark/AwesomeWorkshopFeb2020/GluGluToHToTauTau.root skim_ggH.root 19.6 11467.0 0.1
>>> Process input: root://eosuser.cern.ch//eos/user/g/gstark/AwesomeWorkshopFeb2020/GluGluToHToTauTau.root
Error in <TNetXNGFile::Open>: [ERROR] Server responded with an error: [3010] Unable to give access - user access restricted - unauthorized identity used ; Permission denied
Warning in <TTreeReader::SetEntryBase()>: There was an issue opening the last file associated to the TChain being processed.
Number of events: 0
Cross-section: 19.6
Integrated luminosity: 11467
Global scaling: 0.1
Error in <TNetXNGFile::Open>: [ERROR] Server responded with an error: [3010] Unable to give access - user access restricted - unauthorized identity used ; Permission denied
terminate called after throwing an instance of 'std::runtime_error'
  what():  GetBranchNames: error in opening the tree Events
/bin/bash: line 87:    13 Aborted                 (core dumped) ./skim root://eosuser.cern.ch//eos/user/g/gstark/AwesomeWorkshopFeb2020/GluGluToHToTauTau.root skim_ggH.root 19.6 11467.0 0.1
section_end:1581450227:build_script
ERROR: Job failed: exit code 1
Access Control
So we need to give our CI/CD access to our data. This is actually a good thing. It means CMS can’t just grab it! Anyhow, this is pretty much done by executing printf $SERVICE_PASS | base64 -d | kinit $CERN_USER assuming that we’ve set the corresponding environment variables by safely encoding them (printf "hunter42" | base64).
Running examples with variables
Sometimes you’ll run into a code example here that you might want to run locally but relies on variables you might not have set? Sure, simply do the following
SERVICE_PASS=hunter42 CERN_USER=GoodWill printf $SERVICE_PASS | base64 -d | kinit $CERN_USER
Base-64 encoding?
Sometimes you have a string that contains certain characters that would be interpreted incorrectly by GitLab’s CI system. In order to protect against that, you can safely base-64 encode the string, store it, and then decode it as part of the CI job. This is entirely safe and recommended.
Service Account or Not?
When you’re dealing with a personal repository (project) that nobody else has administrative access to, e.g., the settings, then it’s ok to use your CERN account/password in the environment variables for the settings…
However, when you’re sharing or part of a group, it is much better to use a group’s service account or a user’s (maybe yours) service account for authentication instead. For this lesson however, we’ll be using your account and show pictures of how to set these environment variables.
How to make a service account?
Go to CERN Account Management -> Create New Account and click on the
Servicebutton, then clickNextand follow the steps.
Variables
There are two kinds of environment variables:
- predefined
- custom
Additionally, you can specify that the variable is a file type which is useful for passing in private keys to the CI/CD Runners. Variables can be added globally or per-job using the variables parameter.
Predefined Variables
There are quite a lot of predefined variables. We won’t cover these in depth but link for reference as they’re well-documented in the GitLab docs.
Custom Variables
Let’s go ahead and add some custom variables to fix up our access control.
- Navigate to the
Settings -> CI/CDof your repository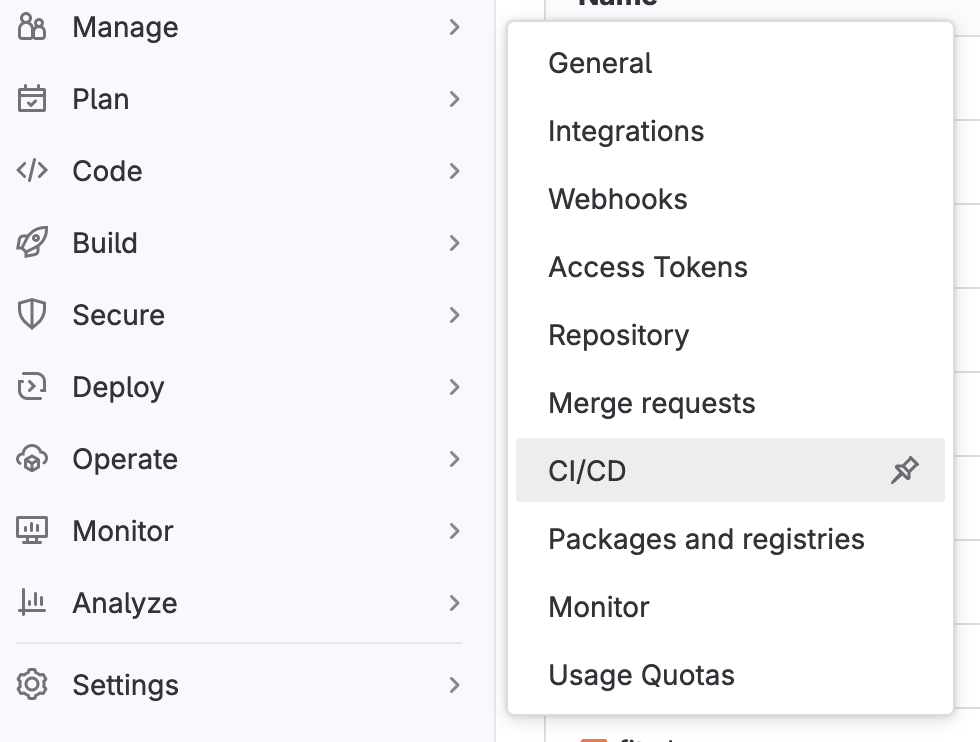
- Expand the
Variablessection on this page by clickingExpand
- Specify two environment variables,
SERVICE_PASSandCERN_USER, and fill them in appropriately. (If possible, mask the password).
Attention
- This means that we should add our
CERN_USERand ourSERVICE_PASSto the Gitlab Variables under the CI/CD section of the setting tab.- If your password is
hunter42then doprintf "hunter42" | base64 aHVudGVyNDI= # copy this as your SERVICE_PASS
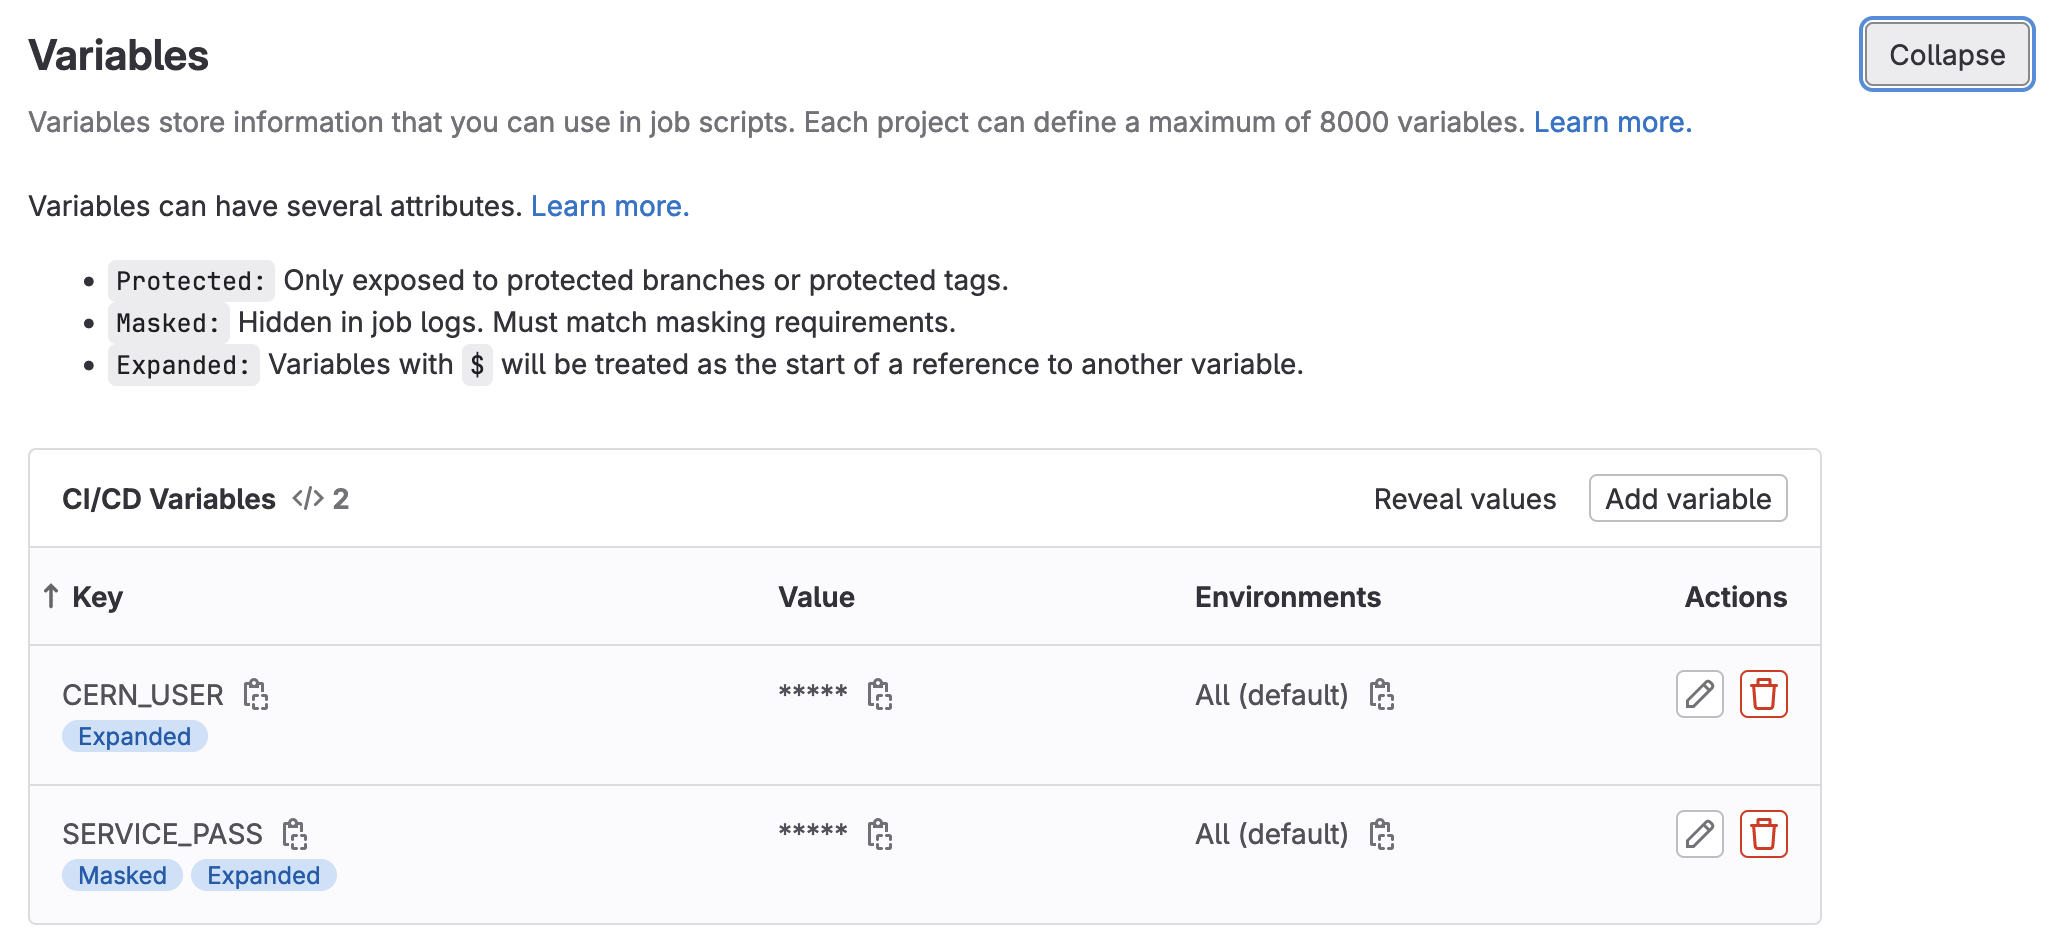
- Click to save the variables.
DON’T PEEK
DON’T PEEK AT YOUR FRIEND’S SCREEN WHILE DOING THIS.
Adding kinit for access control
Now it’s time to update your CI/CD to use the environment variables you defined by adding printf $SERVICE_PASS | base64 -d | kinit $CERN_USER@CERN.CH as part of the before_script to the skim_ggH job, as that’s the job that requires access.
At this point, it’s also important to note that we will need a root container which has kerberos tools installed. So just for this exercise we will switch to another Docker image, root:6.26.10-conda, which has those tools. In the rest of the chapters we use examples with files in public space, so you won’t need kerberos tools.
Adding Artifacts on Success
As it seems like we have a complete CI/CD that does physics, we should see what came out. We just need to add artifacts for the skim_ggH job. This is left as an exercise to you.
Adding Artifacts
Let’s add
artifactsto ourskim_ggHjob to save theskim_ggH.rootfile. Let’s have the artifacts expire in a week instead.Solution
stages:
- greeting
- build
- run

hello world:
  stage: greeting
  script:
    - echo "Hello World"

.template_build:
  stage: build
  before_script:
   - COMPILER=$(root-config --cxx)
   - FLAGS=$(root-config --cflags --libs)
  script:
   - $COMPILER -g -O3 -Wall -Wextra -Wpedantic -o skim skim.cxx $FLAGS
  artifacts:
    paths:
     - skim
    expire_in: 1 day

multi_build:
  extends: .template_build
  image: $ROOT_IMAGE
  parallel:
    matrix:
      - ROOT_IMAGE: ["rootproject/root:6.26.10-conda", "rootproject/root:latest"]

skim_ggH:
  stage: run
  dependencies:
    - "multi_build: [rootproject/root:6.26.10-conda]"
  image: rootproject/root:6.26.10-conda
  before_script:
    - printf $SERVICE_PASS | base64 -d | kinit $CERN_USER@CERN.CH
  script:
    - ./skim root://eosuser.cern.ch//eos/user/g/gstark/AwesomeWorkshopFeb2020/GluGluToHToTauTau.root skim_ggH.root 19.6 11467.0 0.1
  artifacts:
    paths:
      - skim_ggH.root
    expire_in: 1 week
And this allows us to download artifacts from the successfully run job.
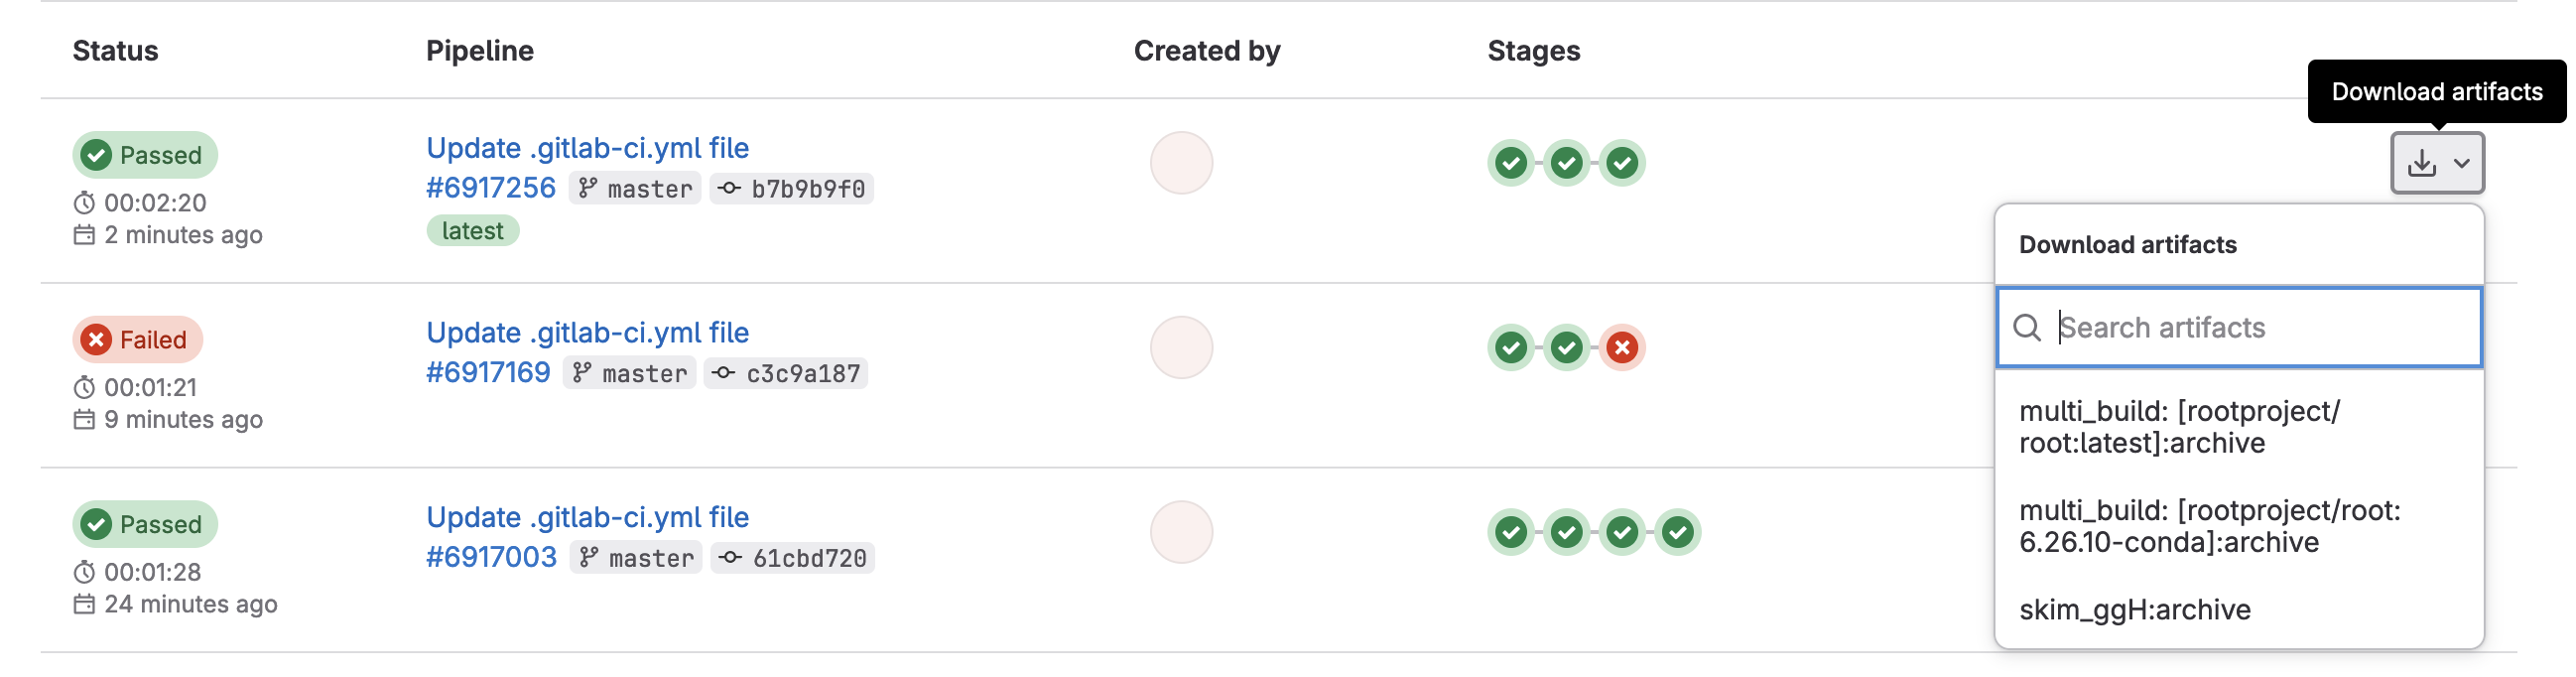
or if you click through to a skim_ggH job, you can browse the artifacts

which should just be the skim_ggH.root file you just made.
Further Reading
Key Points
Service accounts provide an extra layer of security between the outside world and your account.
Environment variables in GitLab CI/CD allow you to hide protected information from others who can see your code.
Making Plots to Take Over The World
Overview
Teaching: 5 min
Exercises: 10 minQuestions
How do we make plots?
Objectives
Use everything you learned to make plots!
On Your Own
So, in order to make plots, we just need to take the skimmed file skim_ggH.root and pass it through the histograms.py code that exists. This can be run with the following code.
python histograms.py skim_ggH.root ggH hist_ggH.root
This needs to be added to your .gitlab-ci.yml which should look like the following:
stages:
  - greeting
  - build
  - run

hello world:
  stage: greeting
  script:
   - echo "Hello World"

.template_build:
  stage: build
  before_script:
   - COMPILER=$(root-config --cxx)
   - FLAGS=$(root-config --cflags --libs)
  script:
   - $COMPILER -g -O3 -Wall -Wextra -Wpedantic -o skim skim.cxx $FLAGS
  artifacts:
    paths:
      - skim
    expire_in: 1 day

multi_build:
  extends: .template_build
  image: $ROOT_IMAGE
  parallel:
    matrix:
      - ROOT_IMAGE: ["rootproject/root:6.28.10-ubuntu22.04", "rootproject/root:latest"]

skim_ggH:
  stage: run
  dependencies:
    - "multi_build: [rootproject/root:6.28.10-ubuntu22.04]"
  image: rootproject/root:6.28.10-ubuntu22.04
  script:
    - ./skim root://eospublic.cern.ch//eos/root-eos/HiggsTauTauReduced/GluGluToHToTauTau.root skim_ggH.root 19.6 11467.0 0.1
  artifacts:
    paths:
      - skim_ggH.root
    expire_in: 1 week
Adding Artifacts
So we need to do a few things:
- Add a
plotstage- Add a
plot_ggHjob- Save the output
hist_ggH.rootas an artifact (expires in 1 week)You know what? While you’re at it, why not delete the
greetingstage andhello_worldjob too? There’s no need for it anymore 🙂.Solution
stages:
  - build
  - run
  - plot
...
...
...
plot_ggH:
  stage: plot
  dependencies:
    - skim_ggH
  image: rootproject/root:6.28.10-ubuntu22.04
  script:
    - python histograms.py skim_ggH.root ggH hist_ggH.root
  artifacts:
    paths:
      - hist_ggH.root
    expire_in: 1 week
Once we’re done, we should probably start thinking about how to test some of these outputs we’ve made. We now have a skimmed ggH ROOT file and a file of histograms of the skimmed ggH.
Are we testing anything?
Integration testing is actually testing that the scripts we have still run. So we are constantly testing as we go here, which is nice. Additionally, there’s also continuous deployment because we’ve been making artifacts that are passed to other jobs. There are many ways to deploy the results of the code base, such as pushing to a web server, putting files on EOS from the CI jobs, and so on. Artifacts are one way to deploy.
Key Points
Another script, another job, another stage, another artifact.
Let's Actually Make A Test (For Real)
Overview
Teaching: 5 min
Exercises: 20 minQuestions
I’m out of questions.
I’ve been here too long. Mr. Stark, I don’t feel too good.
Objectives
Actually add a test on the output of running physics.
So at this point, I’m going to be very hands-off and just explain what you will be doing. Here’s where you should be starting from:
stages:
  - build
  - run
  - plot

.template_build:
  stage: build
  before_script:
   - COMPILER=$(root-config --cxx)
   - FLAGS=$(root-config --cflags --libs)
  script:
   - $COMPILER -g -O3 -Wall -Wextra -Wpedantic -o skim skim.cxx $FLAGS
  artifacts:
    paths:
      - skim
    expire_in: 1 day

multi_build:
  extends: .template_build
  image: $ROOT_IMAGE
  parallel:
    matrix:
      - ROOT_IMAGE: ["rootproject/root:6.28.10-ubuntu22.04", "rootproject/root:latest"]

skim_ggH:
  stage: run
  dependencies:
    - build_skim
  image: rootproject/root:6.28.10-ubuntu22.04
  script:
    - ./skim root://eospublic.cern.ch//eos/root-eos/HiggsTauTauReduced/GluGluToHToTauTau.root skim_ggH.root 19.6 11467.0 0.1
  artifacts:
    paths:
      - skim_ggH.root
      - skim_ggH.log
    expire_in: 1 week

plot_ggH:
  stage: plot
  dependencies:
    - skim_ggH
  image: rootproject/root:6.28.10-ubuntu22.04
  script:
    - python histograms.py skim_ggH.root ggH hist_ggH.root
  artifacts:
    paths:
      - hist_ggH.root
    expire_in: 1 week
Adding a regression test
- Add a
teststage after theplotstage.- Add a test job,
test_ggH, part of theteststage, and has the rightdependencies.
- Note:
./skimneeds to be updated to produce askim_ggH.log(hint:./skim .... > skim_ggH.log).- We also need the
hist_ggH.rootfile produced by the plot job.- Create a directory called
tests/and make two Python files in it namedtest_cutflow_ggH.pyandtest_plot_ggH.pythat usePyROOTandpython3.
- You might find the following lines (below) helpful to set up the tests.
- Write a few different tests of your choosing that test (and assert) something about
hist_ggH.root. Some ideas are:
- Check the structure (does
ggH_pt_1exist?).- Check that the integral of a histogram matches a value you expect.
- Check that the bins of a histogram match the values you expect.
- Update your
test_ggHjob to execute the regression tests.- Try causing your CI/CD to fail on the
test_ggHjob.Done?
Once you’re happy with setting up the regression test, mark your merge request as ready by clicking the
Resolve WIP Statusbutton, and then merge it into master.
Template for test_cutflow_ggH.py
import sys

logfile = open('skim_ggH.log', 'r')
lines = [line.rstrip() for line in logfile]

required_lines = [
   'Number of events: 47696',
   'Cross-section: 19.6',
   'Integrated luminosity: 11467',
   'Global scaling: 0.1',
   'Passes trigger: pass=3402       all=47696      -- eff=7.13 % cumulative eff=7.13 %',
   'nMuon > 0 : pass=3402       all=3402       -- eff=100.00 % cumulative eff=7.13 %',
   'nTau > 0  : pass=3401       all=3402       -- eff=99.97 % cumulative eff=7.13 %',
   'Event has good taus: pass=846        all=3401       -- eff=24.88 % cumulative eff=1.77 %',
   'Event has good muons: pass=813        all=846        -- eff=96.10 % cumulative eff=1.70 %',
   'Valid muon in selected pair: pass=813        all=813        -- eff=100.00 % cumulative eff=1.70 %',
   'Valid tau in selected pair: pass=813        all=813        -- eff=100.00 % cumulative eff=1.70 %',
]

print('\n'.join(lines))
for required_line in required_lines:
    if not required_line in lines:
        print(f'Did not find line in log file. {required_line}')
        sys.exit(1)
Template for test_plot_ggH.py
import sys
import ROOT

f = ROOT.TFile.Open('hist_ggH.root')
keys = [k.GetName() for k in f.GetListOfKeys()]

required_keys = ['ggH_pt_1', 'ggH_pt_2']

print('\n'.join(keys))
for required_key in required_keys:
    if not required_key in keys:
        print(f'Required key not found. {required_key}')
        sys.exit(1)

integral = f.ggH_pt_1.Integral()
if abs(integral - 222.88716647028923) > 0.0001:
    print(f'Integral of ggH_pt_1 is different: {integral}')
    sys.exit(1)
Key Points
This kind of test is a regression test, as we’re testing assuming the code up to this point was correct.
This is not a unit test. Unit tests would be testing individual pieces of the
atlas/athenaorCMSSWcode-base, or specific functionality you wrote into your algorithms.
Homework
Overview
Teaching: 0 min
Exercises: 30 minQuestions
Objectives
Add more testing, perhaps to statistics.
Like the last section, I will simply explain what you need to do. After the previous section, you should have the following in .gitlab-ci.yml:
stages:
  - build
  - run
  - plot
  - test

.template_build:
  stage: build
  before_script:
   - COMPILER=$(root-config --cxx)
   - FLAGS=$(root-config --cflags --libs)
  script:
   - $COMPILER -g -O3 -Wall -Wextra -Wpedantic -o skim skim.cxx $FLAGS
  artifacts:
    paths:
      - skim
    expire_in: 1 day

multi_build:
  extends: .template_build
  image: $ROOT_IMAGE
  parallel:
    matrix:
      - ROOT_IMAGE: ["rootproject/root:6.28.10-ubuntu22.04", "rootproject/root:latest"]

skim_ggH:
  stage: run
  dependencies:
    - "multi_build: [rootproject/root:6.28.10-ubuntu22.04]"
  image: rootproject/root:6.28.10-ubuntu22.04
  script:
    - ./skim root://eospublic.cern.ch//eos/root-eos/HiggsTauTauReduced/GluGluToHToTauTau.root skim_ggH.root 19.6 11467.0 0.1 > skim_ggH.log
  artifacts:
    paths:
      - skim_ggH.root
      - skim_ggH.log
    expire_in: 1 week

plot_ggH:
  stage: plot
  dependencies:
    - skim_ggH
  image: rootproject/root:6.28.10-ubuntu22.04
  script:
    - python histograms.py skim_ggH.root ggH hist_ggH.root
  artifacts:
    paths:
      - hist_ggH.root
    expire_in: 1 week

test_ggH:
  stage: test
  dependencies:
    - skim_ggH
    - plot_ggH
  image: rootproject/root:6.28.10-ubuntu22.04
  script:
    - python tests/test_cutflow_ggH.py
    - python tests/test_plot_ggH.py
In your virtual-pipelines-eventselection repository, you need to:
- Add more tests for physics.
- Go wild!
Key Points
Use everything you’ve learned to write your own CI/CD!