Introduction
Overview
Teaching: 0 min
Exercises: 0 minQuestions
What is SSH?
How does SSH encrypt traffic?
What’s a private/public key?
Objectives
Understanding asymmetric cryptography
Secure Shell (SSH) is a protocol to access other computers. It was invented in 1995 to make the old methods more secure but, on first glance, it still behaves similar to remote shell or telnet from the eighties: you can connect to a remote computer to enter commands in a terminal. In the simplest case, you will just type the name of the computer you want to connect to:
ssh username@servername.domain
However, SSH has become much more powerful than this if you know how to use it correctly. In the following, we will try to go through all the helpful features you should know when working remotely.
But first we need to talk a bit about security, especially encryption.
Asymmetric Encryption
One cornerstone technology of the current internet is asymmetric cryptography, or public-key cryptography. We all use it constantly without caring about it when browsing the web, but it’s also important for the efficient usage of SSH, so we need to go through some key features of it.
The idea behind asymmetric encryption is to have two distinct, different keys for encryption. One key can encrypt the message and then only the other key can decrypt the message. In practice, we will keep one of these keys private and publish the other.
As an example, let’s say we have two people, Alice and Bob, where Alice owns the private key and Bob has the public key. Then, with this key pair, they can perform two things:
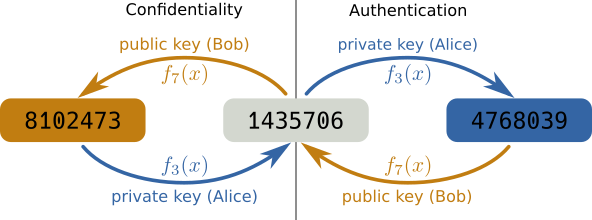
Confidentiality
- Bob can send confidential information only intended for Alice by encrypting it with the public key. Only Alice has the private key to decrypt it and nobody else can see the content of the message (left side of the figure).
Authentication
- To establish the identity of Alice, Bob gives Alice a message to encrypt with her private key. Bob can then decrypt it with his public key to be sure he talks to Alice as only she would have been able to encrypt the message (right side of the figure).
- This is the one you are using almost everywhere in the internet: every https connection on the internet uses this principle to make sure that the server claiming to be “netflix.com” is actually the real Netflix server. And this is also what we use for SSH connections.
Following this example, consider a string of numbers from 1435706. Now for
encryption, we could just “add” a value to each of these digits and take the
modulus by 10 to get another digit, \(f_{k}(x) = (x + k) \bmod 10\)
Now, if we choose as keys \(A=3\) and \(B=7\), then we can “encrypt” the
message by applying \(f_A(x)\) on each digit to get the encrypted message,
4768039. And we can decrypt it again by applying \(f_B(x)\) to get the
original message, 1435706. This also works by first applying \(f_B(x)\)
and then \(f_A(x)\).
So, if we encrypt a message with one key, we need to use the other key to decrypt the message again and vice versa. Now, this example is obviously way too simple but it is actually rather close to the RSA algorithm still used today.
Warning: Private means private!
While the public key can be shared freely, it is critical that the private key remains private. If someone gains access to your private key they can impersonate you in the digital world and get access to a lot of your resources.
Key Points
asymmetric cryptography has two keys, a private and a public key.
it can be used to establish the identity of the owner of the private key.
the private key should be kept as safe as possible.
Basics
Overview
Teaching: 0 min
Exercises: 0 minQuestions
How do I connect to a server with ssh?
How can I debug if there’s a problem connecting with ssh?
Objectives
Connect to a server via ssh.
Copy files from your local computer to the host server.
Copy files from your host server to your local computer.
Now back to SSH: When we connect to a server using SSH, it will use the same method of asymmetric encryption to establish the identity of the server. When you connect for the first time, SSH will ask you if you know this computer. If you type for the first time
ssh <username>@<servername>
(again, replace <username> for your collaboration username and <servername> for your collaboration servername), you
should see something like
The authenticity of host 'bastion.desy.de (131.169.5.82)' can't be established.
RSA key fingerprint is SHA256:WbkI/Ko+FdCbIAVn6ky2odyWxCvCL3+5XqWSZQ6PynE.
Are you sure you want to continue connecting (yes/no)?
This means that ssh doesn’t have the public key of the servername, bastion.desy.de (in this case), which is called the “host key”. Therefore, it warns that it cannot be sure you connected to the right server. It’s usually fine to just say yes; it will only ask you the first time and remember this decision. After you enter yes, you will get a message like
Warning: Permanently added 'bastion.desy.de' (RSA) to the list of known hosts.
which is perfectly normal. In the next step, the server will ask you for your password and after that, you should see a command line prompt and are now connected.
Once you are connected, the next important step is to disconnect. To do so, just type
exit and press return (enter), and your connection will be closed. If you’re very
impatient you can also press Ctrl-D as a shortcut.
Warning: Long running jobs
Don’t run long-running and CPU or memory heavy jobs on login nodes like the one you just used. Login nodes are shared resources for all users and it’s not very polite and, mostly, it is also not permitted to occupy them with calculations that could be done on dedicated machines. You probably have access to batch systems to submit resource intensive jobs!
Exercise
Login to your desired server and verify that the login succeeded with the
hostnamecommand and log out again.
One final thing about host keys
After you connected to a server, ssh remembers the host key and will verify it on each connection. So you might see something like this:
@@@@@@@@@@@@@@@@@@@@@@@@@@@@@@@@@@@@@@@@@@@@@@@@@@@@@@@@@@@
@    WARNING: REMOTE HOST IDENTIFICATION HAS CHANGED!     @
@@@@@@@@@@@@@@@@@@@@@@@@@@@@@@@@@@@@@@@@@@@@@@@@@@@@@@@@@@@
IT IS POSSIBLE THAT SOMEONE IS DOING SOMETHING NASTY!
Someone could be eavesdropping on you right now (man-in-the-middle attack)!
It is also possible that a host key has just been changed.
The fingerprint for the RSA key sent by the remote host is
SHA256:zyIMwlji8jqtD+UuSFuknQmevQPAUCiT39BfH/NrIbA.
Please contact your system administrator.
This means the host presented a different key than it used to. This can sometimes happen if the server you want to connect to was reinstalled. If you know that the server was reinstalled or upgraded, you can tell ssh to forget the previous host key by running
ssh-keygen -R <servername>
Copying Files
In addition to just connecting to a remote shell we can also ssh to copy files
from one computer to another. Very similar to the cp command, there is a
scp command, for a “Secure Copy”. To specify a file on a server just precede
the filename with the ssh connection string followed by a colon. For example:
scp desyusername@bastion.desy.de:/etc/motd bastion-message
This will copy the file /etc/motd into the current directory on your local computer as bastion-message. In the same way,
scp bastion-message desyusername@bastion.desy.de:~/
will copy the file bastion-message from your local directory into your home
directory on the server bastion.desy.de.
Exercise
Copy a file from your local computer to your server’s home directory
Hint
You can use the
touchcommand to create an empty file to copy.
Exercise
Copy a file from your server’s home directory to you local directory.
Exercise
Copy a full directory with all files at once either from your local computer to the server or from the server to your local computer.
Hint
Try
man scporscp --helpto get to know about scp flags that may be of use.Solution
Supply
-rto scp to recursively copy the full directory.However, for more efficient copying of large amount of files you should consider using
rsync
Debugging
If you run into trouble in one of the following sections, it can be very
instructive to switch on debugging output to get to know possible issues, by using the -v flag of ssh:
ssh -v <username>@<servername>
Once you have created a configuration file (next section) it can also sometimes
be helpful to disable it to rule out this source of error. This can be done
by using the -F option to specify a blank config file:
ssh -F /dev/null <username>@<servername>
Key Points
simple connection to a server is just done by
ssh username@servername
scpcan be used to copy files from and to remote computersssh uses host keys to ensure the identity of the server you connect to
Nested SSH Connections (Optional)
Overview
Teaching: 0 min
Exercises: 0 minQuestions
How can I connect to a host machine if I cannot access it directly?
Objectives
Jump to another host machine within a ssh connection.
You can use ssh inside a ssh connection to “jump” from machine to machine.
This sometimes is necessary as not all computers can be connected to directly
from the internet. For example, the login node for the KEK computing center
cannot be accessed directly if your are not in the KEK network or using a VPN. The
KEK network is rather complex so a very simplified layout is shown in
:numref:fig:keknetwork.
.. _fig:keknetwork:
.. figure:: keknetwork.png :align: center
Very simplified layout of the KEK network.
Note
It is possible for your home institute to get direct access to a KEK network so you might not be affected by this restriction while at work.
So, unless you are using VPN or are at KEK, you most likely need to connect to the
gateway servers first, either sshcc1.kek.jp or sshcc2.kek.jp
ssh username@sshcc1.kek.jp
Warning
Your username on KEKCC is not necessarily the same as your DESY username.
and once this connection is established you can login to KEKCC from this gateway server.
ssh username@login.cc.kek.jp
Warnings
- This second step needs to be done in the terminal connected to the gateway server
- The initial password for
login.cc.kek.jpis not the same as that ofsshcc1.kek.jp.
Now, you should be connected to KEKCC but you needed to enter two commands. And trying to copy files from KEKCC to your home machine becomes very complicated as you would have copy them in multiple steps as well so, this is clearly not yet the optimal solution.
Key Points
You can jump between hosts by executing ssh within a ssh connection
The config file!
Overview
Teaching: 0 min
Exercises: 0 minQuestions
How can I avoid typing long SSH commands?
How can I automatically hop via an intermediate server?
How can I set and remember advanced settings?
Objectives
Write your first SSH config file!
Now you can connect to a server but, if your username or the server name
is long, you will have to type all of this every time you want to connect. Luckily, we can
automate this using the SSH configuration file, .ssh/config, in your home
directory. Usually, this file doesn’t exist but you can simply create an empty
file with that name.
The syntax of the configuration file is very simple. It’s just the name of a configuration option followed by it’s value. For example, to send periodic status updates which might help keep connections from disconnecting we can simply write the following in the file:
# try to keep the connection alive, this avoids connection timeouts
ServerAliveInterval 60But, more importantly, we can also define “hosts” to connect to and settings that should only apply for these hosts. For example:
Host desy
    User YOUR_DESY_USERNAME
Hostname bastion.desy.deThis now allows us to just execute ssh desy and the correct username and
full hostname are taken from the configuration file.
This will also work withscp so, now you can just use the shorter version of the previous exercise in Basics
to - let’s say - copy a file from the login server
scp <hostname>:/etc/mtod bastion-message
where <hostname> is whatever name you gave to the server configuration in the config file.
In the case for DESY users, this now also allows us to automate the login to KEKCC via the gateway server
Host kekcc
    User YOUR_KEKCC_USERNAME
    Hostname login.cc.kek.jp
    Compression yes
    # Don't connect directly but rather via the gateway server
    ProxyJump sshcc1.kek.jp

Host sshcc1.kek.jp
User YOUR_SSHLOGIN_USERNAMEThe line containing ProxyJump tells ssh to not directly connect to the host
but first connect to the gateway host and then connect to it from there. We could make
this more complicated if needed by also adding a ProxyJump to the gateway server
configuration if we need to perform even more jumps.
You should now be able to
login to KEKCC by just typing ssh kekcc and also copy files directly with
scp. But you will have to enter your password two times: once, when
connecting to the gateway server and then, when connecting to the KEKCC machine.
In case of
ProxyJumptroubleThe
ProxyJumpdirective was introduced in OpenSSH 7.3. If you get an error messageBad configuration option: proxyjump, please check if you can update your SSH client.While we definitely recommend you to get an up-to-date system that can use the newer version, a quick workaround is to replace the
ProxyJumpline with the following (usingProxyCommand):ProxyCommand ssh hostname -W %h:%pWhere
hostnameshould be the server you jump through, sosshcc1.kek.jpin this example.
Exercise
Add a working server configuration to your config file and verify that you can log into it.
Hint
You can take the above snippet to create the config file. Make sure to replace your own usernames and servers.
Debugging
When debugging, it can sometimes be helpful to disable the config file
to rule it out as a source of error. This can be done
by using the -F option to specify a blank config file:
sh -F /dev/null <username>@<servername>
Key Points
SSH configuration file is in
.ssh/config.The configuration file allows us to automate and configure ssh.
We can define short names to connect to servers.
We can automate jumping between hosts.
We can disable a config file for debugging.
Key based authentication!
Overview
Teaching: 0 min
Exercises: 0 minQuestions
How can I avoid typing very long passwords while still ensuring strong security?
Objectives
Generate an SSH key and use it
As you have seen there is a lot of entering your password, especially when jumping between hosts. Time to take care of that. When we explained asymmetric encryption, we mentioned that SSH can use it to authenticate you to a server. This is usually safer and more convenient than using the password directly.
Note
Key based login doesn’t work to all servers. The most notable exception for us is DESY as they have a different security system called kerberos which is incompatible with key-based login. However, for DESY, one can obtain a
kerberos token <https://confluence.desy.de/x/173UBw>_ instead which will have almost the same effect.
Creating a key pair
First, we need to create a private/public key pair to be used for SSH, called an
identity. We want to do this on your local machine just by calling ssh-keygen. Without any options this will just
create a private/public key pair we can use but, you might at least give it a
comment string so that you can identify the key easier. For example, -C will provide a comment to your key.
ssh-keygen -C "Alice's Laptop"
After executing this command, it will prompt you for a file name. By default, it should offer
.ssh/id_rsa in your home directory. If you do not already have a key,
just choose this. This will then be your default ssh identity and, if you happen to have another one in the same directory, it will be used
by default. Otherwise, you can choose any filename you like and you can create as
many keys as you want, but then, you will have to manually tell ssh which one to use.
It is advisable to put them in the .ssh directory but in theory you can put them
anywhere.
Warning!
If you already have a key in your
.sshdirectory this might overwrite the existing key and cause problems on existing logins. Only overwrite the existing key if you are sure you don’t need the old one.
Next, it will ask you for a passphrase to protect the key. While technically you can create keys without a passphrase, you should never do so as it would make it easier for others to get access to your key. This passphrase is not related to your account passwords and doesn’t need to be changed, but you should choose something safe, preferably a sequence of random words. Don’t worry, you don’t have to type it all the time. After that it should just print some information on the key and, with that, you have created your very own SSH identity.
Question
Where is the public key stored?
Hint
Check the output of
ssh-keygenSolution
In a file with the same name as the private key but
.pubin the end.
Question (optional)
The default key type is to use “rsa”. What types are possible for a key?
Hint
Try
man ssh-keygenor, for more information, google “ssh key types”.Solution
There should be RSA, DSA, ECDSA and Ed25519. However, DSA has been found unsafe and there are some concerns about ECDSA so, the only real options are RSA and Ed25519. Ed25519 was added later and should be more secure but it is not supported on very old versions of SSH.
Using your new key
Now that you have a key, let’s tell ssh to use it. If you chose the default name, ssh
will offer it to the remote server automatically. If you did not, or have other keys in the same directory,
you need to tell ssh which identity to use with the -i flag each time you run it. But, again, the best way
to do this is to add the key to the configuration file. You can even tell ssh to not try to
use the password at all but just the listed keys. For example:
Host sshcc1.kek.jp
    User YOUR_SSHLOGIN_USERNAME
    IdentityFile ~/.ssh/id_kekccgateway
IdentitiesOnly yesBut if the remote server doesn’t know your identity, it will reject it. So we
need to give the public key to the remote server. This is very simple, all
private keys you want to be able to log into a server should have their public
keys in .ssh/authorized_keys on the server; just the contents of the
.pub files, one after another. And, there is a program available to create
this file. We just have to call it for each server we want to be able to login
with this key.
ssh-copy-id -i ~/.ssh/id_rsa <hostname1>
Hint
If you created the key in a different file you need to change the filename given with the
-iparameters. You can also omit the-i <identity>option and ssh-copy-id will copy all public keys it can find.
Once that is done, you should be able to login to the server with only the key password. You should only be asked to enter the passphrase once or maybe not at all if you already used the key recently, since, on most machines, ssh will automatically remember the passphrase during the session.
Hint
If ssh does ask you for your passphrase every time you might need to check or configure your
ssh-agent, the process that remembers the keys. Start the ssh-agent in the background:bash eval "$(ssh-agent -s)"Now, add your private key to the ssh-agentbash ssh-add ~/path/to/key
You need to repeat these steps for all machines you work from, so your laptop and your workstation, if you have both. Each machine you “own” should have its own private/public key pair and these should be known to the servers you want to log into.
Making keys available on other machines
Finally, you usually don’t want to have private keys present on systems you don’t really have control over for security reasons. But, even more important, that would require us to keep track of too many key pairs. Usually, we avoid having keys on servers like KEKCC. But sometimes, especially when using git, you might need or want keys to be available on these machines as well.
The best thing to do here is “Agent forwarding”: You tell ssh “please make the
keys I have on this machine available while I connect to another machine”. This is
done very easily, either by adding -A to the ssh call or by adding
ForwardAgent Yes to the configuration file, either globally or on a per
host basis.
Now, after connecting, you should be able to use your keys as if you were working
on your local machine. You can also inspect the keys available: ssh keeps
identities in an “authentication agent” for easy use. They are usually added the
first time they are used and then kept during the session. You can inspect and
modify this list of keys with the command ssh-add.
Note for OSX users
On MacOSX you need to add the following lines to the configuration file to enable agent forwarding:
UseKeychain yes
AddKeysToAgent yes
(see this note for technical details)
Key Points
ssh-keygencan be used to create private/public key pairs for authentication
ssh-copy-idcan be used to copy the public key to the server to enable login via the private keywhich keys to use for which server can be configured in the configuration file
Agent forwarding can be used to make your local private keys available on the server you connect.
ssh-addallows you to add, list or remove identities from the agent
Kerberos-based login
Overview
Teaching: 0 min
Exercises: 0 minQuestions
How do I get a krb5 ticket?
How do I make my ssh config file use the krb5 ticket?
Objectives
To be added…
Key Points
To be added…
Port forwarding
Overview
Teaching: 0 min
Exercises: 0 minQuestions
How can I connect to Jupyter notebook running on the server?
How can I connect to a website tunnelling to a server?
Objectives
Forward ports
One of the last topics we need to discuss is the ability of SSH to do port forwarding. For this we first need to quickly explain what a port is: In computer networks you need two things to connect to a computer, it’s address and a port number. The address identifies which machine to talk to and the port number is just a simple number between 1 and 65535 to identify the service or program to talk to.
Which service uses which port number is not fully fixed so in theory we could run anything on any given port number but that would make the internet very complicated. So there is a set of “well known” port numbers which are used by default. For example, ssh uses port 22 by default and when browsing the web the https connections are on port 443 while the older, un-encrypted http is on port 80.
Now sometimes you might want to have a connection other than ssh to a machine
like the KEKCC login node that is not reachable. For example to reach a
web server like http://bweb3.cc.kek.jp that is only reachable inside the kek
network we need to connect to port 80 on the machine bweb3.cc.kek.jp
ssh can help us do that: we can instruct it to make something like a tunnel and route all the network traffic through its encrypted channel. The most common case for this is called local port forwarding: ssh creates opens port on the local machine and forwards all requests to connect to this one to another machine on the other end of the ssh connection. So getting back to the example:
ssh -L 8080:bweb3.cc.kek.jp:80 kekcc
This will open a connection to kekcc and the local port 8080. Any connection to
this port is then forwarded to bweb3.cc.kek.jp on port 80. So now to connect
to bweb3 we can open our local web browser and enter http://localhost:8080
and we should see it open the correct webpage.
Note that the 8080 in the local side can be chosen freely but only one program can open a port at any given time and you can only use ports above 1024 unless you have administrator privileges. 8080 is a “typical” port used for forwardings and is usually free. But any number is fine.
Question
How would the command look like if I want to open https://software.belle2.org via a connection to
bastion.desy.de? What do I need to type in my web browser?Hint
Make sure to choose the correct port
Solution
We need to run
ssh -L 8080:software.belle2.org:443 desyand then typehttps://localhost:8080in the browser.
Programs that open ports on the target machine
One special case is running programs on the other side that directly open a port
on the machine you’re working on for you to connect. The most prominent example
in our field are Jupyter notebooks <https://jupyter.org/>_ which offer a very
nice python interface via web browser.
Warning
Opening a port is not user specific but opens the port visible to all users on the network. So whenever you open a port to listen to connections you should make sure it cannot be misused. Jupyter does this for you with passwords or token strings so you don’t need to worry in this specific case.
Weblogins
Some organizations like DESY offer direct weblogins (e.g. for desy) for Jupyter notebooks so you might have an easier solution at your fingertips.
Now you can tell jupyter notebooks which port to use but this time we run it on the KEKCC computers and there might be other users there so it can be a bit tricky to find an open port number. This means you should not just use “8080”. You should pick a random number between 1025 and 65535 for yourself.
Now we can connect to kekcc and forward this port number to the same number on the connected host. In this example we’ll keep 8080 but you should really pick your own number.
ssh -L 8080:localhost:8080 kekcc
In this case localhost means “whatever is called the local machine on the
remote side of the connection”. Once that is done we can try to start a jupyter
notebook on kekcc
source /cvmfs/belle.cern.ch/tools/b2setup release-05-00-01
jupyter notebook --port=8080 --no-browser
This should print a bit of information including a bit at the end that looks like this:
Or copy and paste one of these URLs:
  http://localhost:8080/?token=...
Now you just need to make sure that the number is the same as you chose. If that
is not the case then the port you chose is already occupied and you need to stop
the notebook (press Ctrl-C), disconnect ssh and try with a different number.
If it is the same number you’re all good and you can just copy-paste the full
link (including the characters after token=) into your web browser and you
should see a notebook interface open up.
Key Points
each network connection consists of a host and a port number
port forwarding allows to connect to other services via ssh
ssh -L localport:remotehost:remoteport serverwill forward all connections tolocalporton the local machine to whatever is calledremotehostat portremoteportonserverthis allows to open jupyter notebooks on kekcc or other computing centers
Additional tips & tricks
Overview
Teaching: 0 min
Exercises: 0 minQuestions
Objectives
Use
rsyncto copy large/many filesUse tmux to keep your sessions alive and for tiling your terminal.
By now you hopefully know all the things necessary to comfortably work with ssh and configure it to your liking. There are a few more things that can make working with ssh even more comfortable so we just collect them here for people interested in this.
rsync for file transfers
Very often one might want to synchronize a folder from a server with a local
machine. You already downloaded most of it but now you created a few new plots
and running scp -r would copy everything again unless you really specify
just the new files.
There is a program to solve exactly this problem called rsync. By default it
works on folders and will only transmit what is necessary. The most common use
case is
rsync -vaz server:/folder/ localfolder
which will efficiently copy everything in folder on server and put it in
the directory localfolder (beware, it matters whether or not you put a slash
at the end of the target)/ The most common options are
| Option | Explanation |
|---|---|
-v |
verbose mode, print file names as they are copied |
-a |
archive mode, copy everything recursively and preserve file times and permissions |
-z |
compress data while transmitting it |
-n |
Only show which files would be copied instead of copying. Useful to check everything works as expected before starting a big copy |
--exclude |
exclude the given files from copying, useful for logfiles you might not need |
--delete |
delete everything in localfolder that is not in the source folder on the server. This is great to keep an exact copy but can be dangerous as files created locally might get lost |
So to create an exact copy of a directory but excluding the logs subdirectory we could use
rsync -vaz --exclude=logs --delete server:/folder/ localfolder
Editing files over SSH
There are multiple ways to show files on a system connected to by ssh as if they were local files. For example
- there is
sshfswhich lets you connect the files on a remote machine via the command line. Once it’s installed you can just runsshfs [user@]hostname:[directory] mountpoint. There even is a windows version. - on Linux when using Gnome in the file browser there is a “+ Other locations”
in left pane at the bottom. This should bring up a “Connect to Server” field
where you can enter any ssh host in the form
ssh://username@host/folderand gnome will let you see the files on that host. Seehere <https://help.gnome.org/users/gnome-help/stable/nautilus-connect.html.en>_ for more information but this works similar in other desktop environments. - In addition many editors or development environments have their own support to
work on a remote machine via ssh. There is a
guide on confluence <https://confluence.desy.de/x/XGJ8Cg>_ explaining the setup for some of them.
SSH multiplexing
ssh allows us to have multiple sessions over the same connection: You connect once and all subsequent connections go over the same connection. This can speed up connection times and also reduces password prompts if key based authentication doesn’t work. All we have to do is put the following in the configuration file
ControlMaster auto
ControlPath ~/.ssh/%r@%h:%p.control
ControlPersist 30m
And when connecting ssh will automatically create a control path that can be used by other connections and will keep the connection alive for 30m after we closed the last ssh session.
This also allows to add port forwards to an existing connection: once you are
connected to a server you can run ssh -fNL localport:remotehost:remoteport
server locally in a different terminal to add a port forwarding.
If you really want to close the connection to a server you will have to run
ssh -O exit server and ssh will close the channel completely.
sshuttle for advanced forwarding
There is an additional tool called sshuttle. You can only run it on machines where you have administration privileges but then it allows to use ssh to transparently connect your whole laptop to the network. This is then basically identical to a VPN connection.
Using a terminal multiplexer (e.g. tmux, screen)
When you loose your ssh connection or your terminal window is closed, all processes that had been running in that terminal are also killed. This can be frustrating if it is a long-running process such compilation or a dataset download.
To avoid this you can use a terminal multiplexer program such as GNU screen or the newer and more feature-rich tmux. Both are pre-installed on KEKCC and NAF.
Hint
For computational jobs like processing a steering file, use a batch submission system instead (see :ref:
this warning <batch system recommendation warning>).
These programs create one or multiple new terminal sessions within your terminal, and these sessions run independently of the original terminal, even if it exits. You just have to re-connect and re-attach the old screen or tmux session. A terminal multiplexer allows for example to
-
Start a process (e.g. a download or compilation) on your work computer, log out (which detaches the session) go home and from your home desktop / notebook re-attach the session and check how your process is doing.
-
Having multiple interactive shells in parallel on a remote host, without needing to open multiple terminals and connecting from each one separately. Think of it like having multiple remote “tabs”. Tmux can also act as a terminal window manager and arrange them side-by-side. This can be useful e.g. for running a process in one pane and monitoring the processor load via htop
If you don’t know either programs yet: learn how to use (the newer) tmux. Check out the official getting started guide from its wiki or one of the various googable online guides such as this one. And I also recommend keeping a cheat sheet in your bookmarks. The commands that you need for the most basic use-case are
tmux new-session: Creates and attaches a new tmux session. This is also the default behaviour when just entering thetmux. However, thenew-sessionsubcommand allows for additional options such as naming sessions (seetmux new-session --help).tmux kill-sessionKills the current tmux session. Use this when you finish your work and don’t require your session anymore, it is a polite thing to do on shared resources like login nodes.tmux detachDetaches the current tmux session, so that you return your original terminal session, but the tmux session keeps running in the background. This happens automatically when you loose your connection or your terminal is closed.tmux attach. Short form:tmux a. Attaches a running but detached tmux session. When you log into a cluster like KEKCC or NAF to attach your previous tmux session, make sure are on exactly the same host as the one in which you started the initial tmux session.
All these commands take optional arguments to be able to handle multiple sessions and there are many more useful tmux commands than those listed here, for example if you want to have multiple windows (tmux “tabs”) and panes in a tmux. To see those, check out the documentation links above, where you will also find keyboard shortcuts for most of them.
Key Points
There’s a lot to be discovered!