Introduction
Overview
Teaching: 15 min
Exercises: 0 minQuestions
What is a GPU?
What role do GPUs play in machine learning?
Which machine learning libraries support GPUs?
Why should I use a GPU for my ML code?
Objectives
Discuss the differences between CPUs and GPUs.
Provide examples of Python machine learning libraries that support GPUs.
What is a GPU?
A processor core is an individual processor within a Central Processing Unit (CPU). This core is the computer chip inside the CPU that performs calculations. Today nearly all computers have multi-core processors, which means that their CPU contains more than one core. This increases the performance of the CPU because it can do more calculations. Confusingly, the terms processor and core often get used interchangeably.
Graphics Processing Units (GPUs) are specialised processors that contain many cores. They were originally designed to render graphics but these days they’re used for other things as well. Although CPUs can have multiple cores they don’t have nearly as many as a GPU. Typically GPUs will have 1000s of small cores on a single processor. The differences between CPUs and GPUs are summarised in this table.
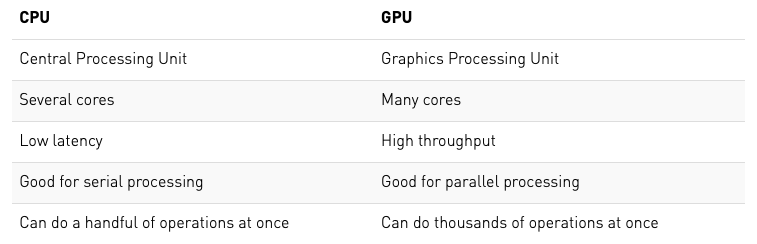
It’s important to note that just because GPUs have more cores than CPUs they are not universally better. There is a trade-off between increasing the number of cores and the flexibility of what they can be used for. GPU cores are smaller and more specialised than the cores on a CPU, this means that they are better for specific applications, but cannot be optimised or used efficiently in as many ways as CPUs.
In particular GPUs are very efficient for performing highly parallel matrix multiplication, because this is an important application for graphics rendering.
CUDA vs. OpenCL
The Compute Unified Device Architecture (CUDA) is a parallel computing platform developed by NVIDIA that enables software to jointly use both the CPU and GPU. OpenCL is an alternative and more general parallel computing platform developed by Apple that allows software to access not only CPU and GPU simultaneously, but also FPGAs and other DSPs. Both CUDA and OpenCL are compatible with Python and allow the user to implement highly parallel processes on a GPU without needing to explicitly specify the parallelisation, i.e. they do the optimisation for you.
AMD vs. NVIDIA
While both AMD and NVIDIA are major vendors of GPUs, NVIDIA is currently the most common GPU vendor for machine learning and cloud computing. Most GPU-enabled Python libraries will only work with NVIDIA GPUs.
Different types of GPU
This is a comparison of some of the most widely used NVIDIA GPUs in terms of their core numbers and memory. There are of course other differences between these GPUs (including price!) which may lead to a specific type being chosen for a particular computing centre or application, but they are all suitable for AI.
| GPU | No. Cores | Memory |
|---|---|---|
| K40 | 2880 | 12GB |
| K80 | 4992 | 24GB |
| V100 | 5120 | 16 or 32GB |
| P100 | 3584 | 16GB |
| T4 | 2560 | 16GB |
Which Python machine learning libraries support GPUs?
All of the major deep learning Python libraries support the use of GPUs and allow users to distribute their code over multiple GPUs.
| Package | GPU | Multi-GPU |
|---|---|---|
| Tensorflow | ✓ | ✓ |
| PyTorch | ✓ | ✓ |
| Keras | ✓ | ✓ |
| Caffe | ✓ | ✓ |
An important ML Python library that you may notice is missing from this list is Scikit-Learn. Scikit-learn does not support GPU processing at the moment and there are currently no plans to implement support in the near future. Why is this? Well, GPU support is primarily used for neural networks and deep learning, neither of which are key elements of the Scikit-learn library.
Why should I use a GPU for my ML code?
The matrix operations that GPus are optimised for are exactly what happens in the training step for building a deep learning model. In a neural network, the process of multiplying input data by weights can be formulated as a matrix operation and as your network grows to include 10s of millions of parameters it also becomes a pretty big one. Having many cores available to perform this matrix multiplication in parallel means that the GPU can quickly outperform a CPU in this case.
However, if you’re not using a neural network as your machine learning model you may find that a GPU doesn’t improve the computation time. It’s the large matrix multiplications required for neural networks that really make GPUs useful. Likewise if you are using a neural network but its very small then again a GPU will not be any faster than a CPU - in fact it might even be slower.
Using PyTorch with a GPU
In the Introduction to Machine Learning lesson a neural network was created using PyTorch to classify particle physics events. In this lesson we will build on that neural network in order to demonstrate how it can be implemented on GPU and discuss some of the more general peculiarities specific to training neural networks on GPU.
Key Points
GPUs are great for highly-parallel processing.
CPUs are more flexible than GPUs.
GPUs are most useful for neural network applications in machine learning.
Is a GPU available?
Overview
Teaching: 5 min
Exercises: 15 minQuestions
How do I find out if a GPU is available?
How can I determine the specifications of the GPU?
How do I select to use the GPU?
Objectives
Use Python to list available GPUs.
Identify the characteristics of the available GPU.
Select a GPU in PyTorch.
In this section we will introduce GPUs and explain how they are different to CPUs. We will discuss the properties of different GPUs and explain how to select a particular GPU for the PyTorch example in this lesson.
Find out if a GPU is available
The first thing you need to know when you’re thinking of using a GPU is whether there is actually one available. There are many ways of checking this in Python depending on which libraries you are intending to use with your GPU. The GPUtil library available for pip installation provides simple methods to check. For example:
import GPUtil
GPUtil.getAvailable()
will return a list of available GPUs. However, many libraries also have built in functionality to check whether a GPU compatible with that library is available. For PyTorch this can be done using:
import torch
use_cuda = torch.cuda.is_available()
This command will return a boolean (True/False) letting you know if a GPU is available.
Find out the specifications of the GPU(s)
There are a wide variety of GPUs available these days, so it’s often useful to check the specifications of the GPU(s) that are available to you. For example, the following lines of code will tell you (i) which version of CUDA the GPU(s) support, (ii) how many GPUs there are available, (iii) for a specific GPU (here 0) what kind of GPU it is, and (iv) how much memory it has available in total.
if use_cuda:
    print('__CUDNN VERSION:', torch.backends.cudnn.version())
    print('__Number CUDA Devices:', torch.cuda.device_count())
    print('__CUDA Device Name:',torch.cuda.get_device_name(0))
    print('__CUDA Device Total Memory [GB]:',torch.cuda.get_device_properties(0).total_memory/1e9)
Challenge
Find out if a GPU is available for your PyTorch code and, if so, what its specifications are.
Solution
use_cuda = torch.cuda.is_available()
if use_cuda:
    print('__CUDNN VERSION:', torch.backends.cudnn.version())
    print('__Number CUDA Devices:', torch.cuda.device_count())
    print('__CUDA Device Name:',torch.cuda.get_device_name(0))
    print('__CUDA Device Total Memory [GB]:',torch.cuda.get_device_properties(0).total_memory/1e9)
CPU Equivalent
If you want to do the same for your CPU from Python you can find out what it is using:
import platform
platform.processor()
Selecting a GPU to use
In PyTorch, you can use the use_cuda flag to specify which device you want to use. For example:
device = torch.device("cuda" if use_cuda else "cpu")
print("Device: ",device)
will set the device to the GPU if one is available and to the CPU if there isn’t a GPU available. This means that you don’t need to hard code changes into your code to use one or the other. If there are multiple GPUs available then you can specify a particular GPU using its index, e.g.
device = torch.device("cuda:2" if use_cuda else "cpu")
Challenge
Update your code to select GPU 0.
Solution
device = torch.device("cuda:0" if use_cuda else "cpu")
print("Device: ",device)
Key Points
A GPU needs to be available in order for you to use it.
Not all GPUs are the same.
Using the GPU
Overview
Teaching: 5 min
Exercises: 15 minQuestions
How do I send my data to the GPU?
How do I train my model on the GPU?
Objectives
Learn how to move data between the CPU and the GPU.
Be able to identify common errors when moving data.
Once you have selected which device you want PyTorch to use then you can specify which parts of the computation are done on that device. Everything will run on the CPU as standard, so this is really about deciding which parts of the code you want to send to the GPU. For a neural network, training a model is typically the most computationally expensive part of your code and so that’s where GPUs are normally utilised. To run a training loop in this way requires that two things are passed to the GPU: (i) the model itself and (ii) the training data.
Sending the model to the GPU
In order to train a model on the GPU it is first necessary to send the model itself to the GPU. This is necessary because the trainable parameters of the model need to be on the GPU so that they can be applied and updated in each forward-backward pass. In PyTorch sending the model to the GPU is very simple:
model = model.to(device=device)
You can also do this when you initialise your model. For the example from the ML tutorial this would look like:
model = Classifier_MLP(in_dim=input_size, hidden_dim=hidden_size, out_dim=num_classes).to(device=device)
Older PyTorch versions
In older PyTorch versions, sending things to the GPU was specified in a less flexible way. Instead of using the
.to(device=device)syntax, one used.cuda()to send things to the GPU and.cpu()to send things to the CPU. Although this is deprecated it will still work with more recent versions of PyTorch, and is often seen in older tutorials.
Sending the data to the GPU
The second requirement for running the training loop on the GPU is to move the training data. This can be done in exactly the same way as for the model, i.e.
x_train, y_train = x_train.to(device), y_train.to(device)
Due to the memory limitations of GPUs compared with CPUs, the data should be moved in mini-batches, i.e. you shouldn’t send your whole training data set to the GPU at the beginning of your code. Instead you should only send the data within a single batch iteratively during the training.
Challenge
Adapt the training loop from the ML tutorial to use the GPU.
Solution
model = model.to(device)
for batch, (x_train, y_train) in enumerate(train_loader):

        x_train, y_train = x_train.to(device), y_train.to(device)

        model.zero_grad()
        pred, prob = model(x_train)

        acc = (prob.argmax(dim=-1) == y_train).to(torch.float32).mean()
        train_accs.append(acc.mean().item())

        loss = F.cross_entropy(pred, y_train)
        train_loss.append(loss.item())

        loss.backward()
        optimizer.step()
Common Errors
Remember that if your model is on the GPU then the data in your validation loop will also need to be sent to the GPU. Otherwise you will see an error that looks like this:
RuntimeError: Expected object of device type cuda but got device type cpu
Using the DataLoader Class with the GPU
If you are using the PyTorch DataLoader() class to load your data in each training loop then there are some keyword arguments you can set to speed up the data loading on the GPU. These should be passed to the class when you set up the data loader.
kwargs = {'num_workers': 1, 'pin_memory': True} if use_cuda else {}
train_loader = torch.utils.data.DataLoader(train_data, batch_size=batch_size, shuffle=True, **kwargs)
Pinned memory is used as a staging area for data transfers between the CPU and the GPU. By setting pin_memory=True when we initialise the data loader we are directly allocating space in pinned memory. This avoids the time cost of transferring data from the host to the pinned (non-pageable) staging area every time we move the data onto the GPU later in the code. You can read more about pinned memory on the nvidia blog.
GPU/CPU data mis-matches
Remember that once you have sent a particular set of data to the GPU, if you want to perform a calculation on those data using the CPU then you will need to move it back again. One of the most common errors you will see when using a GPU is a mismatch between the locations of different data being used in a function. This is what we saw above when the validation data were not moved onto the GPU.
In PyTorch you can find out which device your tensor data are on at different points in the code by using the device property:
print(x_train.device)
Challenge
Check which device the probability output from your model is held on. Do the same with the calculated loss.
Solution
for batch, (x_train, y_train) in enumerate(train_loader):

        x_train, y_train = x_train.to(device), y_train.to(device)

        model.zero_grad()
        pred, prob = model(x_train)
        print(prob.device)

        acc = (prob.argmax(dim=-1) == y_train).to(torch.float32).mean()
        train_accs.append(acc.mean().item())

        loss = F.cross_entropy(pred, y_train)
        train_loss.append(loss.item())
        print(loss.device)

        loss.backward()
        optimizer.step()
You should see that both the outputs from the model and the calculated loss are still on the GPU. If you want to use these values on the CPU you will need to use (e.g.)
prob = prob.to('cpu')
loss = loss.to('cpu')
Key Points
Both the model and the data must be moved onto the GPU for training.
Data should be moved onto the GPU in batches.
Comfort break!
Overview
Teaching: 0 min
Exercises: 15 minQuestions
Get up, stretch out, take a short break.
Objectives
Refresh your mind.
Key Points
You’ll be back.
Squirrels may mock you.
Run time comparisons
Overview
Teaching: 5 min
Exercises: 15 minQuestions
Will the ML performance of my model improve when I use the GPU?
Will the computational performance of my model improve when I use the GPU?
Objectives
Calculate the run time of GPU-enabled model training.
Perform a run-time comparison between CPU and GPU training.
In this lesson we will consider different ways of measuring performance and draw comparisons between training a model on the CPU and training it on the GPU.
Model performance
Just as in the Introduction to Machine Learning lesson you can evaluate the performance of your network using a variety of metrics. For example using
from sklearn.metrics import classification_report

print (classification_report(y_test, y_pred, target_names=["background", "signal"]))
However, remember that if you have made your predictions using the model on the GPU then you will need to move the prediction from your network y_pred off the GPU and onto the CPU before using the classification_report() function.
Challenge
Check the performance of the model you trained on the GPU and compare it to the same model trained on the CPU.
Solution
You shouldn’t see any difference in the performance of the two models.
Computational performance
Although there are different ways to evaluate the computational performance of your code, for the purpose of this tutorial the main metric that you’re probably interested in is run time. Training machine learning models can take a really long time and speeding this process up makes life much easier.
Calculating run time
An easy way to determine the run time for a particular section of code is to use the Python time library.
import time
mytime = time.time()
print(mytime)
The time.time() function returns the time in seconds since January 1, 1970, 00:00:00 (UTC). By itself it’s not always super useful, but for wrapping a piece of code and calculating the elapsed time between the start and end of that code it’s a nice and simple method for determining run time.
import time
start = time.time()

# insert some code to do something here

end = time.time()
print("Run time [s]: ",end-start)
Timing tests when using a GPU
When we are timing PyTorch processes that use a GPU it’s necessary to add one extra line of code into this loop:
import time
start = time.time()

# insert some code to do something here

if use_cuda: torch.cuda.synchronize()    # <---------------- extra line
end = time.time()
print("Run time [s]: ",end-start)
This is because processes on a GPU run asynchronously. This means that when we send a process to the GPU it doesn’t necessarily run immediately, instead it joins a queue. By calling the torch.cuda.synchronize function before specifying the end of our timing test, we can ensure that all of the processes on the GPU have actually run before we calculate the run time.
Challenge
Calculate the run time for the GPU-enabled training loop in your code.
Solution
model = model.to(device)

start = time.time()
for batch, (x_train, y_train) in enumerate(train_loader):

        x_train, y_train = x_train.to(device), y_train.to(device)

        model.zero_grad()
        pred, prob = model(x_train)

        acc = (prob.argmax(dim=-1) == y_train).to(torch.float32).mean()
        train_accs.append(acc.mean().item())

        loss = F.cross_entropy(pred, y_train)
        train_loss.append(loss.item())

        loss.backward()
        optimizer.step()

if use_cuda: torch.cuda.synchronize()
end = time.time()
print("Run time [s]: ",end-start)
Network depth
You’ll quickly realise that the GPU-enabled loop doesn’t really run that much faster than the normal training on CPU. That’s because the neural network we’ve been using so far is really really small so the matrix multiplications on the CPU are just as fast as the ones we can do on the GPU. The figure below shows how big our network needs to be to make the GPU useful by increasing the number of artificial neurons in each of our hidden layers.
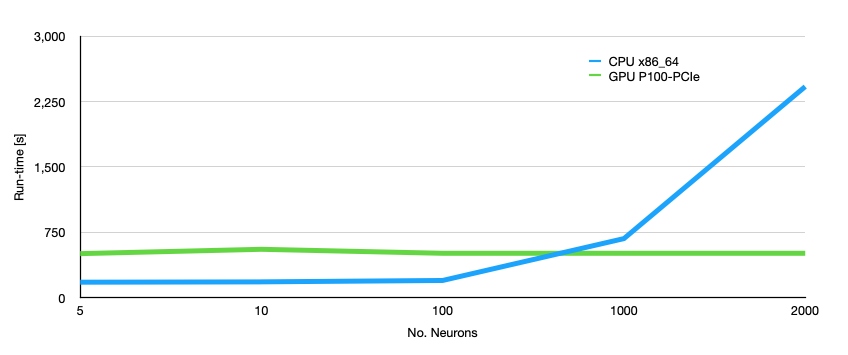
We can see from the above plot that for our small network with only two hidden layers we need at least 1000 neurons in each hidden layer to make using the GPU more useful than using the CPU. In fact for smaller networks the CPU is faster than the GPU. At this point you need to ask yourself: “how many neurons do I need?” The answer to this is of course specific to the application and it needs to be tuned using your validation data set. Then you can decide whether you need to run on GPU or not.
Challenge
Increase the number of neurons in the hidden layers of your network to 2000 and re-run your timing tests. How do the results look now?
Solution
hidden_size = 2000You should see a difference in run time that is roughly 4 - 5 x faster with the GPU. The exact value will depend on what type of GPU you are using.
Key Points
Using a GPU will not improve your ML performance.
Using a GPU will improve your run time only under certain circumstances.
GPU processes are asynchronous.
Memory considerations
Overview
Teaching: 10 min
Exercises: 10 minQuestions
Why do I need to send my data to the GPU in batches?
How can I monitor the GPU memory usage?
Objectives
Understand the issues around GPU memory limits.
Provide information on where to learn more about GPU memory management.
When it comes to memory usage, there are two main things to consider: the size of your training data and the size of your model. Remember that all the learnable parameters in your model require space in memory and that parameters where historic gradients are being calculated and used also accumulate in memory. In this lesson we will look at the memory being used by the training data and the memory being used by the model itself.
Mini-batching
There are two reasons that we sub-divide the data into mini-batches during training:
- To produce a better loss curve;
- To make sure that the data fit into GPU memory.
“Friends don’t let friends use mini-batches larger than 32” - Yann LeCunn
Most deep learning applications use stochastic gradient algorithms to update the values of the weights and biases in the network during training. Rather than computing these updates on a sample by sample basis, they instead use parameter updates based on gradient averages over small subsets of the full training set. These are known as mini-batches and the batch size specifies how many samples are in each mini-batch.
Exactly how to set the batch size for a particular machine learning application is a multi-faceted problem. On one hand, increasing the batch size can make more efficient use of the parallel processes on the GPU, but on the other hand large batch sizes have been shown to adversely affect the convergence of the training and cause models to over-fit the training data. Typically the batch size is treated as a hyper-parameter than can be tuned using the validation data set.
A further consideration when you are using a large model on a GPU is whether there is enough memory available to fit both the model parameters and the training data into GPU memory. This is of particular importance if the size of an individual training sample itself is large, as it might be for image based machine learning model applications or those with thousands of features.
Common Errors
If you run into memory problems on a GPU, you will see an error that looks like this:
RuntimeError: CUDA out of memory.
Challenge
Take the final network from you run time tests (
hidden_size=2000) and try using the whole training data set as a single batch. What happens?Solution
The first step to this challenge is working out how many data samples are in the full training set:
print(len(train_loader.dataset))You can then set this number as your batch size.
The solution to this challenge will depend on exactly what kind of GPU you’re running on. But in most cases you will run out of memory and see the error described above.
Monitoring memory usage
You may have noticed in the output from the challenges above that the error message associated with running out of memory typically includes some information like this:
RuntimeError: CUDA out of memory. Tried to allocate 8.74 GiB (GPU 0; 15.90 GiB total capacity; 8.84 GiB already allocated; 6.32 GiB free; 8.86 GiB reserved in total by PyTorch)
The allocation of memory on a GPU is not super simple. As well as the memory that is used to store tensor data, software applications will also typically reserve additional memory in a cache in order to speed up processing that requires access to memory. The way that the amount of reserved memory is decided depends on the software library itself.
In PyTorch it is possible to monitor the allocated memory for a particular GPU using:
a = torch.cuda.memory_allocated(0)
and to monitor the cached memory using:
c = torch.cuda.memory_reserved(0)
Memory usage in neural networks
The dataset we’re using to train the model in this example is pretty small in terms of volume, so small changes to a reasonable batch size (16, 32, 64 etc.) will not have a huge effect on the GPU memory usage in this case. However, we are using a fully-connected neural network which contains a large number of learnable parameters.
The learnable parameters in a fully-connected layer - nn.Linear(m, n) in PyTorch - use O(nm) memory: that is to say, the memory requirements scale quadratically with the number of features.
Challenge
By adding additional layers, work out how deep you can make your network before running out of GPU memory when using a batch size of 32.
Solution
The solution to this challenge will depend on exactly what kind of GPU you’re running on. However, typically it will happen for a network with 5 hidden layers, each containing 5000 neurons.
Where can I get help if I have memory problems on the GPU?
For PyTorch there are some helpful FAQs available, which outline common coding issues that can cause memory not to be released efficiently. There is also a useful description of the routines available to monitor memory usage.
Key Points
GPU memory is not the only consideration when setting the batch size.
Memory limits will depend on both allocated and reserved memory.
Comfort break!
Overview
Teaching: 0 min
Exercises: 15 minQuestions
Get up, stretch out, take a short break.
Objectives
Refresh your mind.
Key Points
You’ll be back.
They’re the jedi of the sea.
OPTIONAL: Going Parallel
Overview
Teaching: 10 min
Exercises: 20 minQuestions
How can I use multiple GPUs at once?
What are the limitations of multi-GPU machine learning?
Objectives
Implement a multi-GPU training loop
under construction
Key Points
Using Multiple-GPUs with PyTorch is trivial
Multi-GPU training is subject to processing bottlenecks.