Ctrl+K
HSF Unix Shell Tutorial - Home HSF Unix Shell Tutorial - Home
  • Summary and Setup
  • Introducing the Shell
  • Navigating Files and Directories
  • Working With Files and Directories
  • Pipes and Filters
  • Loops
  • Shell Scripts
  • Finding Things
  • Repository
  • Open issue
  • .ipynb

Navigating Files and Directories

Contents

  • Home Directory Variation
  • Slashes
  • Clearing your terminal
    • Getting help
  • Help for built-in commands
    • The --help option
    • When to use short or long options
  • Unsupported command-line options
    • The man command
  • Manual pages on the web
  • Challenge: Exploring More ls Options
  • Challenge: Listing in Reverse Chronological Order
    • Exploring Other Directories
  • Other Hidden Files
  • Two More Shortcuts
  • Challenge: Absolute vs Relative Paths
  • Challenge: Relative Path Resolution
  • Challenge: ls Reading Comprehension
  • General Syntax of a Shell Command
    • Nelle’s Pipeline: Organizing Files

Navigating Files and Directories#

Objectives

  • Explain the similarities and differences between a file and a directory.

  • Translate an absolute path into a relative path and vice versa.

  • Construct absolute and relative paths that identify specific files and directories.

  • Use options and arguments to change the behaviour of a shell command.

  • Demonstrate the use of tab completion and explain its advantages.

Questions

  • How can I move around on my computer?

  • How can I see what files and directories I have?

  • How can I specify the location of a file or directory on my computer?

Instructor Note

  • Introducing and navigating the filesystem in the shell can be confusing. You may have both terminal and GUI file explorer open side by side so learners can see the content and file structure while they’re using terminal to navigate the system.

The part of the operating system responsible for managing files and directories is called the file system. It organizes our data into files, which hold information, and directories (also called ‘folders’), which hold files or other directories.

Several commands are frequently used to create, inspect, rename, and delete files and directories. To start exploring them, we’ll go to our open shell window.

First, let’s find out where we are by running a command called pwd (which stands for ‘print working directory’). Directories are like places — at any time while we are using the shell, we are in exactly one place called our current working directory. Commands mostly read and write files in the current working directory, i.e. ‘here’, so knowing where you are before running a command is important. pwd shows you where you are:

! pwd
/Users/nelle

Here, the computer’s response is /Users/nelle, which is Nelle’s home directory:

Home Directory Variation#

The home directory path will look different on different operating systems. On Linux, it may look like /home/nelle, and on Windows, it will be similar to C:\Documents and Settings\nelle or C:\Users\nelle. (Note that it may look slightly different for different versions of Windows.) In future examples, we’ve used Mac output as the default - Linux and Windows output may differ slightly but should be generally similar.

We will also assume that your pwd command returns your user’s home directory. If pwd returns something different, you may need to navigate there using cd or some commands in this lesson will not work as written. See Exploring Other Directories for more details on the cd command.

To understand what a ‘home directory’ is, let’s have a look at how the file system as a whole is organized. For the sake of this example, we’ll be illustrating the filesystem on our scientist Nelle’s computer. After this illustration, you’ll be learning commands to explore your own filesystem, which will be constructed in a similar way, but not be exactly identical.

On Nelle’s computer, the filesystem looks like this:
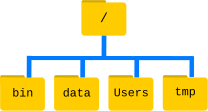
{alt=’The file system is made up of a root directory that contains sub-directories titled bin, data, users, and tmp’}

The filesystem looks like an upside down tree. The topmost directory is the root directory that holds everything else. We refer to it using a slash character, /, on its own; this character is the leading slash in /Users/nelle.

Inside that directory are several other directories: bin (which is where some built-in programs are stored), data (for miscellaneous data files), Users (where users’ personal directories are located), tmp (for temporary files that don’t need to be stored long-term), and so on.

We know that our current working directory /Users/nelle is stored inside /Users because /Users is the first part of its name. Similarly, we know that /Users is stored inside the root directory / because its name begins with /.

Slashes#

Notice that there are two meanings for the / character. When it appears at the front of a file or directory name, it refers to the root directory. When it appears inside a path, it’s just a separator.

Underneath /Users, we find one directory for each user with an account on Nelle’s machine, her colleagues imhotep and larry.
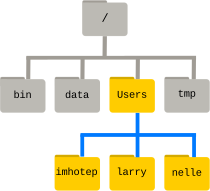
{alt=’Like other directories, home directories are sub-directories underneath “/Users” like “/Users/imhotep”, “/Users/larry” or”/Users/nelle”’}

The user imhotep’s files are stored in /Users/imhotep, user larry’s in /Users/larry, and Nelle’s in /Users/nelle. Nelle is the user in our examples here; therefore, we get /Users/nelle as our home directory. Typically, when you open a new command prompt, you will be in your home directory to start.

Now let’s learn the command that will let us see the contents of our own filesystem. We can see what’s in our home directory by running ls:

ls
Desktop    data       north-pacific-gyre  pizza.cfg  writing
creatures  molecules  notes.txt           solar.pdf

(Again, your results may be slightly different depending on your operating system and how you have customized your filesystem.)

ls prints the names of the files and directories in the current directory. We can make its output more comprehensible by using the -F option which tells ls to classify the output by adding a marker to file and directory names to indicate what they are:

  • a trailing / indicates that this is a directory

  • @ indicates a link

  • * indicates an executable

Depending on your shell’s default settings, the shell might also use colors to indicate whether each entry is a file or directory.

Here, we can see that the home directory contains only sub-directories. Any names in the output that don’t have a classification symbol are files in the current working directory.

ls -F
Desktop/    data/       north-pacific-gyre/  pizza.cfg  writing/
creatures/  molecules/  notes.txt            solar.pdf

Clearing your terminal#

If your screen gets too cluttered, you can clear your terminal using the clear command. You can still access previous commands using ↑ and ↓ to move line-by-line, or by scrolling in your terminal.

Getting help#

ls has lots of other options. There are two common ways to find out how to use a command and what options it accepts — depending on your environment, you might find that only one of these ways works:

  1. We can pass a --help option to any command (available on Linux and Git Bash), for example:

$ ls --help
  1. We can read its manual with man (available on Linux and macOS):

$ man ls

We’ll describe both ways next.

Help for built-in commands#

Some commands are built in to the Bash shell, rather than existing as separate programs on the filesystem. One example is the cd (change directory) command. If you get a message like No manual entry for cd, try help cd instead. The help command is how you get usage information for Bash built-ins.

The --help option#

Most bash commands and programs that people have written to be run from within bash, support a --help option that displays more information on how to use the command or program.

ls --help

Show code cell output

Hide code cell output

List directory contents.
Ignore files and directories starting with a '.' by default
Usage: ls [OPTION]... [FILE]...
Options:
      --help
          Print help information.
      --format <format>
          Set the display format.
  -C
          Display the files in columns.
  -l, --long
          Display detailed information.
  -x
          List entries in rows instead of in columns.
  -T, --tabsize <COLS>
          Assume tab stops at each COLS instead of 8 [env: TABSIZE=]
  -m
          List entries separated by commas.
      --zero
          List entries separated by ASCII NUL characters.
  -D, --dired
          generate output designed for Emacs' dired (Directory Editor) mode
      --hyperlink[=<WHEN>]
          hyperlink file names WHEN [default: never] [possible values: always,
          auto, never]
  -1
          List one file per line.
  -o
          Long format without group information.
          Identical to --format=long with --no-group.
  -g
          Long format without owner information.
  -n, --numeric-uid-gid
          -l with numeric UIDs and GIDs.
      --quoting-style <quoting-style>
          Set quoting style. [possible values: literal, locale, shell,
          shell-escape, shell-always, shell-escape-always, clocale, c, escape]
  -N, --literal
          Use literal quoting style. Equivalent to `--quoting-style=literal`
  -b, --escape
          Use escape quoting style. Equivalent to `--quoting-style=escape`
  -Q, --quote-name
          Use C quoting style. Equivalent to `--quoting-style=c`
  -q, --hide-control-chars
          Replace control characters with '?' if they are not escaped.
      --show-control-chars
          Show control characters 'as is' if they are not escaped.
      --time <field>
          Show time in `<field>`:
          access time (-u): atime, access, use;
          change time (-t): ctime, status.
          modification time: mtime, modification.
          birth time: birth, creation;
  -c
          If the long listing format (e.g., -l, -o) is being used, print the
          status change time (the 'ctime' in the inode) instead of the
          modification
          time. When explicitly sorting by time (--sort=time or -t) or when not
          using a long listing format, sort according to the status change time.
  -u
          If the long listing format (e.g., -l, -o) is being used, print the
          status access time instead of the modification time. When explicitly
          sorting by time (--sort=time or -t) or when not using a long listing
          format, sort according to the access time.
      --hide <PATTERN>
          do not list implied entries matching shell PATTERN (overridden by -a
          or -A)
  -I, --ignore <PATTERN>
          do not list implied entries matching shell PATTERN
  -B, --ignore-backups
          Ignore entries which end with ~.
      --sort <field>
          Sort by `<field>`: name, none (-U), time (-t), size (-S), extension
          (-X) or width [possible values: name, none, time, size, version,
          extension, width]
  -S
          Sort by file size, largest first.
  -t
          Sort by modification time (the 'mtime' in the inode), newest first.
  -v
          Natural sort of (version) numbers in the filenames.
  -X
          Sort alphabetically by entry extension.
  -U
          Do not sort; list the files in whatever order they are stored in the
          directory.  This is especially useful when listing very large
          directories,
          since not doing any sorting can be noticeably faster.
  -L, --dereference
          When showing file information for a symbolic link, show information
          for the
          file the link references rather than the link itself.
      --dereference-command-line-symlink-to-dir
          Do not follow symlinks except when they link to directories and are
          given as command line arguments.
  -H, --dereference-command-line
          Do not follow symlinks except when given as command line arguments.
  -G, --no-group
          Do not show group in long format.
      --author
          Show author in long format. On the supported platforms,
          the author always matches the file owner.
  -a, --all
          Do not ignore hidden files (files with names that start with '.').
  -A, --almost-all
          In a directory, do not ignore all file names that start with '.',
          only ignore '.' and '..'.
  -f
          List all files in directory order, unsorted. Equivalent to -aU.
          Disables --color unless explicitly specified.
  -d, --directory
          Only list the names of directories, rather than listing directory
          contents.
          This will not follow symbolic links unless one of
          `--dereference-command-line
          (-H)`, `--dereference (-L)`, or
          `--dereference-command-line-symlink-to-dir` is
          specified.
  -h, --human-readable
          Print human readable file sizes (e.g. 1K 234M 56G).
  -k, --kibibytes
          default to 1024-byte blocks for file system usage; used only with -s
          and per
          directory totals
      --si
          Print human readable file sizes using powers of 1000 instead of 1024.
      --block-size <BLOCK_SIZE>
          scale sizes by BLOCK_SIZE when printing them
  -i, --inode
          print the index number of each file
  -r, --reverse
          Reverse whatever the sorting method is e.g., list files in reverse
          alphabetical order, youngest first, smallest first, or whatever.
  -R, --recursive
          List the contents of all directories recursively.
  -w, --width <COLS>
          Assume that the terminal is COLS columns wide.
  -s, --size
          print the allocated size of each file, in blocks
      --color[=<color>]
          Color output based on file type. [possible values: always, auto,
          never]
      --indicator-style <indicator-style>
          Append indicator with style WORD to entry names:
          none (default),  slash (-p), file-type (--file-type), classify (-F)
          [possible values: none, slash, file-type, classify]
  -F, --classify[=<when>]
          Append a character to each file name indicating the file type. Also,
          for
          regular files that are executable, append '*'. The file type
          indicators are
          '/' for directories, '@' for symbolic links, '|' for FIFOs, '=' for
          sockets,
          '>' for doors, and nothing for regular files. when may be omitted, or
          one of:
              none - Do not classify. This is the default.
              auto - Only classify if standard output is a terminal.
              always - Always classify.
          Specifying --classify and no when is equivalent to --classify=always.
          This will
          not follow symbolic links listed on the command line unless the
          --dereference-command-line (-H), --dereference (-L), or
          --dereference-command-line-symlink-to-dir options are specified.
          [possible values: always, auto, never]
      --file-type
          Same as --classify, but do not append '*'
  -p
          Append / indicator to directories.
      --time-style <TIME_STYLE>
          time/date format with -l; see TIME_STYLE below [env: TIME_STYLE=]
      --full-time
          like -l --time-style=full-iso
  -Z, --context
          print any security context of each file
      --group-directories-first
          group directories before files; can be augmented with
          a --sort option, but any use of --sort=none (-U) disables grouping
  -V, --version
          Print version
The TIME_STYLE argument can be full-iso, long-iso, iso, locale or +FORMAT.
FORMAT is interpreted like in date. Also the TIME_STYLE environment variable
sets the default style to use.

When to use short or long options#

When options exist as both short and long options:

  • Use the short option when typing commands directly into the shell to minimize keystrokes and get your task done faster.

  • Use the long option in scripts to provide clarity. It will be read many times and typed once.

Unsupported command-line options#

If you try to use an option that is not supported, ls and other commands will usually print an error message similar to:

$ ls -j
ls: invalid option -- 'j'
Try 'ls --help' for more information.

The man command#

The other way to learn about ls is to type

$ man ls

This command will turn your terminal into a page with a description of the ls command and its options.

To navigate through the man pages, you may use ↑ and ↓ to move line-by-line, or try b and Spacebar to skip up and down by a full page. To search for a character or word in the man pages, use / followed by the character or word you are searching for. Sometimes a search will result in multiple hits. If so, you can move between hits using N (for moving forward) and Shift+N (for moving backward).

To quit the man pages, press q.

man ls

Show code cell output

Hide code cell output

LS(1)                       General Commands Manual                       LS(1)
NAME
       ls  -  List  directory  contents.  Ignore files and directories starting
       with a '.' by default
SYNOPSIS
       ls [--help] [--format] [-C ] [-l|--long]  [-x  ]  [-T|--tabsize]  [-m  ]
       [--zero]  [-D|--dired]  [--hyperlink]  [-1  ]  [-o  ]  [-g  ]  [-n|--nu‐
       meric-uid-gid]    [--quoting-style]     [-N|--literal]     [-b|--escape]
       [-Q|--quote-name]    [-q|--hide-control-chars]    [--show-control-chars]
       [--time]  [-c  ]  [-u  ]  [--hide]  [-I|--ignore]  [-B|--ignore-backups]
       [--sort]  [-S  ]  [-t ] [-v ] [-X ] [-U ] [-L|--dereference] [--derefer‐
       ence-command-line-symlink-to-dir]        [-H|--dereference-command-line]
       [-G|--no-group]  [--author] [-a|--all] [-A|--almost-all] [-f ] [-d|--di‐
       rectory] [-h|--human-readable]  [-k|--kibibytes]  [--si]  [--block-size]
       [-i|--inode]  [-r|--reverse]  [-R|--recursive]  [-w|--width] [-s|--size]
       [--color]  [--indicator-style]  [-F|--classify]  [--file-type]   [-p   ]
       [--time-style]  [--full-time] [-Z|--context] [--group-directories-first]
       [-V|--version] [paths]
DESCRIPTION
       List directory contents.  Ignore files and directories starting  with  a
       '.' by default
OPTIONS
       --help Print help information.
       --format
              Set the display format.
       -C     Display the files in columns.
       -l, --long
              Display detailed information.
       -x     List entries in rows instead of in columns.
       -T, --tabsize <COLS>
              Assume tab stops at each COLS instead of 8
       -m     List entries separated by commas.
       --zero List entries separated by ASCII NUL characters.
       -D, --dired
              generate output designed for Emacs' dired (Directory Editor) mode
       --hyperlink[=<WHEN>] [default: never]
              hyperlink file names WHEN
              Possible values:
                     • always
                     • auto
                     • never
       -1     List one file per line.
       -o     Long  format  without  group  information.   Identical  to --for‐
              mat=long with --no-group.
       -g     Long format without owner information.
       -n, --numeric-uid-gid
              -l with numeric UIDs and GIDs.
       --quoting-style
              Set quoting style.
              Possible values:
                     • literal
                     • locale
                     • shell
                     • shell-escape
                     • shell-always
                     • shell-escape-always
                     • clocale
                     • c
                     • escape
       -N, --literal
              Use literal quoting style.  Equivalent  to  `--quoting-style=lit‐
              eral`
       -b, --escape
              Use escape quoting style. Equivalent to `--quoting-style=escape`
       -Q, --quote-name
              Use C quoting style. Equivalent to `--quoting-style=c`
       -q, --hide-control-chars
              Replace control characters with '?' if they are not escaped.
       --show-control-chars
              Show control characters 'as is' if they are not escaped.
       --time <field>
              Show  time  in  `<field>`:  access time (-u): atime, access, use;
              change time (-t): ctime, status.  modification time: mtime, modi‐
              fication.  birth time: birth, creation;
       -c     If the long listing format (e.g., -l, -o) is  being  used,  print
              the  status change time (the 'ctime' in the inode) instead of the
              modification time. When explicitly sorting by  time  (--sort=time
              or -t) or when not using a long listing format, sort according to
              the status change time.
       -u     If  the  long  listing format (e.g., -l, -o) is being used, print
              the status access time instead of the modification time. When ex‐
              plicitly sorting by time (--sort=time or -t) or when not using  a
              long listing format, sort according to the access time.
       --hide <PATTERN>
              do not list implied entries matching shell PATTERN (overridden by
              -a or -A)
       -I, --ignore <PATTERN>
              do not list implied entries matching shell PATTERN
       -B, --ignore-backups
              Ignore entries which end with ~.
       --sort <field>
              Sort  by `<field>`: name, none (-U), time (-t), size (-S), exten‐
              sion (-X) or width
              Possible values:
                     • name
                     • none
                     • time
                     • size
                     • version
                     • extension
                     • width
       -S     Sort by file size, largest first.
       -t     Sort by modification time (the  'mtime'  in  the  inode),  newest
              first.
       -v     Natural sort of (version) numbers in the filenames.
       -X     Sort alphabetically by entry extension.
       -U     Do  not sort; list the files in whatever order they are stored in
              the directory.  This is especially useful when listing very large
              directories, since  not  doing  any  sorting  can  be  noticeably
              faster.
       -L, --dereference
              When  showing file information for a symbolic link, show informa‐
              tion for the file the link references rather than  the  link  it‐
              self.
       --dereference-command-line-symlink-to-dir
              Do  not  follow symlinks except when they link to directories and
              are given as command line arguments.
       -H, --dereference-command-line
              Do not follow symlinks except when given as  command  line  argu‐
              ments.
       -G, --no-group
              Do not show group in long format.
       --author
              Show  author  in long format. On the supported platforms, the au‐
              thor always matches the file owner.
       -a, --all
              Do not ignore hidden files (files  with  names  that  start  with
              '.').
       -A, --almost-all
              In a directory, do not ignore all file names that start with '.',
              only ignore '.' and '..'.
       -f     List  all  files in directory order, unsorted. Equivalent to -aU.
              Disables --color unless explicitly specified.
       -d, --directory
              Only list the names of directories, rather than listing directory
              contents.  This will not follow  symbolic  links  unless  one  of
              `--dereference-command-line   (-H)`,   `--dereference  (-L)`,  or
              `--dereference-command-line-symlink-to-dir` is specified.
       -h, --human-readable
              Print human readable file sizes (e.g. 1K 234M 56G).
       -k, --kibibytes
              default to 1024-byte blocks for file system usage; used only with
              -s and per directory totals
       --si   Print human readable file sizes using powers of 1000  instead  of
              1024.
       --block-size <BLOCK_SIZE>
              scale sizes by BLOCK_SIZE when printing them
       -i, --inode
              print the index number of each file
       -r, --reverse
              Reverse  whatever  the  sorting method is e.g., list files in re‐
              verse alphabetical order,  youngest  first,  smallest  first,  or
              whatever.
       -R, --recursive
              List the contents of all directories recursively.
       -w, --width <COLS>
              Assume that the terminal is COLS columns wide.
       -s, --size
              print the allocated size of each file, in blocks
       --color
              Color output based on file type.
              Possible values:
                     • always
                     • auto
                     • never
       --indicator-style
              Append  indicator with style WORD to entry names: none (default),
              slash (-p), file-type (--file-type), classify (-F)
              Possible values:
                     • none
                     • slash
                     • file-type
                     • classify
       -F, --classify[=<when>]
              Append a character to each file name indicating  the  file  type.
              Also, for regular files that are executable, append '*'. The file
              type  indicators are '/' for directories, '@' for symbolic links,
              '|' for FIFOs, '=' for sockets, '>' for doors,  and  nothing  for
              regular files. when may be omitted, or one of:
                  none - Do not classify. This is the default.
                  auto - Only classify if standard output is a terminal.
                  always  - Always classify.  Specifying --classify and no when
              is equivalent to --classify=always. This will not follow symbolic
              links listed on the command line  unless  the  --dereference-com‐
              mand-line   (-H),   --dereference   (-L),  or  --dereference-com‐
              mand-line-symlink-to-dir options are specified.
              Possible values:
                     • always
                     • auto
                     • never
       --file-type
              Same as --classify, but do not append '*'
       -p     Append / indicator to directories.
       --time-style <TIME_STYLE>
              time/date format with -l; see TIME_STYLE below
       --full-time
              like -l --time-style=full-iso
       -Z, --context
              print any security context of each file
       --group-directories-first
              group directories before files; can be augmented  with  a  --sort
              option, but any use of --sort=none (-U) disables grouping
       -V, --version
              Print version
EXTRA
       The  TIME_STYLE argument can be full-iso, long-iso, iso, locale or +FOR‐
       MAT. FORMAT is interpreted like in date. Also the TIME_STYLE environment
       variable sets the default style to use.
VERSION
       v(uutils coreutils) 0.10.0
EXAMPLES
       List files one per line:
       ls -1
       List all files, including hidden files:
       ls [-a|--all]
       List files with a trailing symbol to  indicate  file  type  (directory/,
       symbolic_link@, executable*, ...):
       ls [-F|--classify]
       List all files in [l]ong format (permissions, ownership, size, and modi‐
       fication date):
       ls [-la|-l --all]
       List  files  in  [l]ong  format with size displayed using human-readable
       units (KiB, MiB, GiB):
       ls [-lh|-l --human-readable]
       List files in [l]ong format, sorted by [S]ize (descending) recursively:
       ls [-lSR|-lS --recursive]
       List files in [l]ong format, sorted by [t]ime the file was modified  and
       in reverse order (oldest first):
       ls [-ltr|-lt --reverse]
       Only list directories:
       ls [-d|--directory] */
       The  examples  are  provided by the tldr-pages project <https://tldr.sh>
       under the CC BY 4.0 License. Please note that, as uutils is  a  work  in
       progress, some examples might fail.
                                   2026-09-03                             LS(1)

Manual pages on the web#

Of course, there is a third way to access help for commands: searching the internet via your web browser. When using internet search, including the phrase unix man page in your search query will help to find relevant results.

GNU provides links to its manuals including the core GNU utilities, which covers many commands introduced within this lesson.

Challenge: Exploring More ls Options#

You can also use two options at the same time. What does the command ls do when used with the -l option? What about if you use both the -l and the -h option?

Some of its output is about properties that we do not cover in this lesson (such as file permissions and ownership), but the rest should be useful nevertheless.

Solution

The -l option makes ls use a long listing format, showing not only the file/directory names but also additional information, such as the file size and the time of its last modification. If you use both the -h option and the -l option, this makes the file size ‘human readable’, i.e. displaying something like 5.3K instead of 5369.

Challenge: Listing in Reverse Chronological Order#

By default, ls lists the contents of a directory in alphabetical order by name. The command ls -t lists items by time of last change instead of alphabetically. The command ls -r lists the contents of a directory in reverse order. Which file is displayed last when you combine the -t and -r options? Hint: You may need to use the -l option to see the last changed dates.

Solution

The most recently changed file is listed last when using -rt. This can be very useful for finding your most recent edits or checking to see if a new output file was written.

Exploring Other Directories#

Not only can we use ls on the current working directory, but we can use it to list the contents of a different directory. Let’s take a look at our Desktop directory by running ls -F Desktop, i.e., the command ls with the -F option and the argument Desktop. The argument Desktop tells ls that we want a listing of something other than our current working directory:

ls -F Desktop
shell-lesson-data/

Note that if a directory named Desktop does not exist in your current working directory, this command will return an error. Typically, a Desktop directory exists in your home directory, which we assume is the current working directory of your bash shell.

Your output should be a list of all the files and sub-directories in your Desktop directory, including the shell-lesson-data directory you downloaded at the setup for this lesson. (On most systems, the contents of the Desktop directory in the shell will show up as icons in a graphical user interface behind all the open windows. See if this is the case for you.)

Organizing things hierarchically helps us keep track of our work. While it’s possible to put hundreds of files in our home directory just as it’s possible to pile hundreds of printed papers on our desk, it’s much easier to find things when they’ve been organized into sensibly-named subdirectories.

Now that we know the shell-lesson-data directory is located in our Desktop directory, we can do two things.

First, using the same strategy as before, we can look at its contents by passing a directory name to ls:

ls -F Desktop/shell-lesson-data
exercise-data/  north-pacific-gyre/

Second, we can actually change our location to a different directory, so we are no longer located in our home directory.

The command to change locations is cd followed by a directory name to change our working directory. cd stands for ‘change directory’, which is a bit misleading. The command doesn’t change the directory; it changes the shell’s current working directory. In other words it changes the shell’s settings for what directory we are in. The cd command is akin to double-clicking a folder in a graphical interface to get into that folder.

Let’s say we want to move into the exercise-data directory we saw above. We can use the following series of commands to get there:

cd Desktop
cd shell-lesson-data
cd exercise-data

These commands will move us from our home directory into our Desktop directory, then into the shell-lesson-data directory, then into the exercise-data directory. You will notice that cd doesn’t print anything. This is normal. Many shell commands will not output anything to the screen when successfully executed. But if we run pwd after it, we can see that we are now in /Users/nelle/Desktop/shell-lesson-data/exercise-data.

If we run ls -F without arguments now, it lists the contents of /Users/nelle/Desktop/shell-lesson-data/exercise-data, because that’s where we now are:

ls -F
alkanes/  animal-counts/  creatures/  numbers.txt  writing/

We now know how to go down the directory tree (i.e. how to go into a subdirectory), but how do we go up (i.e. how do we leave a directory and go into its parent directory)? We might try the following:

$ cd shell-lesson-data
-bash: cd: shell-lesson-data: No such file or directory

But we get an error! Why is this?

With our methods so far, cd can only see sub-directories inside your current directory. There are different ways to see directories above your current location; we’ll start with the simplest.

There is a shortcut in the shell to move up one directory level. It works as follows:

cd ..

.. is a special directory name meaning “the directory containing this one”, or more succinctly, the parent of the current directory. Sure enough, if we run pwd after running cd .., we’re back in /Users/nelle/Desktop/shell-lesson-data:

$ pwd
/Users/nelle/Desktop/shell-lesson-data

The special directory .. doesn’t usually show up when we run ls. If we want to display it, we can add the -a option to ls -F:

ls -F -a
./  ../  exercise-data/  north-pacific-gyre/

-a stands for ‘show all’ (including hidden files); it forces ls to show us file and directory names that begin with ., such as .. (which, if we’re in /Users/nelle, refers to the /Users directory). As you can see, it also displays another special directory that’s just called ., which means ‘the current working directory’. It may seem redundant to have a name for it, but we’ll see some uses for it soon.

Note that in most command line tools, multiple options can be combined with a single - and no spaces between the options; ls -F -a is equivalent to ls -Fa.

Other Hidden Files#

In addition to the hidden directories .. and ., you may also see a file called .bash_profile. This file usually contains shell configuration settings. You may also see other files and directories beginning with .. These are usually files and directories that are used to configure different programs on your computer. The prefix . is used to prevent these configuration files from cluttering the terminal when a standard ls command is used.

These three commands are the basic commands for navigating the filesystem on your computer: pwd, ls, and cd. Let’s explore some variations on those commands. What happens if you type cd on its own, without giving a directory?

$ cd

How can you check what happened? pwd gives us the answer!

$ pwd
/Users/nelle

It turns out that cd without an argument will return you to your home directory, which is great if you’ve got lost in your own filesystem.

Let’s try returning to the exercise-data directory from before. Last time, we used three commands, but we can actually string together the list of directories to move to exercise-data in one step:

$ cd Desktop/shell-lesson-data/exercise-data

Check that we’ve moved to the right place by running pwd and ls -F.

If we want to move up one level from the data directory, we could use cd ... But there is another way to move to any directory, regardless of your current location.

So far, when specifying directory names, or even a directory path (as above), we have been using relative paths. When you use a relative path with a command like ls or cd, it tries to find that location from where we are, rather than from the root of the file system.

However, it is possible to specify the absolute path to a directory by including its entire path from the root directory, which is indicated by a leading slash. The leading / tells the computer to follow the path from the root of the file system, so it always refers to exactly one directory, no matter where we are when we run the command.

This allows us to move to our shell-lesson-data directory from anywhere on the filesystem (including from inside exercise-data). To find the absolute path we’re looking for, we can use pwd and then extract the piece we need to move to shell-lesson-data.

$ pwd
/Users/nelle/Desktop/shell-lesson-data/exercise-data
$ cd /Users/nelle/Desktop/shell-lesson-data

Run pwd and ls -F to ensure that we’re in the directory we expect.

Two More Shortcuts#

The shell interprets a tilde (~) character at the start of a path to mean “the current user’s home directory”. For example, if Nelle’s home directory is /Users/nelle, then ~/data is equivalent to /Users/nelle/data. This only works if it is the first character in the path; here/there/~/elsewhere is not here/there/Users/nelle/elsewhere.

Another shortcut is the - (dash) character. cd will translate - into the previous directory I was in, which is faster than having to remember, then type, the full path. This is a very efficient way of moving back and forth between two directories – i.e. if you execute cd - twice, you end up back in the starting directory.

The difference between cd .. and cd - is that the former brings you up, while the latter brings you back.


Try it! First navigate to ~/Desktop/shell-lesson-data (you should already be there).

$ cd ~/Desktop/shell-lesson-data

Then cd into the exercise-data/creatures directory

$ cd exercise-data/creatures

Now if you run

$ cd -

you’ll see you’re back in ~/Desktop/shell-lesson-data. Run cd - again and you’re back in ~/Desktop/shell-lesson-data/exercise-data/creatures

Challenge: Absolute vs Relative Paths#

Starting from /Users/nelle/data, which of the following commands could Nelle use to navigate to her home directory, which is /Users/nelle?

  1. cd .

  2. cd /

  3. cd /home/nelle

  4. cd ../..

  5. cd ~

  6. cd home

  7. cd ~/data/..

  8. cd

  9. cd ..

Solution

  1. No: . stands for the current directory.

  2. No: / stands for the root directory.

  3. No: Nelle’s home directory is /Users/nelle.

  4. No: this command goes up two levels, i.e. ends in /Users.

  5. Yes: ~ stands for the user’s home directory, in this case /Users/nelle.

  6. No: this command would navigate into a directory home in the current directory if it exists.

  7. Yes: unnecessarily complicated, but correct.

  8. Yes: shortcut to go back to the user’s home directory.

  9. Yes: goes up one level.

Challenge: Relative Path Resolution#

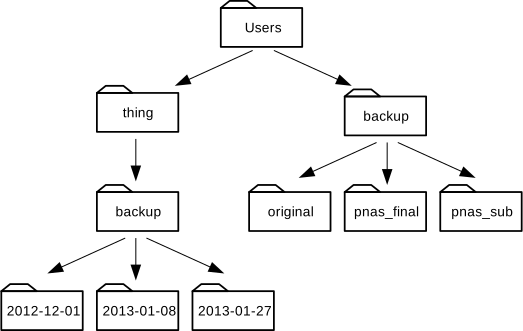
Using the filesystem diagram below, if pwd displays /Users/thing, what will ls -F ../backup display?

  1. ../backup: No such file or directory

  2. 2012-12-01 2013-01-08 2013-01-27

  3. 2012-12-01/ 2013-01-08/ 2013-01-27/

  4. original/ pnas_final/ pnas_sub/

{alt=’A directory tree below the Users directory where “/Users” contains the directories “backup” and “thing”; “/Users/backup” contains “original”,”pnas_final” and “pnas_sub”; “/Users/thing” contains “backup”; and”/Users/thing/backup” contains “2012-12-01”, “2013-01-08” and”2013-01-27”’}

Solution

  1. No: there is a directory backup in /Users.

  2. No: this is the content of Users/thing/backup, but with .., we asked for one level further up.

  3. No: see previous explanation.

  4. Yes: ../backup/ refers to /Users/backup/.

Challenge: ls Reading Comprehension#

Using the filesystem diagram below, if pwd displays /Users/backup, and -r tells ls to display things in reverse order, what command(s) will result in the following output:

pnas_sub/ pnas_final/ original/

{alt=’A directory tree below the Users directory where “/Users” contains the directories “backup” and “thing”; “/Users/backup” contains “original”,”pnas_final” and “pnas_sub”; “/Users/thing” contains “backup”; and”/Users/thing/backup” contains “2012-12-01”, “2013-01-08” and”2013-01-27”’}

  1. ls pwd

  2. ls -r -F

  3. ls -r -F /Users/backup

Solution

  1. No: pwd is not the name of a directory.

  2. Yes: ls without directory argument lists files and directories in the current directory.

  3. Yes: uses the absolute path explicitly.

General Syntax of a Shell Command#

We have now encountered commands, options, and arguments, but it is perhaps useful to formalise some terminology.

Consider the command below as a general example of a command, which we will dissect into its component parts:

$ ls -F /
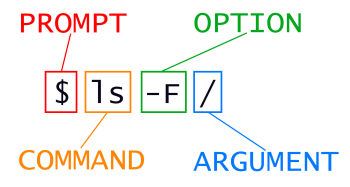
{alt=’General syntax of a shell command’}

ls is the command, with an option -F and an argument /. We’ve already encountered options which either start with a single dash (-), known as short options, or two dashes (--), known as long options. [Options] change the behavior of a command and Arguments tell the command what to operate on (e.g. files and directories). Sometimes options and arguments are referred to as parameters. A command can be called with more than one option and more than one argument, but a command doesn’t always require an argument or an option.

You might sometimes see options being referred to as switches or flags, especially for options that take no argument. In this lesson we will stick with using the term option.

Each part is separated by spaces. If you omit the space between ls and -F the shell will look for a command called ls-F, which doesn’t exist. Also, capitalization can be important. For example, ls -s will display the size of files and directories alongside the names, while ls -S will sort the files and directories by size, as shown below:

ls -s exercise-data
total 20
4 alkanes  4 animal-counts  4 creatures  4 numbers.txt  4 writing

Note that the sizes returned by ls -s are in blocks. As these are defined differently for different operating systems, you may not obtain the same figures as in the example.

ls -S exercise-data
alkanes  animal-counts  creatures  writing  numbers.txt

Putting all that together, our command ls -F / above gives us a listing of files and directories in the root directory /. An example of the output you might get from the above command is given below:

ls -F /
bin@   etc/              lib@    lost+found/  opt/   run/   srv/      tmp/
boot/  home/             lib32@  media/       proc/  sbin@  swapfile  usr/
dev/   imagegeneration/  lib64@  mnt/         root/  snap/  sys/      var/

Nelle’s Pipeline: Organizing Files#

Knowing this much about files and directories, Nelle is ready to organize the files that the protein assay machine will create.

She creates a directory called north-pacific-gyre (to remind herself where the data came from), which will contain the data files from the assay machine and her data processing scripts.

Each of her physical samples is labelled according to her lab’s convention with a unique ten-character ID, such as ‘NENE01729A’. This ID is what she used in her collection log to record the location, time, depth, and other characteristics of the sample, so she decides to use it within the filename of each data file. Since the output of the assay machine is plain text, she will call her files NENE01729A.txt, NENE01812A.txt, and so on. All 1520 files will go into the same directory.

Now in her current directory shell-lesson-data, Nelle can see what files she has using the command:

ls north-pacific-gyre/
NENE01729A.txt  NENE01751B.txt  NENE01971Z.txt  NENE02040A.txt  NENE02043B.txt
NENE01729B.txt  NENE01812A.txt  NENE01978A.txt  NENE02040B.txt  goodiff.sh
NENE01736A.txt  NENE01843A.txt  NENE01978B.txt  NENE02040Z.txt  goostats.sh
NENE01751A.txt  NENE01843B.txt  NENE02018B.txt  NENE02043A.txt

This command is a lot to type, but she can let the shell do most of the work through what is called tab completion. If she types:

$ ls nor

and then presses Tab (the tab key on her keyboard), the shell automatically completes the directory name for her:

$ ls north-pacific-gyre/

Pressing Tab again does nothing, since there are multiple possibilities; pressing Tab twice brings up a list of all the files.

If Nelle then presses G and then presses Tab again, the shell will append ‘goo’ since all files that start with ‘g’ share the first three characters ‘goo’.

$ ls north-pacific-gyre/goo

To see all of those files, she can press Tab twice more.

ls north-pacific-gyre/goo
goodiff.sh   goostats.sh

This is called tab completion, and we will see it in many other tools as we go on.

Key Points

  • The file system is responsible for managing information on the disk.

  • Information is stored in files, which are stored in directories (folders).

  • Directories can also store other directories, which then form a directory tree.

  • pwd prints the user’s current working directory.

  • ls [path] prints a listing of a specific file or directory; ls on its own lists the current working directory.

  • cd [path] changes the current working directory.

  • Most commands take options that begin with a single -.

  • Directory names in a path are separated with / on Unix, but \ on Windows.

  • / on its own is the root directory of the whole file system.

  • An absolute path specifies a location from the root of the file system.

  • A relative path specifies a location starting from the current location.

  • . on its own means ‘the current directory’; .. means ‘the directory above the current one’.

previous

Introducing the Shell

next

Working With Files and Directories

Contents
  • Home Directory Variation
  • Slashes
  • Clearing your terminal
    • Getting help
  • Help for built-in commands
    • The --help option
    • When to use short or long options
  • Unsupported command-line options
    • The man command
  • Manual pages on the web
  • Challenge: Exploring More ls Options
  • Challenge: Listing in Reverse Chronological Order
    • Exploring Other Directories
  • Other Hidden Files
  • Two More Shortcuts
  • Challenge: Absolute vs Relative Paths
  • Challenge: Relative Path Resolution
  • Challenge: ls Reading Comprehension
  • General Syntax of a Shell Command
    • Nelle’s Pipeline: Organizing Files

By HSF

© Copyright CC-BY 4.0.