Aggregated resource
All-in-One
This page combines the lesson into one continuous view.
Lesson controls
Jump between episodes, filter the page, or reveal every hint and solution when you need the full teaching flow.
Episode
Introduction
Questions
- What is continuous integration / continuous deployment?
Objectives
- Understand why CI/CD is important
- Learn what can be possible with CI/CD
- Find resources to explore in more depth
What is CI/CD?
Continuous Integration (CI), and Continuous Deployment (CD) are two related concepts in the field of DevOps, a sub-domain of software engineering.
- CI
- Continuously integrates source code changes into your repository while testing to ensure the changes do not "break" anything.
- CD
- Continuously deploys a service based on your code.
A common example of a CI/CD workflow or pipeline in a repository would be one which—after each push of a set of commits—tests the codebase (via CI) and deploys documentation (via CD) on a website.
CI/CD workflows can be configured to run after a push, after a pull request, or on a schedule. The broader purpose of CI/CD is to automate anything repetitive that doesn’t need to be done manually, and can be thought of as a labour-based manifestation of the DRY (don’t repeat yourself) principle in programming.
This is just like a fishing practice for conservation preservation!

Breaking Changes
What does it even mean to “break” something? The idea of “breaking” something is pretty contextual. If you’re working on C++ code, then you probably want to make sure things compile and run without segfaulting at the bare minimum. If it’s Python code, maybe you have some tests with pytest that you want to make sure pass (“exit successfully”). Or if you’re working on a paper draft, you might check for grammar, misspellings, and that the document compiles from LaTeX. Whatever the use-case is, integration is about catching breaking changes.
pytest ?pytest visit its documentation or follow this training module.Deployment
Similarly, “deployment” can mean a lot of things. Perhaps you have a Curriculum Vitae (CV) that is automatically built from LaTeX and uploaded to your website. Another case is to release Docker images of your framework that others depend on. Maybe it’s just uploading documentation. Or to even upload a new tag of your Python package on pypi. Whatever the use-case is, deployment is about releasing changes.
Workflow Automation
CI/CD is the first step to automating your entire workflow. Imagine everything you do in order to run an analysis, or make some changes. Can you make a computer do it automatically? If so, do it! The less human work you do, the less risk of making human mistakes.
Don’t just limit yourself to thinking of CI/CD as primarily for testing changes, but as one part of automating an entire development cycle. You can trigger notifications to your cellphone, fetch/download new data, execute cron jobs, and so much more. However, for the lessons you’ll be going through today and that you’ve just recently learned about Python testing with pytest, we’ll focus primarily on setting up CI/CD with tests for code that you’ve written already.
CI/CD Solutions
Now, obviously, we’re not going to make our own fully-fledged CI/CD solution. Plenty exist in the wild today, and below are just a popular few:
- Native GitHub Actions
- Native GitLab CI/CD
- Travis CI
- Circle CI
- TeamCity
- Bamboo
- Jenkins
- Buddy
- CodeShip
- CodeFresh
For today’s lesson, we’ll only focus on GitHub’s solution (GitHub Actions). However, be aware that all the concepts you’ll be taught today: including pipelines, jobs, artifacts; all exist in other solutions by similar/different names. For example, GitLab supports two features known as caching and artifacts; but Travis doesn’t quite implement the same thing for caching and has no native support for artifacts. Therefore, while we don’t discourage you from trying out other solutions, there’s no “one size fits all” when designing your own CI/CD workflow.
Key Points
- CI/CD is crucial for any reproducibility and testing
- Take advantage of automation to reduce your workload
Episode
Exit Codes
Questions
- What is an exit code?
Objectives
- Understand exit codes
- How to print exit codes
- How to set exit codes in a script
- How to ignore exit codes
- Create a script that terminates in success/error
As we enter the first episode of the Continuous Integration / Continuous Deployment (CI/CD) session, we learn how to exit.
Exit codes communicate the outcome of a script with (in this case) the CI/CD pipeline. We generally want a CI/CD pipeline to fail if one of its components fails. For example, you would not usually want to run CD to deploy a custom Docker image if the CI tests fail for the code in that image.
Start by Exiting
How does a general task know whether or not a script finished correctly or not? You could parse (grep) the output:
> ls nonexistent-filels: cannot access 'nonexistent-file': No such file or directoryBut every command outputs something differently. Instead, scripts also have an (invisible) exit code:
> ls nonexistent-file
> echo $?
ls: cannot access 'nonexistent-file': No such file or directory
2The exit code is 2 indicating failure. What about on success? The exit code is 0 like so:
> echo
> echo $?0But this works for any command you run on the command line! For example, if I mistyped git status:
> git status
> echo $?
git: 'stauts' is not a git command. See 'git --help'.
The most similar command is
status
1and there, the exit code is non-zero – a failure.
0 as false. However, exit code of 0 means there was no error. If you feel queasy about remembering this, imagine that the question asked is “Was there an error in executing the command?” 0 means “no” and non-zero (1, 2, …) means “yes”.Try out some other commands on your system, and see what things look like.
Some exit codes are recommended to have special meanings by convention, although there is nothing stopping someone from overriding them in their script.
Printing Exit Codes
As you’ve seen above, the exit code from the last executed command is stored in the $? environment variable. Accessing it from a shell is easy echo $?. What about from Python? There are many different ways depending on which library you use. Using similar examples above, we can use the getstatusoutput() call:
python3 in your command line. On some systems, you need to use the python command instead of python3. Check which version you have with python3 --version.>>> from subprocess import getstatusoutput # for python2: from commands import getstatusoutput
>>> status,output=getstatusoutput('ls')
>>> status
0
>>> status,output=getstatusoutput('ls nonexistent-file')
>>> status
2Once inside the Python interpreter, simply type exit() then press enter, to exit. It may happen that this returns a different exit code than from the command line (indicating there’s some internal implementation in Python). All you need to be concerned with is that the exit code was non-zero (there was an error).
Setting Exit Codes
So now that we can get those exit codes, how can we set them? Let’s explore this in shell and in python3.
Shell
Create a file called bash_exit.sh with the following content:
#!/usr/bin/env bash

if [ $1 == "hello" ]
then
  exit 0
else
  exit 59
fi
and then make it executable chmod +x bash_exit.sh. Now, try running it with ./bash_exit.sh hello and ./bash_exit.sh goodbye and see what those exit codes are with echo $?.
Python
The same can be done in a Python file. Create a file called python_exit.py with the following content:
#!/usr/bin/env python3

import sys


if sys.argv[1] == "hello":
  sys.exit(0)
else:
  sys.exit(59)
and then make it executable chmod +x python_exit.py. Now, try running it with ./python_exit.py hello and ./python_exit.py goodbye and see what those exit codes are. Déjà vu?
Ignoring Exit Codes
To finish up this section, one thing you’ll notice sometimes (in ATLAS or CMS) is that a script you run doesn’t seem to respect exit codes. A notable example in ATLAS is the use of setupATLAS which returns non-zero exit status codes even though it runs successfully! This can be very annoying when you start development with the assumption that exit status codes are meaningful (such as with CI). In these cases, you’ll need to ignore the exit code. An easy way to do this is to execute a second command that always gives exit 0 if the first command doesn’t, like so:
> false || echo "ignore failure"
> echo $?
ignore failure
0where false is just a simple command that always returns a non-zero exit code.
The command_1 || command_2 OR-operator means to execute command_2 only if command_1 has failed (non-zero exit code).
Similarly, the command_1 && command_2 AND-operator means to execute command_2 only if command_1 has succeeded.
These are both examples of short-circuited boolean expressions. Short-circuited expressions return the result of the boolean expression as soon as the minimal information necessary for the result is computed: the operands are executed from left to right, and the right operand only evaluates if the left operand doesn’t determine the answer.
Try this out using one of the scripts you made in the previous session:
> ./python_exit.py goodbye || echo ignoreWhat does that give you?
It’s possible to ignore an exit code quietly by running command_1 || true, where true always returns an exit code of 0.
Key Points
- Exit codes are used to identify if a command or script executed with errors or not
- Not everyone respects exit codes
Episode
Being Assertive
Questions
- What happens with assertions in Python?
Objectives
- Understand how assertions in Python correspond to exit codes
- Figure out how pytest fits in
This is a relatively short section, but we need to connect some things you’ve learned from testing in Python with exit codes.
Assert Your Tests
An assertion is a sanity-check carried out by the assert statement, useful when debugging code.
Let’s create a file called python_assert.py with the following content:
x = "hello"

assert x == "hello"

assert x == "goodbye"
and then run it with python python_assert.py.
What happens when an assertion fails in Python?
Traceback (most recent call last):
  File "./python_assert.py", line 5, in <module>
    assert x == "goodbye"
AssertionError
An exception is raised: AssertionError. The nice thing about Python is that all unhandled exceptions return a non-zero exit code. If an exit code is not set, this defaults to 1.
> echo $?
1
Ignoring what would cause the assertion to be True or False, we can see that assertions automatically indicate failure in a script.
What about pytest?
Pytest, thankfully, handles these assertion failures intuitively. To try this out quickly, go ahead and modify python_assert.py as follows:
x = "hello"

def test_assert_success():
    assert x == "hello"

def test_assert_failure():
    assert x == "goodbye"
Running pytest python_assert.py will produce an expected exit code depending on whether the test passed or failed.
You should be able to confirm that the exit codes are useful here.
Key Points
- You can do whatever you like in a test, as long as you return the right exit code
- Pytest, and other test utilities will propagate the exit codes correctly
Episode
Understanding YAML
Questions
- What is YAML?
Objectives
- Learn about YAML
YAML
YAML (YAML Ain’t Markup Language (a recursive acronym), originally standing for Yet Another Markup Language) is a human-readable data-serialization language. It is commonly used for configuration files and in applications where data is being stored or transmitted. CI systems’ modus operandi typically rely on YAML for configuration. We’ll cover, briefly, some of the native types involved and what the structure looks like.
Scalars
number-value: 42
floating-point-value: 3.141592
boolean-value: true # on, yes -- also work
# strings can be both 'single-quoted` and "double-quoted"
string-value: 'Bonjour'
python-version: "3.10"
unquoted-string: Hello World
hexadecimal: 0x12d4
scientific: 12.3015e+05
infinity: .inf
not-a-number: .NAN
null: ~
another-null: null
key with spaces: value
datetime: 2001-12-15T02:59:43.1Z
datetime_with_spaces: 2001-12-14 21:59:43.10 -5
date: 2002-12-14: . This is important for YAML parsing and is a common mistake.python-version: 3.10 will automatically
be converted to python-version: 3.1 (notice 3.1 instead of 3.10). The conversion will lead to unexpected failures
as your CI will be running on a version not specified by you. This behavior resulted in several failed jobs after the release
of Python 3.10 on CI services. The conversion (and the build failure) can be avoided by converting the floating-point numbers
to strings - python-version: "3.10".Lists and Dictionaries
Elements of a list start with a “- " (a dash and a space) at the same indentation level.
jedis:
  - Yoda
  - Qui-Gon Jinn
  - Obi-Wan Kenobi
  - Luke Skywalker
Elements of a dictionary are in the form of “key: value” (the colon must be followed by a space).
jedi:
  name: Obi-Wan Kenobi
  home-planet: Stewjon
  species: human
  master: Qui-Gon Jinn
  height: 1.82m
Inline-Syntax
Since YAML is a superset of JSON, you can also write JSON-style maps and sequences.
episodes: [1, 2, 3, 4, 5, 6, 7]
best-jedi: {name: Obi-Wan, side: light}
Multiline Strings
In YAML, there are two different ways to handle multiline strings. This is useful, for example, when you have a long code block that you want to format in a pretty way, but don’t want to impact the functionality of the underlying CI script. In these cases, multiline strings can help. For an interactive demonstration, you can visit https://yaml-multiline.info/.
Put simply, you have two operators you can use to determine whether to keep newlines (|, exactly how you wrote it) or to remove newlines (>, fold them in). Similarly, you can also choose whether you want a single newline at the end of the multiline string, multiple newlines at the end (+), or no newlines at the end (-). The following is a summary of some variations:
folded_no_ending_newline:
  script:
    - >-
      echo "foo" &&
      echo "bar" &&
      echo "baz"


    - echo "do something else"

unfolded_ending_single_newline:
  script:
    - |
      echo "foo" && \
      echo "bar" && \
      echo "baz"


    - echo "do something else"
Nested
requests:
  # first item of `requests` list is just a string
  - http://example.com/

  # second item of `requests` list is a dictionary
  - url: http://example.com/
    method: GET
Comments
Comments begin with a pound sign (#) and continue for the rest of the line:
# This is a full line comment
foo: bar # this is a comment, too
Key Points
- YAML is a plain-text format, similar to JSON, useful for configuration
- YAML is a superset of JSON, so it contains additional features like comments, while still supporting JSON.
Episode
YAML and GitHub Actions
Questions
- What is the GitHub Actions specification?
Objectives
- Learn where to find more details about everything for the GitHub Actions.
- Understand the components of GitHub Actions YAML file.
GitHub Actions YAML
The GitHub Actions configurations are specified using YAML files stored in the.github/workflows/ directory. Here is an example of a YAML file:
name: example

on: push

jobs:
  job_1:
    runs-on: ubuntu-latest
    steps:
      - name: My first step
run: echo This is the first step of my first job.name: GitHub displays the names of your workflows on your repository’s actions page. If you omit name, GitHub sets it to the YAML file name.
on: Required. Specify the event that automatically triggers a workflow run. This example uses the push event, so that the jobs run every time someone pushes a change to the repository.
For more details, check this link.
jobsSpecify the job(s) to be run. Jobs run in parallel by default. To run jobs sequentially, you have to define dependencies on other jobs. We’ll cover this in a later section.
<job_id>: Each job must have an id to associate with the job, job_1 in the above example. The key job_id is a string that is unique to the jobs object. It must start with a letter or _ and contain only alphanumeric characters, -, or _. Its value is a map of the job’s configuration data.
runs-on: Required. Each job runs in a particular type of machine (called a “runner”) that we choose with this key. There are options for the major operating systems (Linux, Windows, and macOS) and different versions of them. The available options can be found here.steps: Specify sequence of tasks. A step is an individual task that can run commands (known as actions). Each step in a job executes on the same runner, allowing the actions in that job to share data with each other. If you do not provide aname, the step name will default to the text specified in theruncommand.
run commandsrun step will need to be wrapped in single or double quotes. For example, commands that contain a colon (:) need to be wrapped in quotes so that the YAML parser knows to interpret the whole thing as a string rather than a “key: value” pair. Be careful when using special characters: :, {, }, [, ], ,, &, *, #, ?, |, -, <, >, =, !, %, @, `.Overall Structure
Every single parameter we consider for all configurations are keys under jobs. The YAML is structured using job names. For example, we can define two jobs that run in parallel (more on parallel/serial later) with different sets of parameters.
name: <name of your workflow>

on: <event or list of events>

jobs:
  job_1:
    name: <name of the first job>
    runs-on: <type of machine to run the job on>
    steps:
      - name: <step 1>
        run: |
          <commands>
      - name: <step 2>
        run: |
          <commands>
  job_2:
    name: <name of the second job>
    runs-on: <type of machine to run the job on>
    steps:
      - name: <step 1>
        run: |
          <commands>
      - name: <step 2>
        run: |
<commands>Key Points
- You should bookmark the GitHub Actions reference. You’ll visit that page often.
- Actions are standalone commands that are combined into steps to create a job.
- Workflows are made up of one or more jobs and can be scheduled or triggered.
Episode
Coffee break!
Questions
- Get up, stretch out, take a short break.
Objectives
- Refresh your mind.
Key Points
- You’ll be back.
- They’re the Jedi of the sea.
Episode
Hello CI World
Questions
- How do I run a simple GitHub Actions job?
Objectives
- Add CI/CD to your project.
Adding CI/CD to a project
The first thing we’ll do is create a .github/workflows/main.yml file in the project.
cd virtual-pipelines-eventselection/
mkdir -p .github/workflows
touch .github/workflows/main.yml
This repository happens to already contain a workflow, so let’s delete it so we can focus on our own workflow.
rm .github/workflows/test-analysis.ymlOpen .github/workflows/main.yml with your favorite editor and add the following:
name: example
on: push
jobs:
  greeting:
    runs-on: ubuntu-latest
    steps:
      - run: echo hello world
Run GitHub Actions
Now, let’s see it in action!
We’ve created the .github/workflows/main.yml file, but it’s not yet on GitHub. We’ll push these changes to GitHub so that it can run our job.
Since we’re adding a new feature (Actions) to our project, we’ll work in a feature branch. This is just a human-friendly named branch to indicate that it’s adding a new feature.
cd virtual-pipelines-eventselection/
git checkout -b feature/add-actions
git add .github/workflows/main.yml
git commit -m "my first actions"
git push -u origin feature/add-actions
And that’s it! You’ve successfully run your CI/CD job and you can view the output. You just have to navigate to the GitHub webpage for the virtual-pipelines-eventselection project and hit the Actions button; you will find details of your job (status, output,…).
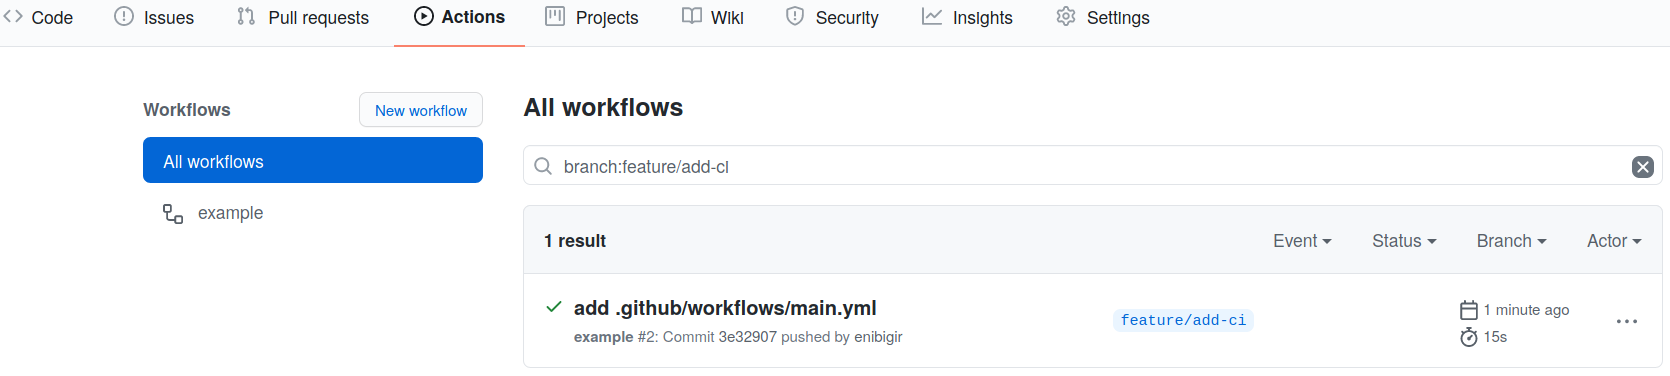
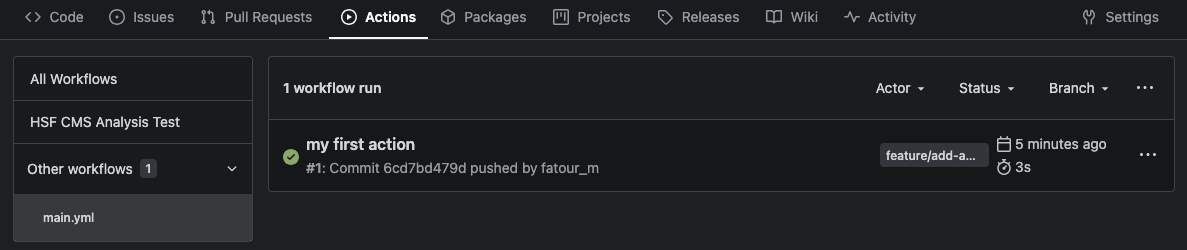
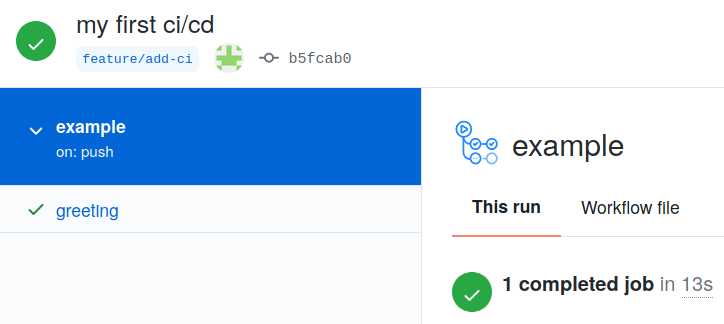
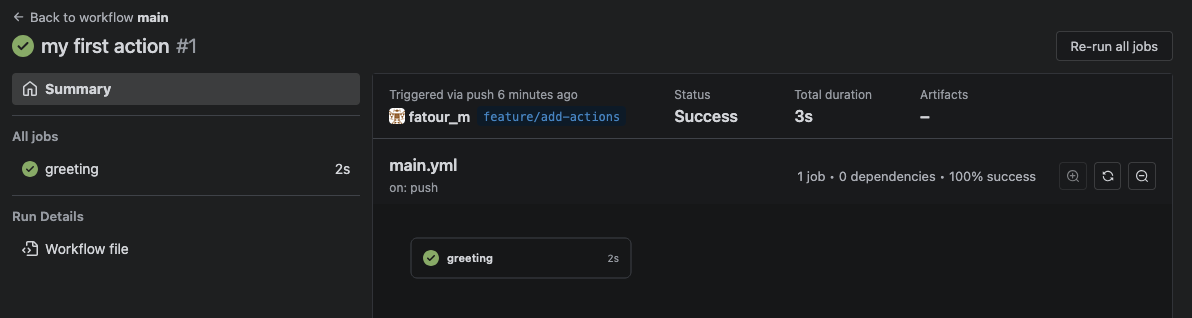
From this page, click through until you can find the output for the successful job run, which should look like the following:
Pull Request
Lastly, we’ll open up a pull request for this branch, since we plan to merge this back into main when we’re happy with the first iteration of the Actions.
Draft Pull Requests
If you expect to be working on a branch for a bit of time while you have a pull request open, it’s good etiquette to mark it as a “draft pull request.” This makes it clear to everyone that you will continue to add new commits and that it may not yet be the right time to review the pull request. Once you are ready with the work, you can mark the pull request as “ready for review.”
Key Points
- Creating
.github/workflows/main.ymlis the first step to salvation. - Pipelines are made of jobs with steps.
Episode
Adding CI to Your Existing Code
Questions
- I have code already in GitHub, how can I add CI to it?
Objectives
- Learn how to get your CI/CD Runners to build your code
- Try and see if the CI/CD can catch problems with our code.
Time To Skim
The Naive Attempt
As of right now, your .github/workflows/main.yml should look like
name: example
on: push
jobs:
  greeting:
    runs-on: ubuntu-latest
    steps:
      - run: echo hello world
Let’s go ahead and teach our CI to build our code. Let’s add another job (named build_skim) that runs in parallel for now, and runs the compiler ROOT uses.
Note: ROOT is an open-source framework used in High Energy Physics.
Let’s give it a try.
COMPILER=$(root-config --cxx)
$COMPILER -g -O3 -Wall -Wextra -Wpedantic -o skim skim.cxx
The compilation will result in an output binary called skim.
Adding a new job
How do we change the CI to add a new job that compiles our code?
Solution
jobs:
  greeting:
    runs-on: ubuntu-latest
    steps:
      - run: echo hello world

  build_skim:
    runs-on: ubuntu-latest
    steps:
      - name: build
        run: |
          COMPILER=$(root-config --cxx)
          $COMPILER -g -O3 -Wall -Wextra -Wpedantic -o skim skim.cxx
Check jobs
Let’s commit and push the changes we made, and let’s go to GitHub to check if both jobs ran.
git add .github/workflows/main.yml
git commit -m "add build skim job"
git push -u origin feature/add-actions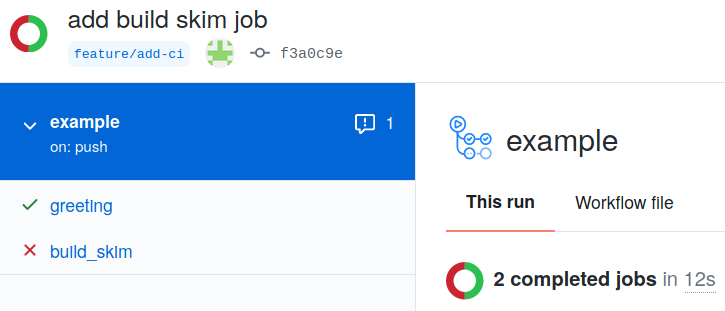
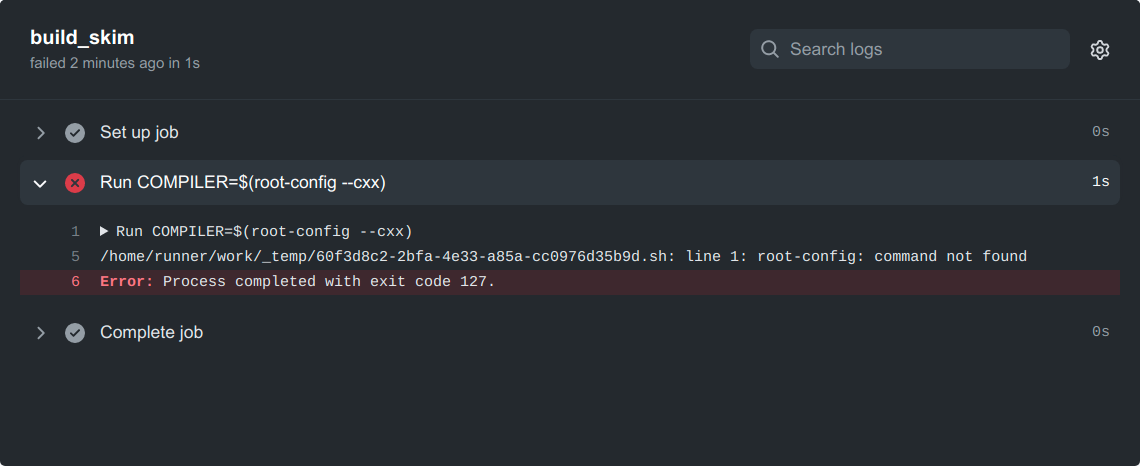
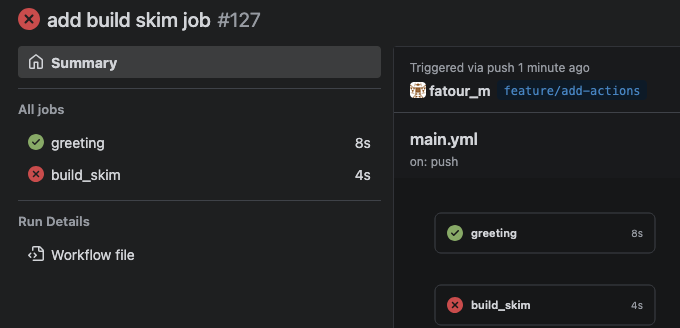
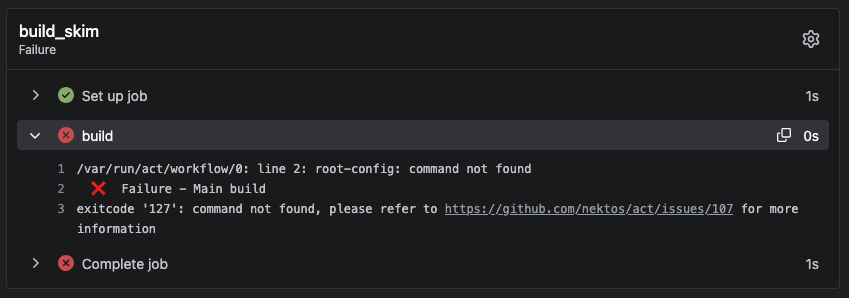
No root-config?
Ok, so maybe we were a little naive here. GitHub runners come pre-installed with a wide variety of software that is commonly needed in CI workflows (e.g. for Ubuntu 22.04 runners the list can be found here). ROOT is not pre-installed, so we will have to add a step to install it ourselves. After reading the ROOT documentation, we find that a convenient way to run it on various systems is using something called a Docker container.
There are several tools that are used for containerization, like Docker, Podman, and Apptainer (formerly Singularity). For this tutorial, you don’t need to know anything about containerization. You can just think of this as the base software set that comes pre-installed on the system that runs your code.
We will be using the Docker images hosted at the rootproject/root Docker Hub. Let’s start by using the image with tag 6.26.10-conda.
build_skim:
  runs-on: ubuntu-latest
  container: rootproject/root:6.26.10-conda
  steps:
    - name: checkout repository
      uses: actions/checkout@v4
    - name: build
      run: |
        COMPILER=$(root-config --cxx)
$COMPILER -g -O3 -Wall -Wextra -Wpedantic -o skim skim.cxxNote the extra line container: rootproject/root:6.26.10-conda that specifies the container image that we want to use. Since it comes pre-packaged with ROOT, we do not need to have a step to install it. This image also contains other tools that we will need for the rest of the tutorial.
Failed again???
What’s that?
error: skim.cxx: No such file or directory
Answer
It seems the job cannot access the repository. We need to instruct GitHub Actions to checkout the repository.
steps:
   - name: checkout repository
     uses: actions/checkout@v4
Let’s go ahead and tell our CI to checkout the repository.
Still failed??? What the hell.
What happened?
Answer
It turns out we just forgot the include flags needed for compilation. If you look at the log, you’ll see
 | skim.cxx:11:10: fatal error: ROOT/RDataFrame.hxx: No such file or directory
 |  #include "ROOT/RDataFrame.hxx"
 |           ^~~~~~~~~~~~~~~~~~~~~
  #include "ROOT/RDataFrame.hxx"
           ^~~~~~~~~~~~~~~~~~~~~
 | compilation terminated.
 Error: exit with `FAILURE`: 1
How do we fix it? We just need to add another variable to add the flags at the end via $FLAGS defined as FLAGS=$(root-config --cflags --libs).
Ok, let’s go ahead and update our .github/workflow/main.yml again, and it better be fixed or so help me…
Ways to get software
As we saw before, GitHub pre-installs many common software packages and libraries that people might need, but often we need to install additional software. There are often actions we can use for this, like actions/setup-python to install Python or mamba-org/setup-micromamba to install Mamba (an alternative to Conda, an environment manager). These actions are simply repositories that contain scripts to install or perform certain actions. You can find more information about these actions by going to github.com/<name-of-action>. For example, for mamba-org/setup-micromamba you can find more information at https://github.com/mamba-org/setup-micromamba.
If we wanted to use Conda instead of Docker, our build_skim job would look like this:
build_skim:
  runs-on: ubuntu-latest
  defaults:
    run:
      shell: bash -el {0}
  steps:
    - name: checkout repository
      uses: actions/checkout@v4
    - name: Install ROOT
      uses: mamba-org/setup-micromamba@v1
      with:
        environment-name: env
        create-args: root
    - name: build
      run: |
        COMPILER=$(root-config --cxx)
        FLAGS=$(root-config --cflags --libs)
$COMPILER -g -O3 -Wall -Wextra -Wpedantic -o skim skim.cxx $FLAGSBuilding multiple versions
Great, so we finally got it working… Let’s build both the version of the code we’re testing and also test that the latest ROOT image (rootproject/root:latest) works with our code. Call this new job build_skim_latest.
Adding the `build_skim_latest` job
What does the .github/workflow/main.yml look like now?
Solution
jobs:
  greeting:
    runs-on: ubuntu-latest
    steps:
      - run: echo hello world

  build_skim:
    runs-on: ubuntu-latest
    container: rootproject/root:6.26.10-conda
    steps:
      - name: checkout repository
        uses: actions/checkout@v4

      - name: build
        run: |
          COMPILER=$(root-config --cxx)
          FLAGS=$(root-config --cflags --libs)
          $COMPILER -g -O3 -Wall -Wextra -Wpedantic -o skim skim.cxx $FLAGS

  build_skim_latest:
    runs-on: ubuntu-latest
    container: rootproject/root:latest
    steps:
      - name: checkout repository
        uses: actions/checkout@v4

      - name: latest
        run: |
          COMPILER=$(root-config --cxx)
          FLAGS=$(root-config --cflags --libs)
$COMPILER -g -O3 -Wall -Wextra -Wpedantic -o skim skim.cxx $FLAGSDependabot for updating GitHub Action versions
GitHub Actions are accompanied by tags ("@v2"…) which are versions/tags of that action. One might need to update these tags, for example from “@v2” to “@v3” because the GitHub Actions developers may fix existing bugs to the action or there may be other updates.
However, this process can be automated by using “Dependabot”, which ensures that the workflow references the updated version of the action. If that is not the case, Dependabot will open a pull request updating the tag of the GitHub action.
The Dependabot action can be added to a GitHub repository by creating the file dependabot.yml in the .github/ folder. The content of the file looks like this (Link to the dependabot.yml):
version: 2
updates:
  # Maintain dependencies for GitHub Actions
  - package-ecosystem: "github-actions"
    directory: "/"
    schedule:
      interval: "weekly"
where interval is the frequency of looking for updates to GitHub Actions.
For more information on Dependabot, see e.g., here.
Key Points
- Setting up CI/CD shouldn’t be mind-numbing
- All defined jobs run in parallel by default
Episode
Matrix
Questions
- How can we make job templates?
Objectives
- Don’t Repeat Yourself (DRY)
- Use a single job for multiple jobs
Matrix
From the previous lesson, we tried to build the code against two different ROOT images by adding an extra job:
jobs:
  greeting:
    runs-on: ubuntu-latest
    steps:
      - run: echo hello world

  build_skim:
    runs-on: ubuntu-latest
    container: rootproject/root:6.26.10-conda
    steps:
      - name: checkout repository
        uses: actions/checkout@v4
      - name: build
        run: |
          COMPILER=$(root-config --cxx)
          FLAGS=$(root-config --cflags --libs)
          $COMPILER -g -O3 -Wall -Wextra -Wpedantic -o skim skim.cxx $FLAGS

  build_skim_latest:
    runs-on: ubuntu-latest
    container: rootproject/root:latest
    steps:
      - name: checkout repository
        uses: actions/checkout@v4
      - name: latest
        run: |
          COMPILER=$(root-config --cxx)
          FLAGS=$(root-config --cflags --libs)
$COMPILER -g -O3 -Wall -Wextra -Wpedantic -o skim skim.cxx $FLAGSWe could do better using matrix. The latter allows us to test the code against a combination of versions in a single job.
jobs:
  greeting:
    runs-on: ubuntu-latest
    steps:
      - run: echo hello world

  build_skim:
    runs-on: ubuntu-latest
    container: rootproject/root:${{ matrix.version }}
    strategy:
      matrix:
        version: [6.26.10-conda, latest]
    steps:
      - name: checkout repository
        uses: actions/checkout@v4

      - name: build
        run: |
          COMPILER=$(root-config --cxx)
          FLAGS=$(root-config --cflags --libs)
$COMPILER -g -O3 -Wall -Wextra -Wpedantic -o skim skim.cxx $FLAGSYAML truncates trailing zeroes from a floating-point number, which means that version: [3.9, 3.10, 3.11] will automatically
be converted to version: [3.9, 3.1, 3.11] (notice 3.1 instead of 3.10). The conversion will lead to unexpected failures
as your CI will be running on a version not specified by you. This behavior resulted in several failed jobs after the release
of Python 3.10 on GitHub Actions. The conversion (and the build failure) can be avoided by converting the floating-point number
to strings - version: ['3.9', '3.10', '3.11'].
More details on matrices: https://docs.github.com/en/actions/reference/workflow-syntax-for-github-actions.
We can push the changes to GitHub and see how it will look like.
git add .github/workflows/main.yml
git commit -m "add multi jobs"
git push -u origin feature/add-ci
While the jobs are running, let’s imagine we don’t want our CI/CD to crash if that happens. We have to add continue-on-error: true to a job.
runs-on: ubuntu-latest
continue-on-error: true
For the matrix case, Github Actions fails the entire workflow and stops all the running jobs if any of the jobs in the matrix fail. This can be prevented by using fail-fast: false key:value.
strategy:
  fail-fast: false
More details: https://docs.github.com/en/actions/reference/workflow-syntax-for-github-actions.
Allow a specific matrix job to fail
But what if we want to only allow the job with version set to latest to fail without failing the workflow run?
Solution
runs-on: ubuntu-latest
container: rootproject/root:${{ matrix.version }}
continue-on-error: ${{ matrix.allow_failure }}
strategy:
  matrix:
    version: [6.26.10-conda]
    allow_failure: [false]
    include:
      - version: latest
        allow_failure: true
Look how much cleaner you’ve made the code. You should now see that it’s pretty easy to start adding more build jobs for other images in a relatively clean way, as you’ve now abstracted the actual building from the definitions.
Key Points
- Using
matrixallows you to test the code against a combination of versions.
Episode
Coffee break!
Questions
- Get up, stretch out, take a short break.
Objectives
- Refresh your mind.
Key Points
- Stupid mistakes happen, but telling a computer to do what you mean versus what you say is hard
Episode
Dependent Jobs
Questions
- How do you make some jobs run after other jobs?
Objectives
- Run some jobs in serial.
Defining dependencies
From the last session, we’re starting with
jobs:
  greeting:
    runs-on: ubuntu-latest
    steps:
      - run: echo hello world

  build_skim:
    runs-on: ubuntu-latest
    container: rootproject/root:${{ matrix.version }}
    strategy:
      matrix:
        version: [6.26.10-conda, latest]
    steps:
      - name: checkout repository
        uses: actions/checkout@v4

      - name: build
        run: |
          COMPILER=$(root-config --cxx)
          FLAGS=$(root-config --cflags --libs)
$COMPILER -g -O3 -Wall -Wextra -Wpedantic -o skim skim.cxx $FLAGSWe’re going to talk about another useful parameter needs.
The key-value needs: job or list of jobs allows you to specify dependencies between jobs in the order you define.
Example:
job2:
  needs: job1
job2 waits until job1 completes successfully. Further reading.
Dependent jobs
How to make build_skim job run after greeting?
Solution
jobs:
  greeting:
    runs-on: ubuntu-latest
    steps:
      - run: echo hello world

  build_skim:
    needs: greeting
    runs-on: ubuntu-latest
    container: rootproject/root:${{ matrix.version }}
    strategy:
      matrix:
        version: [6.26.10-conda, latest]
    steps:
      - name: checkout repository
        uses: actions/checkout@v4

      - name: build
        run: |
          COMPILER=$(root-config --cxx)
          FLAGS=$(root-config --cflags --libs)
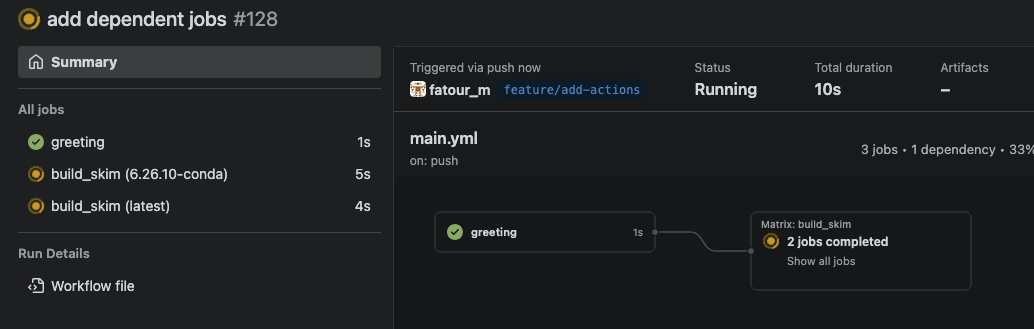
$COMPILER -g -O3 -Wall -Wextra -Wpedantic -o skim skim.cxx $FLAGSLet’s go ahead and add those changes and look at GitHub.
git add .github/workflows/main.yml
git commit -m "add dependent jobs"
git push -u origin feature/add-actions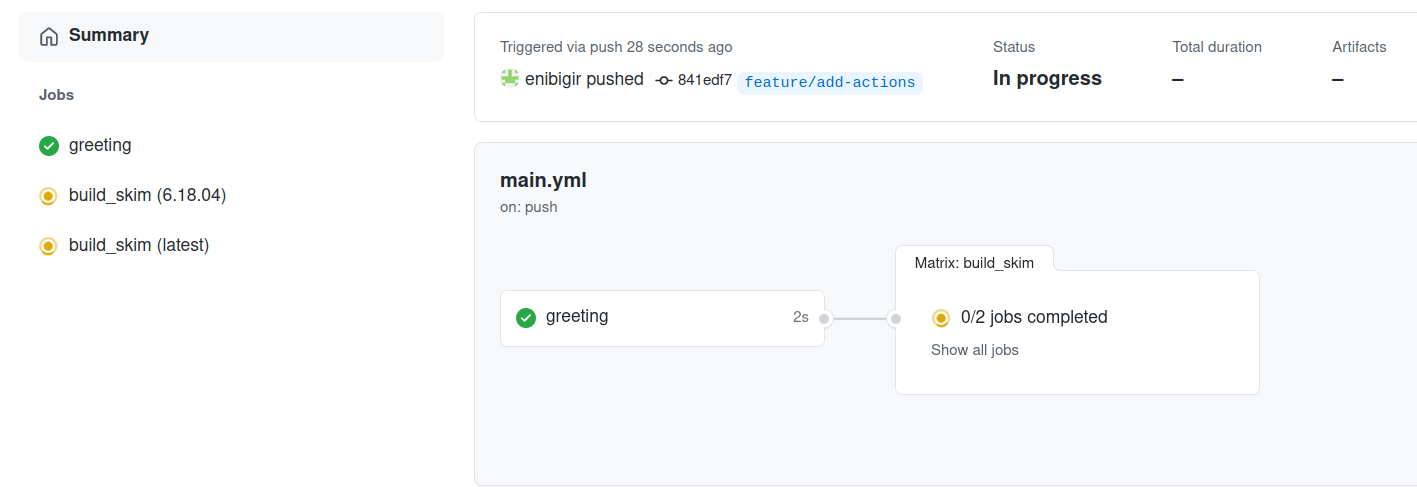
Key Points
- We can specify dependencies between jobs running in a series using the needs value.
Episode
A Skimmer Higgs
Questions
- How can I run my skimming code in the GitHub Actions?
Objectives
- Learn how to skim code and set up artifacts.
The First Naive Attempt
Let’s just attempt to try and get the code working as it is. Since it worked for us already locally, surely the CI/CD must be able to run it?
As a reminder of what we’ve ended with from the last session:
jobs:
  greeting:
    runs-on: ubuntu-latest
    steps:
      - run: echo hello world

  build_skim:
    needs: greeting
    runs-on: ubuntu-latest
    container: rootproject/root:${{ matrix.version }}
    strategy:
      matrix:
        version: [6.26.10-conda, latest]
    steps:
      - name: checkout repository
        uses: actions/checkout@v4

      - name: build
        run: |
          COMPILER=$(root-config --cxx)
          FLAGS=$(root-config --cflags --libs)
$COMPILER -g -O3 -Wall -Wextra -Wpedantic -o skim skim.cxx $FLAGSSince the skim binary is built, let’s see if we can run it. We need to add a job with the name skim.
skim is meant to process data (skimming) that we are going to run on.
Let’s go ahead and figure out how to define a run job. Seems too easy to be true?
skim:
  needs: build_skim
  runs-on: ubuntu-latest
  container: rootproject/root:6.26.10-conda
  steps:
      - name: checkout repository
        uses: actions/checkout@v4

      - name: skim
run: ./skimAfter you’ve added the skim job, you can push your changes to GitHub:
git add .github/workflows/main.yml
git commit -m "add skim job"
git push -u origin feature/add-actions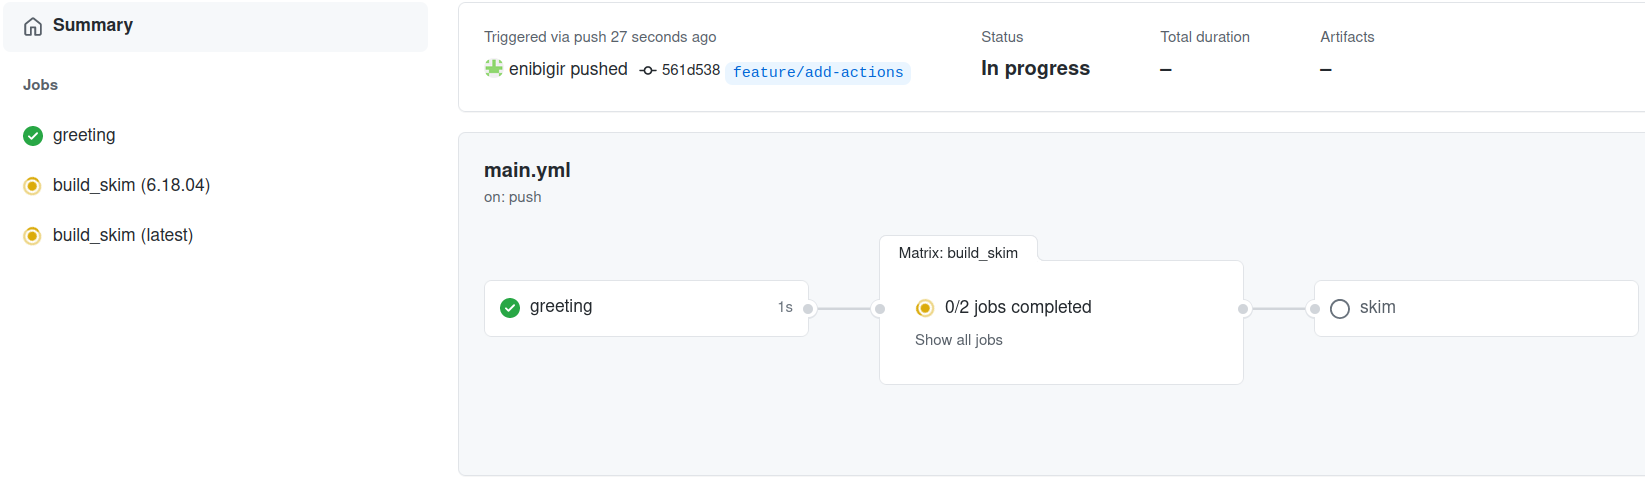
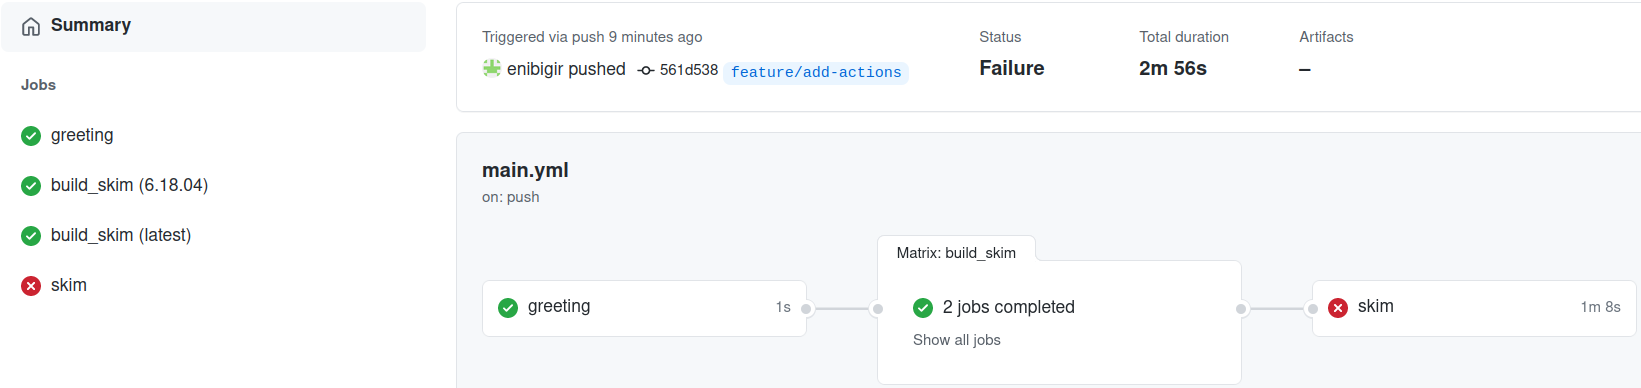
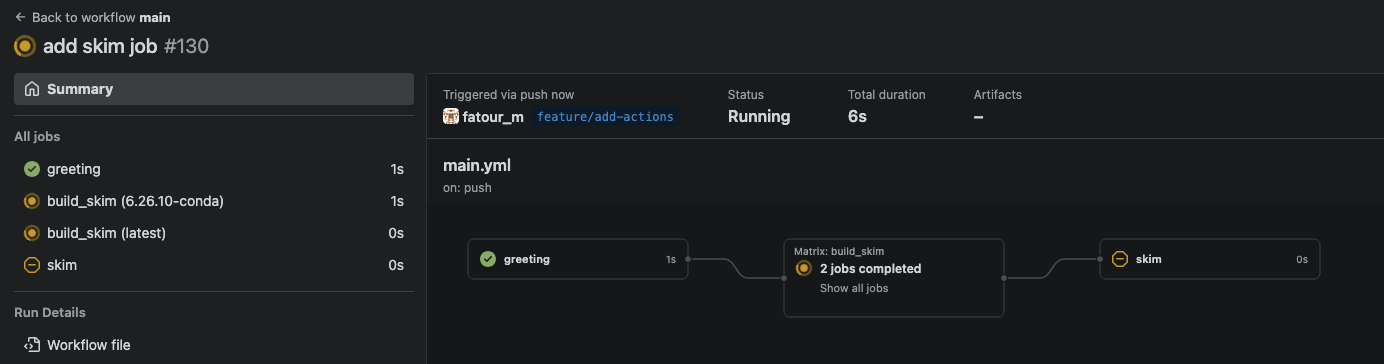
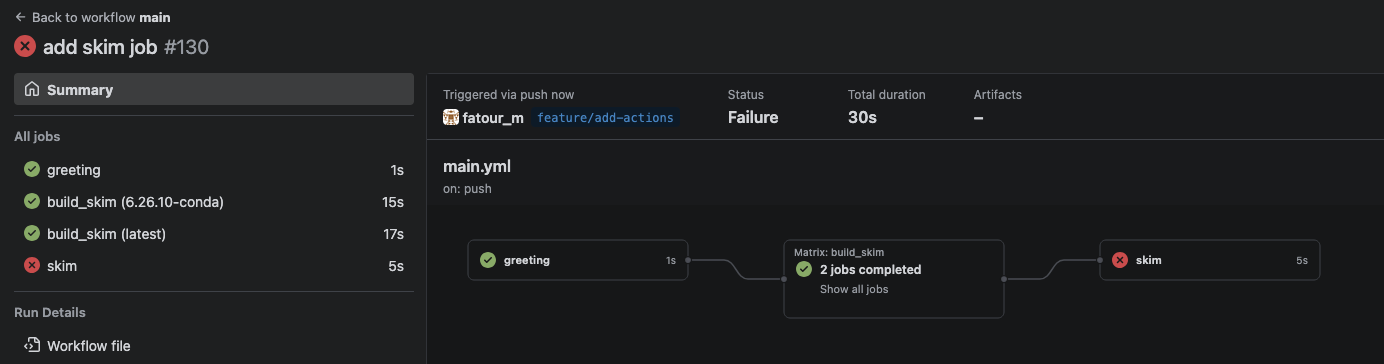
Failed???
Let’s have a look at the log message
./skim: not foundWe’re too naive
Ok, fine. That was way too easy. It seems we have a few issues to deal with. The skim binary in the build_skim job isn’t in the skim job by default. We need to use GitHub artifacts to copy this over from the right job.
Artifacts
Artifacts are used to upload (upload-artifact) and download (download-artifact) files and directories that should be attached to the job after this one has completed. That way, it can share those files with another job in the same workflow.
job_1:
  - uses: actions/upload-artifact@v4
    with:
      name: <name>
      path: <file>
job_2:
  - uses: actions/download-artifact@v4
    with:
      name: <name>
Note that the artifact name should not contain any of the following characters ",:,<,>,|,*,?,\,/.
In order to take advantage of passing data between two jobs, one combines download-artifact with needs.
Combining `download-artifact` with `needs`
Let’s do it.
Solution
...
...
build_skim:
  needs: greeting
  runs-on: ubuntu-latest
  container: rootproject/root:${{ matrix.version }}
  strategy:
    matrix:
      version: [6.26.10-conda, latest]
  steps:
    - name: checkout repository
      uses: actions/checkout@v4

    - name: build
      run: |
        COMPILER=$(root-config --cxx)
        FLAGS=$(root-config --cflags --libs)
        $COMPILER -g -O3 -Wall -Wextra -Wpedantic -o skim skim.cxx $FLAGS

    - uses: actions/upload-artifact@v4
      with:
        name: skim${{ matrix.version }}
        path: skim

skim:
  needs: build_skim
  runs-on: ubuntu-latest
  container: rootproject/root:6.26.10-conda
  steps:
    - name: checkout repository
      uses: actions/checkout@v4

    - uses: actions/download-artifact@v4
      with:
        name: skim6.26.10-conda

    - name: skim
run: ./skimWhat happened?
./skim: Permission deniedPermissions can be changed using the chmod command.
Solution
run: |
  chmod +x ./skim
  ./skim
From the log message, one can see that we are missing arguments.
Use executable with following arguments: ./skim input output cross_section integrated_luminosity scaleWe will deal with that in the next lesson.
Key Points
- Making jobs aware of each other is pretty easy.
- Artifacts are files created by the CI that are offered for download and inspection.
Episode
Getting into the Spy Game
Questions
- How can I give my GitHub Actions private information?
Objectives
- Add custom environment variables
- Learn how to give your CI/CD Runners access to private information
Recall
build_skim:
  needs: greeting
  runs-on: ubuntu-latest
  container: rootproject/root:${{ matrix.version }}
  strategy:
    matrix:
      version: [6.26.10-conda, latest]
  steps:
    - name: checkout repository
      uses: actions/checkout@v4

    - name: build
      run: |
        COMPILER=$(root-config --cxx)
        FLAGS=$(root-config --cflags --libs)
        $COMPILER -g -O3 -Wall -Wextra -Wpedantic -o skim skim.cxx $FLAGS

    - uses: actions/upload-artifact@v4
      with:
        name: skim${{ matrix.version }}
        path: skim
skim:
  needs: build_skim
  runs-on: ubuntu-latest
  container: rootproject/root:6.26.10-conda
  steps:
    - name: checkout repository
      uses: actions/checkout@v4

    - uses: actions/download-artifact@v4
      with:
        name: skim6.26.10-conda

    - name: skim
      run: |
        chmod +x ./skim
./skimIn the previous lesson, we saw that the executable skim takes 5 arguments: input (remote data), output (processed data), cross-section, integrated luminosity, and scale.
Let’s consider the following values:
input: root://eosuser.cern.ch//eos/user/g/gstark/AwesomeWorkshopFeb2020/GluGluToHToTauTau.root
output: skim_ggH.root
cross_section: 19.6
integrated_luminosity: 11467.0
scale: 0.1
Our YAML file should look like
...
 skim:
   needs: build_skim
   runs-on: ubuntu-latest
   container: rootproject/root:6.26.10-conda
   steps:
     - name: checkout repository
       uses: actions/checkout@v4

     - uses: actions/download-artifact@v4
       with:
         name: skim6.26.10-conda

     - name: skim
       run: |
         chmod +x ./skim
./skim root://eosuser.cern.ch//eos/user/g/gstark/AwesomeWorkshopFeb2020/GluGluToHToTauTau.root skim_ggH.root 19.6 11467.0 0.1What about the output?
>>> Process input: root://eosuser.cern.ch//eos/user/g/gstark/AwesomeWorkshopFeb2020/GluGluToHToTauTau.root
Error: n <TNetXNGFile::Open>: [ERROR] Server responded with an error: [3010] Unable to give access - user access restricted - unauthorized identity used; Permission denied
Access Control
The data we’re using are on CERN User Storage (EOS). As a general rule, access to protected data should be authenticated; CERN can’t just grab it!.
It means we need to give our GitHub Actions access to our data. CERN uses kinit for access control.
Anyhow, this is pretty much done by executing echo $USER_PASS | kinit $USER_NAME@CERN.CH, assuming that we’ve set the corresponding environment variables.
If you are not a CERN user, don’t worry. We have a backup solution for you!
You can use this file root://eospublic.cern.ch//eos/root-eos/HiggsTauTauReduced/GluGluToHToTauTau.root and skip the rest of this lesson.
If this still does not work, for example, if the port xrootd uses to fetch the data is blocked on your network, you can instead use https://root.cern/files/HiggsTauTauReduced/GluGluToHToTauTau.root.
Sometimes you’ll run into a code example here that you might want to run locally but relies on variables you might not have set? Sure, simply do the following:
USER_PASS=hunter42 USER_NAME=GoodWill echo $USER_PASS | kinit $USER_NAME@CERN.CHGitHub secrets
We first have to store our sensitive information in GitHub:
- Navigate to the main page of the repository.
- Select
Settings. - In the left sidebar, go to
Secrets and variables, thenActions, and thenNew repository secret. - Type
USER_NAMEin the Name input box and add your username in the Secret input box. - Similarly, add
USER_PASSas well.
Naming your secrets
Note that there are some rules applied to secret names:
- Secret names can only contain alphanumeric characters ([a-z], [A-Z], [0-9]) or underscores (_). Spaces are not allowed.
- Secret names must not start with the GITHUB_ prefix.
- Secret names must not start with a number.
- Secret names must be unique at the level they are created at. For example, a secret created at the organization-level must have a unique name at that level, and a secret created at the repository-level must have a unique name in that repository. If an organization-level secret has the same name as a repository-level secret, then the repository-level secret takes precedence.
Access secrets
The secrets you’ve created are available to use in GitHub Actions workflows. GitHub allows you to access them using the secrets context: ${{ secrets.<secret name> }}.
e.g:
echo ${{ secrets.USER_PASS }} | kinit ${{ secrets.USER_NAME }}@CERN.CHAdding Artifacts on Success
As it seems like we have a complete CI/CD that does physics - we should see what came out. We just need to add artifacts for the skim job. This is left as an exercise to you.
Adding Artifacts
Let’s add artifacts to our skim job to save the skim_ggH.root file. Let’s have the artifacts expire in a week instead.
Solution
...
skim:
   needs: build_skim
   runs-on: ubuntu-latest
   container: rootproject/root:6.26.10-conda
   steps:
     - name: checkout repository
       uses: actions/checkout@v4

     - uses: actions/download-artifact@v4
       with:
         name: skim6.26.10-conda

     - name: access control
       run: echo ${{ secrets.USER_PASS }} | kinit ${{ secrets.USER_NAME }}@CERN.CH

     - name: skim
       run: |
         chmod +x ./skim
         ./skim root://eosuser.cern.ch//eos/user/g/gstark/AwesomeWorkshopFeb2020/GluGluToHToTauTau.root skim_ggH.root 19.6 11467.0 0.1

     - uses: actions/upload-artifact@v4
       with:
         name: skim_ggH
         path: skim_ggH.root
retention-days: 7And this allows us to download artifacts from the successfully run job.
Key Points
- Secrets in GitHub Actions allow you to hide protected information from others who can see your code
Episode
Making Plots to Take Over The World
Questions
- How do we make plots?
Objectives
- Use everything you learned to make plots!
On Your Own
So in order to make plots, we just need to take the skimmed file skim_ggH.root and pass it through the histograms.py code that exists. This can be run with the following code:
python histograms.py skim_ggH.root ggH hist_ggH.rootThis needs to be added to your .github/workflows/main.yml, which should look like the following:
jobs:
  greeting:
    runs-on: ubuntu-latest
    steps:
      - run: echo hello world

  build_skim:
    needs: greeting
    runs-on: ubuntu-latest
    container: rootproject/root:${{ matrix.version }}
    strategy:
      matrix:
        version: [6.26.10-conda, latest]
    steps:
      - name: checkout repository
        uses: actions/checkout@v4

      - name: build
        run: |
          COMPILER=$(root-config --cxx)
          FLAGS=$(root-config --cflags --libs)
          $COMPILER -g -O3 -Wall -Wextra -Wpedantic -o skim skim.cxx $FLAGS

      - uses: actions/upload-artifact@v4
        with:
          name: skim${{ matrix.version }}
          path: skim

  skim:
    needs: build_skim
    runs-on: ubuntu-latest
    container: rootproject/root:6.26.10-conda
    steps:
      - name: checkout repository
        uses: actions/checkout@v4

      - uses: actions/download-artifact@v4
        with:
          name: skim6.26.10-conda

      - name: skim
        run: |
          chmod +x ./skim
          ./skim root://eospublic.cern.ch//eos/root-eos/HiggsTauTauReduced/GluGluToHToTauTau.root skim_ggH.root 19.6 11467.0 0.1

      - uses: actions/upload-artifact@v4
        with:
          name: skim_ggH
path: skim_ggH.rootAdding Artifacts
So we need to do two things:
- add a
plotjob - save the output
hist_ggH.rootas an artifact
You know what? While you’re at it, why not delete the greeting job and multi-version job as well? There’s no need for it anymore 🙂.
Solution
...
...
...
 skim:
   needs: build_skim
   runs-on: ubuntu-latest
   container: rootproject/root:6.26.10-conda
   steps:
     - name: checkout repository
       uses: actions/checkout@v4

     - uses: actions/download-artifact@v4
       with:
         name: skim6.26.10-conda

     - name: skim
       run: |
         chmod +x ./skim
         ./skim root://eospublic.cern.ch//eos/root-eos/HiggsTauTauReduced/GluGluToHToTauTau.root skim_ggH.root 19.6 11467.0 0.1

     - uses: actions/upload-artifact@v4
       with:
         name: skim_ggH
         path: skim_ggH.root

 plot:
   needs: skim
   runs-on: ubuntu-latest
   container: rootproject/root:6.26.10-conda
   steps:
     - name: checkout repository
       uses: actions/checkout@v4

     - uses: actions/download-artifact@v4
       with:
         name: skim_ggH

     - name: plot
       run: python histograms.py skim_ggH.root ggH hist_ggH.root

     - uses: actions/upload-artifact@v4
       with:
         name: histograms
path: hist_ggH.rootOnce we’re done, we should probably start thinking about how to test some of these outputs we’ve made. We now have a skimmed ggH ROOT file and a file of histograms of the skimmed ggH.
Key Points
- Another action, another job, another artifact.
Episode
Let's Actually Make A Test (For Real)
Questions
- How does a realistic workflow look for a physics analysis?
Objectives
- Actually add a test on the output of running physics
So at this point, I’m going to be very hands-off and just explain what you will be doing. Here’s where you should be starting from:
...
...
...
 skim:
   needs: build_skim
   runs-on: ubuntu-latest
   container: rootproject/root:6.26.10-conda
   steps:
     - name: checkout repository
       uses: actions/checkout@v4

     - uses: actions/download-artifact@v4
       with:
         name: skim6.26.10-conda

     - name: skim
       run: |
         chmod +x ./skim
         ./skim root://eospublic.cern.ch//eos/root-eos/HiggsTauTauReduced/GluGluToHToTauTau.root skim_ggH.root 19.6 11467.0 0.1

     - uses: actions/upload-artifact@v4
       with:
         name: skim_ggH
         path: skim_ggH.root

 plot:
   needs: skim
   runs-on: ubuntu-latest
   container: rootproject/root:6.26.10-conda
   steps:
     - name: checkout repository
       uses: actions/checkout@v4

     - uses: actions/download-artifact@v4
       with:
         name: skim_ggH

     - name: plot
       run: python histograms.py skim_ggH.root ggH hist_ggH.root

     - uses: actions/upload-artifact@v4
       with:
         name: histograms
path: hist_ggH.rootAdding a regression test
- Add a test job,
test_ggH, that has the rightdependencies
- Note:
./skimneeds to be updated to produce askim_ggH.log(hint:./skim .... > skim_ggH.log) - We also need the hist_ggH.root file produced by the plot job
- Create a directory called
tests/and make two Python files in it namedtest_cutflow_ggH.pyandtest_plot_ggH.pythat usePyROOTandpython3
- you might find the following lines (below) helpful to set up the tests
- Write a few different tests of your choosing that test (and assert) something about
hist_ggH.root. Some ideas are:
- check the structure (does
ggH_pt_1exist?) - check that the integral of a histogram match a value you expect
- check that the bins of a histogram matches the values you expect
- Update your
test_ggHjob to execute the regression tests - Try causing your CI/CD to fail on the
test_ggHjob
Done?
Resolve WIP Status button, and then merge it in to main.Template for test_cutflow_ggH.py
import sys

logfile = open('skim_ggH.log', 'r')
lines = [line.rstrip() for line in logfile]

required_lines = [
   'Number of events: 47696',
   'Cross-section: 19.6',
   'Integrated luminosity: 11467',
   'Global scaling: 0.1',
   'Passes trigger: pass=3402       all=47696      -- eff=7.13 % cumulative eff=7.13 %',
   'nMuon > 0 : pass=3402       all=3402       -- eff=100.00 % cumulative eff=7.13 %',
   'nTau > 0  : pass=3401       all=3402       -- eff=99.97 % cumulative eff=7.13 %',
   'Event has good taus: pass=846        all=3401       -- eff=24.88 % cumulative eff=1.77 %',
   'Event has good muons: pass=813        all=846        -- eff=96.10 % cumulative eff=1.70 %',
   'Valid muon in selected pair: pass=813        all=813        -- eff=100.00 % cumulative eff=1.70 %',
   'Valid tau in selected pair: pass=813        all=813        -- eff=100.00 % cumulative eff=1.70 %',
]

print('\n'.join(lines))
for required_line in required_lines:
    if not required_line in lines:
        print(f'Did not find line in log file. {required_line}')
        sys.exit(1)
Template for test_plot_ggH.py
import sys
import ROOT

f = ROOT.TFile.Open('hist_ggH.root')
keys = [k.GetName() for k in f.GetListOfKeys()]

required_keys = ['ggH_pt_1', 'ggH_pt_2']

print('\n'.join(keys))
for required_key in required_keys:
    if not required_key in keys:
        print(f'Required key not found. {required_key}')
        sys.exit(1)

integral = f.ggH_pt_1.Integral()
if abs(integral - 222.88716647028923) > 0.0001:
    print(f'Integral of ggH_pt_1 is different: {integral}')
    sys.exit(1)
Key Points
- This kind of test is a regression test, as we’re testing assuming the code up to this point was correct.
- This is not a unit test. Unit tests would be testing individual pieces of the Framework code-base, or specific functionality you wrote into your algorithms.
Episode
Homework
Questions
- Where to go next?
- Want some homework?
Objectives
- Add more testing, perhaps to statistics.
Like the last section, I will simply explain what you need to do. After the previous section, you should have the following in .github/workflows/main.yml:
jobs:
  build_skim:
    runs-on: ubuntu-latest
    container: rootproject/root:6.26.10-conda
    steps:
      - name: checkout repository
        uses: actions/checkout@v4

      - name: build
        run: |
          COMPILER=$(root-config --cxx)
          FLAGS=$(root-config --cflags --libs)
          $COMPILER -g -O3 -Wall -Wextra -Wpedantic -o skim skim.cxx $FLAGS

      - uses: actions/upload-artifact@v4
        with:
          name: skim6.26.10-conda
          path: skim

  skim:
    needs: build_skim
    runs-on: ubuntu-latest
    container: rootproject/root:6.26.10-conda
    steps:
      - name: checkout repository
        uses: actions/checkout@v4

      - uses: actions/download-artifact@v4
        with:
          name: skim6.26.10-conda

      - name: skim
        run: |
          chmod +x ./skim
          ./skim root://eospublic.cern.ch//eos/root-eos/HiggsTauTauReduced/GluGluToHToTauTau.root skim_ggH.root 19.6 11467.0 0.1 > skim_ggH.log

      - uses: actions/upload-artifact@v4
        with:
          name: skim_ggH
          path: |
            skim_ggH.root
            skim_ggH.log

  plot:
    needs: skim
    runs-on: ubuntu-latest
    container: rootproject/root:6.26.10-conda
    steps:
      - name: checkout repository
        uses: actions/checkout@v4

      - uses: actions/download-artifact@v4
        with:
          name: skim_ggH

      - name: plot
        run: python histograms.py skim_ggH.root ggH hist_ggH.root

      - uses: actions/upload-artifact@v4
        with:
          name: histograms
          path: hist_ggH.root

  test:
    needs: plot
    runs-on: ubuntu-latest
    container: rootproject/root:6.26.10-conda
    steps:
      - name: checkout repository
        uses: actions/checkout@v4

      - name: Download from skim
        uses: actions/download-artifact@v4
        with:
          name: skim_ggH

      - name: Download from plot
        uses: actions/download-artifact@v4
        with:
          name: histograms

      - name: cutflow test
        run: python tests/test_cutflow_ggH.py

      - name: plot test
run: python tests/test_plot_ggH.pyIn your virtual-pipelines-eventselection repository, you need to:
- Add more tests
- Go wild!
Key Points
- Use everything you’ve learned to write your own CI/CD!
Episode
Bonus Episode: Building and deploying a Docker container to Github Packages
Questions
- How to build a Docker container for Python packages?
- How to share Docker images?
Objectives
- To be able to build a Docker container and share it via GitHub Packages
Docker Container for Python Packages
Python packages can be installed using a Docker image. The following example illustrates how to write a Dockerfile for building an image containing Python Packages.
FROM ubuntu:20.04

ENV DEBIAN_FRONTEND=noninteractive

RUN apt-get update \
  && apt-get install wget -y \
  && apt-get install dpkg-dev cmake g++ gcc binutils libx11-dev libxpm-dev \
    libxft-dev libxext-dev python3 libssl-dev libgsl0-dev libtiff-dev \
    python3-pip -y

RUN pip3 install numpy awkward uproot4 particle hepunits matplotlib \
  mplhep vector fastjet iminuit
As we see, several packages are installed.
Publish Docker images with GitHub/Gitea Packages and share them!
It is possible to publish Docker images with GitHub Packages or with Gitea’s built-in container registry. To do so, one needs to use GitHub/Gitea CI/CD. A step-by-step guide is presented here.
- Step 1: Create a GitHub/Gitea repository and clone it locally.
- Step 2: In the empty repository, make a folder called
.github/workflows. In this folder, we will store the file containing the YAML script for a workflow, namedDocker-build-deploy.yml(the name doesn’t really matter). - Step 3: In the top directory of your repository, create a file named
Dockerfile. - Step 4: Copy-paste the content above and add it to the Dockerfile. (In principle, it is possible to build this image locally, but we will not do that here, as we wish to build it with CI/CD).
- Step 5: In the
Docker-build-deploy.ymlfile, add the content below. - Step 6: Add LICENSE and README as recommended in the SW Carpentry Git-Novice Lesson, and then the repository is good to go.
name: Create and publish a Docker image

on:
  pull_request:
  push:
    branches: main

env:
  REGISTRY: ghcr.io
  IMAGE_NAME: ${{ github.repository }}

jobs:
  build-and-push-image:
    runs-on: ubuntu-latest
    permissions:
      contents: read
      packages: write

    steps:
      - name: Checkout repository
        uses: actions/checkout@v4

      - name: Log in to the Container registry
        uses: docker/login-action@v3
        with:
          registry: ${{ env.REGISTRY }}
          username: ${{ github.actor }}
          password: ${{ secrets.GITHUB_TOKEN }}

      - name: Docker Metadata
        id: meta
        uses: docker/metadata-action@v5
        with:
          images: ${{ env.REGISTRY }}/${{ env.IMAGE_NAME }}

      - name: Build and push Docker image
        uses: docker/build-push-action@v5
        with:
          context: .
          push: true
          tags: ${{ steps.meta.outputs.tags }}
labels: ${{ steps.meta.outputs.labels }}Note that on Gitea, the automatic secrets.GITHUB_TOKEN cannot write to the package registry, so generate a personal access token with read and write permissions on package (Settings → Applications) and add it to the repository as the secret REGISTRY_TOKEN.
Key Points
- Python packages can be installed in Docker images along with Ubuntu packages.
- It is possible to publish and share Docker images over GitHub Packages.